What's new
British Ordnance Collectors Network

This is a sample guest message. Register a free account today to become a member! Once signed in, you'll be able to participate on this site by adding your own topics and posts, as well as connect with other members through your own private inbox!

3 inch mortar round

spotter

UBIQUE
Staff member
Premium Member
This is a work in progress,i just started this today,
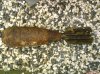
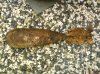
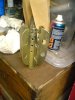
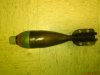
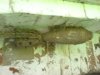
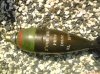
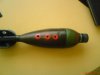
I was recently given a relic 3 inch mortar round ,today i cleaned of the heavy rust with wire cup brush on the grinder,The body has a few deep bits of pitting but im going to make it into a cutaway so i will be able to cut out the worst bit.I have given the body a good covering of filler to fill the rest in ,im going to allow a couple of days for it to harden up fully then sand it back,The tail was replaced with a spare i had,I have a fuze adapter and just need to find a fuze for it,
ill post more pics when i do some more to it
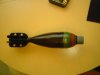
This mortar round was just an empty body it contained no explosives
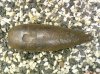
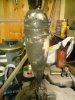
 

Attachments

  • 3inDSC00153.jpg
    3inDSC00153.jpg
    87.2 KB · Views: 67
  • 3inDSC00155.jpg
    3inDSC00155.jpg
    79.7 KB · Views: 64
  • 3inDSC00156.jpg
    3inDSC00156.jpg
    67.8 KB · Views: 75
  • 3inDSC00158.jpg
    3inDSC00158.jpg
    60.6 KB · Views: 90
  • 3inDSC00149.jpg
    3inDSC00149.jpg
    90.3 KB · Views: 90
Today i sanded back the filler and sprayed the round with primer.This showed any imperfections in the filling ,i sanded back the raised areas and applied another coat of primer to check again,it looks ok,So hopefully next weekend i will be able to do the final finish

Pic1 1st coat ,pic2 sanded, pic3 final check
 

Attachments

  • DSC00193mort.jpg
    DSC00193mort.jpg
    65.8 KB · Views: 62
  • DSC00194.jpg
    DSC00194.jpg
    77 KB · Views: 57
  • DSC00196.jpg
    DSC00196.jpg
    66.8 KB · Views: 76
Today more painting ,fitted the fuze adapter,then gave body and tail a coat red oxide ,then matt black,then a light uneven coat of some gold .Will get some varnish tomorrow and hopefully have final bronzy finish before marking up.
The gold looks brighter and thicker on photo than it is in reality
 

Attachments

  • res 10.jpg
    res 10.jpg
    71.6 KB · Views: 59
  • res 12.jpg
    res 12.jpg
    69.3 KB · Views: 69
  • res 11.jpg
    res 11.jpg
    80.8 KB · Views: 74
  • res 09.jpg
    res 09.jpg
    69 KB · Views: 62
Bit more progress today,i applied a coat of walnut varnish but it wasnt tking to the gold paint,so i had to rub down the gold a bit and gave a very light patchy coat of matt black,then re applied the varnish,Im quite pleased with the finish now,i painted the head to represent a smoke round (phosphorous).,once the paint dried i gave it a rub over with fine wire wool to take the newness off it.I just need to make some stencils now and find that fuze.I added a fuze cap for the photos
 

Attachments

  • DSC00021.jpg
    DSC00021.jpg
    41.5 KB · Views: 89
  • DSC00025.jpg
    DSC00025.jpg
    57.4 KB · Views: 99
This one got the good news today! Safely EOD'd
 

Attachments

  • DSC00285.jpg
    DSC00285.jpg
    7.1 KB · Views: 63
Bit more progress today,i applied a coat of walnut varnish but it wasnt tking to the gold paint,so i had to rub down the gold a bit and gave a very light patchy coat of matt black,then re applied the varnish,Im quite pleased with the finish now,i painted the head to represent a smoke round (phosphorous).,once the paint dried i gave it a rub over with fine wire wool to take the newness off it.I just need to make some stencils now and find that fuze.I added a fuze cap for the photos
Well Spotter from that rusty old relic you have done very well with that restoration job !
Congratulations:tinysmile_fatgrin_t

Hopefully you will soon get the 162 Fuze for it.
 
Thanks everyone,yeh im pleased myself and hopefully ive secured a fuze as well
 
Finished at last,fitted with 162 fuze (plug rep type) and stenciled
The holes are drilled to show that it is inert and empty
 

Attachments

  • 3inDSC00054.jpg
    3inDSC00054.jpg
    66.8 KB · Views: 76
  • 3inDSC00056.jpg
    3inDSC00056.jpg
    76.1 KB · Views: 95
  • 3inDSC00059.jpg
    3inDSC00059.jpg
    39.5 KB · Views: 75
Last edited:
Top