What's new
British Ordnance Collectors Network

This is a sample guest message. Register a free account today to become a member! Once signed in, you'll be able to participate on this site by adding your own topics and posts, as well as connect with other members through your own private inbox!

67 Butterfly Clocks How to

satan18

Well-Known Member
Well hear we go again and yet another project coming to an end.

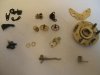
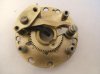
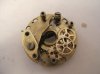
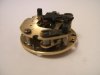
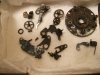
This is the how to step by step guide to stripping and restoring a 67 Time clock for the SD2.

It is a very easy mechanism to take to bits and this took me about 20 minutes to take down,but will take just a bit longer to reasemble,as each component will be inspected and cleaned first and then once i have a box of shiny bits then together she goes.


Best phil
 

Attachments

  • 67 Butterfly clock.jpg
    67 Butterfly clock.jpg
    87.2 KB · Views: 65
Nice one Phil :)
Your projects always raise a smile here geezer. I just wish i had the patience and skills that you my friend with these restorations.
Keep us all posted pal,i know the other lads enjoy them too.

best


waff
 
Nice one Phil :)
Your projects always raise a smile here geezer. I just wish i had the patience and skills that you my friend with these restorations.
Keep us all posted pal,i know the other lads enjoy them too.
best
waff

I have to agree with waff, always interesting stuff you post Phil.

That 67 fuze looks so basic when stripped into pieces like that, but having studied it closer it is such an ingenious design. I think your becoming a bit of an expert at stripping these now- 20 minutes?!!! - are you doing them in your sleep yet? lol.

Looking forward to seeing the transformation, you have great skill in these little fuzes!
regards
Kev
 
Nice one Phil :)
Your projects always raise a smile here geezer. I just wish i had the patience and skills that you my friend with these restorations.
Keep us all posted pal,i know the other lads enjoy them too.

best


waff

Thanks Paul

There in theory Brand new,so long as there isnt to much corrosion
then they are good to do,apart from bits being dropped in a tank
of alluminium oxide dust:sad:

Best phil
 
I have to agree with waff, always interesting stuff you post Phil.

That 67 fuze looks so basic when stripped into pieces like that, but having studied it closer it is such an ingenious design. I think your becoming a bit of an expert at stripping these now- 20 minutes?!!! - are you doing them in your sleep yet? lol.

Looking forward to seeing the transformation, you have great skill in these little fuzes!
regards
Kev
Thanks kev
Nothing ventured nothing gained and all that:tinysmile_fatgrin_t.
Its Going to be a nice one to do as everything is in superb condition,although it doesnt look much at the moment.

Best phil
 
satan 18
nice post

dont know anything about these,whats the longest delay that these can be set for?
thanks
18pounder
 
satan 18
nice post

dont know anything about these,whats the longest delay that these can be set for?
thanks
18pounder

Hi 18 Pounder
Thanks for that :tinysmile_fatgrin_t
There is three calibrations of ten minutes which if there is a slight hang up at the firing point then i reckon max time about 32minutes

Best phil
 
67 Time Delay Stage Rebuild

I shall pick up where i left off,at the initial stripping stage which went well with no broken screws and minimal corrosion anywhere.

Here are all the components after cleaning:tinysmile_fatgrin_t
I used my alluminium oxide grit gun followed by a long soak in a mixture
of pure ammonia,which cleaned all the brass work up.

All the steel components went into the cold black dip which gave them that factory look.

Hear are the stages of rebuild which took about an hour,after everything was set up right and adjusted for correct function.
 

Attachments

  • 67 Butterfly Clock Re Build 009.jpg
    67 Butterfly Clock Re Build 009.jpg
    92.5 KB · Views: 34
  • 67 Butterfly Clock Re Build 014.jpg
    67 Butterfly Clock Re Build 014.jpg
    84.4 KB · Views: 33
  • 67 Butterfly Clock Re Build 015.jpg
    67 Butterfly Clock Re Build 015.jpg
    90 KB · Views: 34
  • 67 Butterfly Clock Re Build 018.jpg
    67 Butterfly Clock Re Build 018.jpg
    85.8 KB · Views: 34
  • 67 Butterfly Clock Re Build 027.jpg
    67 Butterfly Clock Re Build 027.jpg
    88.4 KB · Views: 35
NICE.........I see the master has been at work again.
Good effort Phil.
Dave.
 
I shall pick up where i left off,at the initial stripping stage which went well with no broken screws and minimal corrosion anywhere.
....Satan18

Well Phil what can I say, fantastic!
You have restored that 67 clock to its former glory, wonderful job!
regards
Kev
 
Yet another well done Phil, I sure do appreciate seeing the step by step procdures. You are the master...Dano
 
Well Phil what can I say, fantastic!
You have restored that 67 clock to its former glory, wonderful job!
regards
Kev
Thanks Kev

I enjoyed doing the step by step guide;) so it may be usefull for future projects.

Best phil
 
Yet another well done Phil, I sure do appreciate seeing the step by step procdures. You are the master...Dano

Your to kind Dano:tinysmile_fatgrin_t

I just enjoy these little fiddly things to set a challenge.

Always a pleasure

best phil
 
Looking super as usual my old friend. :)
Sorry ive not caught up with this thread but you know im bogged down with an ongoing other mission at the moment.

best

waff
 
Looking super as usual my old friend. :)
Sorry ive not caught up with this thread but you know im bogged down with an ongoing other mission at the moment.

best

waff

No worries pal
Lots on the old agenda at the mo :eek:oh: which needs to be sorted.

Best phil
 
Top