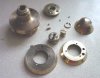
Just after a bit of advice, I picked this fired but good condition no85 cheap, and im debating what to do with it.
I was thinking of taking it apart and sectioning each bit individually but its proving a nightmare to get apart, the grub screws are out and most of the somme mud cleaned off but i cant get it unscrewed for the life of me. I have soaked it for about 3 days in penetrating fluid, completely submerged. has anyone go any tips? Heat or diesel i have found on here, is diesel really better than penetrating fluid? heat i want to use as a last resort. if i have to go down that route then i will leave as is and polish it.
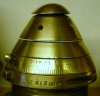
which brings me nicely onto my next question, its got that lovely (not) orange patina all over it, the mud is off and bright brass is showing through in a few places, brasso seems to do bugger all.
vinegar and salt have been mentioned to me and i have used this to good effect on an old brass stove (that only had 20years of surface corrosion though - not 90+ years in the ground!!) but im doubtful about using it in this case.
what about super fine grade wet and dry? or a polishing compound on a polishing wheel?
ideally a complete brass shine would be great but i think thats a bit unrealistic!!
i ask because i have seen a few peoples collections with ground dug fuzes that are almost back to a mirror polish from really grotty, i just wondered if anyone had any suggestions or secret reciepes!
Cheer
Ed
p.s also with regards sectioning the fuze, i wanted to section it in components to keep some whole, with some sectioned, if i cant get it apart what do people reckon to just taking a 90degree chunk out of it through all the components then polishing the cut surfaces?
I was thinking of taking it apart and sectioning each bit individually but its proving a nightmare to get apart, the grub screws are out and most of the somme mud cleaned off but i cant get it unscrewed for the life of me. I have soaked it for about 3 days in penetrating fluid, completely submerged. has anyone go any tips? Heat or diesel i have found on here, is diesel really better than penetrating fluid? heat i want to use as a last resort. if i have to go down that route then i will leave as is and polish it.
which brings me nicely onto my next question, its got that lovely (not) orange patina all over it, the mud is off and bright brass is showing through in a few places, brasso seems to do bugger all.
vinegar and salt have been mentioned to me and i have used this to good effect on an old brass stove (that only had 20years of surface corrosion though - not 90+ years in the ground!!) but im doubtful about using it in this case.
what about super fine grade wet and dry? or a polishing compound on a polishing wheel?
ideally a complete brass shine would be great but i think thats a bit unrealistic!!
i ask because i have seen a few peoples collections with ground dug fuzes that are almost back to a mirror polish from really grotty, i just wondered if anyone had any suggestions or secret reciepes!
Cheer
Ed
p.s also with regards sectioning the fuze, i wanted to section it in components to keep some whole, with some sectioned, if i cant get it apart what do people reckon to just taking a 90degree chunk out of it through all the components then polishing the cut surfaces?