What's new
British Ordnance Collectors Network

This is a sample guest message. Register a free account today to become a member! Once signed in, you'll be able to participate on this site by adding your own topics and posts, as well as connect with other members through your own private inbox!

How to look after Relic Grenades

Norris

Member
Hi All,
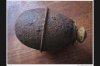
I have just purchased my first relic condition grenade,a WW2 German M39 although I would like more. Any tips on looking after them? My initial feeling is do nothing and leave it alone but would the odd coat of gun oil help preserve the medal?
I have also attached a picture of my display, small I know but only starting collecting in January. Please excuse the WW2 Pistols!! Thanks, Alan
 

Attachments

  • image.jpg
    image.jpg
    130.7 KB · Views: 80
  • image.jpg
    image.jpg
    293.8 KB · Views: 108
Hi Norris, nice display case however I expect all being well you'll run out of space, we all do sooner or later.

As for preservation this has been discussed at length on the forum and there is never a right answer and its down to personal preference. Some would leave it as it is. Others would sand off the rust and repaint it. In my opinion the important thing is to ensure it doesn't degrade any further so in your position I would just treat it with a rust treatment solution that stabilises the rust. This may darken the colour of the item though so consider pouring some inside so at least the rust is stopped from the inside out. I would caution against the rust treatment solutions which remove rust in this instance due to the thin walls of your grenade - you may find once the rust has gone there are some holes there. Whilst rust removal solution is brilliant on thick bodied objects such as shells it could destroy this particular grenade.
Good luck!
Dave.
 
Hi Dave,
Thanks for your post and advice. Any particular brand of rust stabiliser you would recommend?
As for the cabinet room I am already considering buying another, who knows what people do after many years of collecting, must be a nightmare albeit a good one!
Cheers
Alan
 
I personally would restore this one: it's relatively easy to get another in this particular condition. If you decide to do so, remove the fuze, treat it with rust-stabiliser (orthophosphoric acid) for approx. 10 minutes, then wash it carefully and multiple times with water, leave it overnight immersed in baking soda solution (neutralisation of the acid). Then wash it several times with water again and leave it in pure water for some time. Next: wipe it and wash it with absolute ethanol or acetone (or immerse it there for an hour); this will eliminate the adsorbed water. Dry it with a hairdryer. Here I would immerse it or smear it with diluted 1:1 epoxy resin; soak it well and leave to harden for 36 hours.

If interested, shoot a rocket and I'll continue :nerd:

Sooo, next steps.

If brittle, it would be a good idea to fill the body e.g. with paraffine. I personally would stay away from non-removable resins, because some day you may have to prove your grenade as empty and safe (it would be good to insert a small pellet into the body if sealed empty - just to indicate its emptiness...).

From outside: smoothen the surface with correspondent sandpaper (coarser in the beginning, finer towards the end) until you get smooth and correspondent to the initial size dimensions. In case of concave pits below the surface level, you have two options here: 1) to use some automotive paste (which is usually white in colour, but you may add some paint to darken it correspondingly), or 2) to use several thick layers of primer or paint/lacquer. After the drying you have to smoothen the surface by removing any excess paint/primer over the metal level.

To be continued soon ...:tinysmile_shutup_t:
A.jpgB.jpg
 
Last edited:
Many thanks again for your advice. My main concern is my practical ability!! Could imagine turning my egg into an omelette! Lol. Cheers. Alan
 
Top