British Ordnance Collectors Network
You are using an out of date browser. It may not display this or other websites correctly.
You should upgrade or use an alternative browser.
You should upgrade or use an alternative browser.
M18/M33 Claymore Cutaways?
- Thread starter GTR003121
- Start date
I did the russian version , the Mon 50.
I can help you on the following advices when you want to cut it:
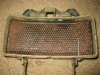
- the mine has a saddle shape, you want to maintain in the balls if you cut it. So first take the back cap off, remove the practice weight substance and replace the back cap. Take a sand filled SOFT hammer, take the mine in your hand (NOT IN A VICE) and gently hammer on the front and front edges of the mine untill the balls start falling out (may take an hour of gently hammering). Mind you not hammering cracks in the minebody.
-If most balls are gone, take a chissel and remove the remaining balls and glue.
-If clean, brush the inside of the mine with vasaline (no bearing grease), the standing edges a bit thicker.
- Drill a appr 20 mm hole in the cap on the back of the mine and brush the inside with vasaline.
-Cut out a piece of fine chicken fence that fits the inside of the mine , however 5 mm smaller around, bend this piece in the general curve of the mine.
- Make about 0,5 kg fast drying plaster of paris and pour this in the mine . when halfway, cast in the chicken fence. Make shure however you leave the height of the balls clear as you still want to place your back cap when the balls are glued on.
-When fully dry (wait a day and leave it in the sun) take of the back cap and gently twist and torque the mine untill the cast falls out. glue the balls to the front in neat rows. Now fit the cast in the mine and add thick plaster of paris which fou wipe off over the edge of the back of the mine. Let this dry and take out the cast. Paint the cast in the colour of the explosives.
Balls can be cleaned by placing the balls in an old duffel bag and hitting this bag on a hard surface (check however if it's a strong enough bag), either taking new bearing balls of the same size.
- Now cut out the part of the mine you want to remove and glue the (plaster of paris & balls) block back into the mine.
-Good luck
I can help you on the following advices when you want to cut it:
- the mine has a saddle shape, you want to maintain in the balls if you cut it. So first take the back cap off, remove the practice weight substance and replace the back cap. Take a sand filled SOFT hammer, take the mine in your hand (NOT IN A VICE) and gently hammer on the front and front edges of the mine untill the balls start falling out (may take an hour of gently hammering). Mind you not hammering cracks in the minebody.
-If most balls are gone, take a chissel and remove the remaining balls and glue.
-If clean, brush the inside of the mine with vasaline (no bearing grease), the standing edges a bit thicker.
- Drill a appr 20 mm hole in the cap on the back of the mine and brush the inside with vasaline.
-Cut out a piece of fine chicken fence that fits the inside of the mine , however 5 mm smaller around, bend this piece in the general curve of the mine.
- Make about 0,5 kg fast drying plaster of paris and pour this in the mine . when halfway, cast in the chicken fence. Make shure however you leave the height of the balls clear as you still want to place your back cap when the balls are glued on.
-When fully dry (wait a day and leave it in the sun) take of the back cap and gently twist and torque the mine untill the cast falls out. glue the balls to the front in neat rows. Now fit the cast in the mine and add thick plaster of paris which fou wipe off over the edge of the back of the mine. Let this dry and take out the cast. Paint the cast in the colour of the explosives.
Balls can be cleaned by placing the balls in an old duffel bag and hitting this bag on a hard surface (check however if it's a strong enough bag), either taking new bearing balls of the same size.
- Now cut out the part of the mine you want to remove and glue the (plaster of paris & balls) block back into the mine.
-Good luck
Attachments
Last edited:
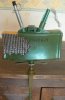
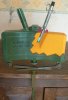
Hi All, is there anyone here who has a cutaway of an M18 or M33 practice Claymore? I have a third M33(green type with ball bearings) coming in a few days and I am interested in doing some sort of cutaway. Anyone have any pics or ideas/suggestions?
J
Are you sure your M33 has ball bearings in it? Many of the later versions of the practice mine were filled with cut scrap metal sealed in with a black epoxy.
GTR003121
Well-Known Member
Are you sure your M33 has ball bearings in it? Many of the later versions of the practice mine were filled with cut scrap metal sealed in with a black epoxy.
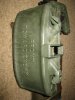
It's a green Claymore, original M18A1 markings removed and replaced with a white M33 stamp. The back cover is removable and it is indeed full of ball bearings.
Last edited:
GTR003121
Well-Known Member
Thanks very much for the info D, maybe I should send it to you! Id hate to screw it up!
J
J
I did the russian version , the Mon 50.
I can help you on the following advices when you want to cut it:
- the mine has a saddle shape, you want to maintain in the balls if you cut it. So first take the back cap off, remove the practice weight substance and replace the back cap. Take a sand filled SOFT hammer, take the mine in your hand (NOT IN A VICE) and gently hammer on the front and front edges of the mine untill the balls start falling out (may take an hour of gently hammering). Mind you not hammering cracks in the minebody.
-If most balls are gone, take a chissel and remove the remaining balls and glue.
-If clean, brush the inside of the mine with vasaline (no bearing grease), the standing edges a bit thicker.
- Drill a appr 20 mm hole in the cap on the back of the mine and brush the inside with vasaline.
-Cut out a piece of fine chicken fence that fits the inside of the mine , however 5 mm smaller around, bend this piece in the general curve of the mine.
- Make about 0,5 kg fast drying plaster of paris and pour this in the mine . when halfway, cast in the chicken fence. Make shure however you leave the height of the balls clear as you still want to place your back cap when the balls are glued on.
-When fully dry (wait a day and leave it in the sun) take of the back cap and gently twist and torque the mine untill the cast falls out. glue the balls to the front in neat rows. Now fit the cast in the mine and add thick plaster of paris which fou wipe off over the edge of the back of the mine. Let this dry and take out the cast. Paint the cast in the colour of the explosives.
Balls can be cleaned by placing the balls in an old duffel bag and hitting this bag on a hard surface (check however if it's a strong enough bag), either taking new bearing balls of the same size.
- Now cut out the part of the mine you want to remove and glue the (plaster of paris & balls) block back into the mine.
-Good luck
It's a green Claymore, original M18A1 markings removed and replaced with a white M33 stamp. The back cover is removable and it is indeed full of ball bearings.
Excellent. Those are getting harder and harder to find. Looking forward to seeing the cutaway.