skull181
Well-Known Member
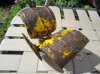
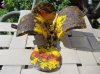
Here's my "Butterfly Bomb" or parts of it.....
I hope to restore this back to a decent condition, when I find the "missing parts"
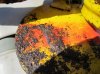
On the third picture, there is a number/code??
I hope to restore this back to a decent condition, when I find the "missing parts"
On the third picture, there is a number/code??


") Just gone underground for a while.
Just gone underground for a while.