cockybundoo
New Member
After reaping the benefits of everyone’s knowledge and information, I began to feel guilty everytime I was met by the welcome message
‘Hello cockybundoo,
Our records indicate that you have never posted to our site before! Why not make your first post today by saying hello to our community in our Introductions forum.
Why not start with your first post today and become an active part of BOCN now!’
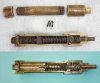
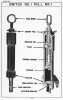
So I decided that my first posting will be of a No.1 Pull Switch that I have recently sectioned.
It was my first attempt at doing anything like this, I learnt a lot and there are a few things I would do differently next time.
I don’t have access to proper cutting tools, so I had to resort to the old Mk1 Saw, hand, metal. I couldn’t disassemble it, as the top section was stuck fast either because of the damage and/or the fact that it also appears to have been crimped on.
I had to be very careful, as I didn’t want to damage the working parts. I managed to cut through it enough, to separate the individual parts.
I purchased it from a dealer who believed that it came from one of the Scandinavian Countries.
As the working parts were forward, the damage seems to suggest that it was because it had already been fired (either by use or in attempt to disarm it), or that it was part of a dump that someone attempted to destroy by fire.
I hope that people find my posting of interest and that my attempt to ‘pay back my dues’ has gone someway to help contribute to the BOCN network.
I would really like to thank all those that contribute and are so willing to share the knowledge they have. I gauged how good this network was, when I saw that Bonnex was a member and making posts.
‘Hello cockybundoo,
Our records indicate that you have never posted to our site before! Why not make your first post today by saying hello to our community in our Introductions forum.
Why not start with your first post today and become an active part of BOCN now!’
So I decided that my first posting will be of a No.1 Pull Switch that I have recently sectioned.
It was my first attempt at doing anything like this, I learnt a lot and there are a few things I would do differently next time.
I don’t have access to proper cutting tools, so I had to resort to the old Mk1 Saw, hand, metal. I couldn’t disassemble it, as the top section was stuck fast either because of the damage and/or the fact that it also appears to have been crimped on.
I had to be very careful, as I didn’t want to damage the working parts. I managed to cut through it enough, to separate the individual parts.
I purchased it from a dealer who believed that it came from one of the Scandinavian Countries.
As the working parts were forward, the damage seems to suggest that it was because it had already been fired (either by use or in attempt to disarm it), or that it was part of a dump that someone attempted to destroy by fire.
I hope that people find my posting of interest and that my attempt to ‘pay back my dues’ has gone someway to help contribute to the BOCN network.
I would really like to thank all those that contribute and are so willing to share the knowledge they have. I gauged how good this network was, when I saw that Bonnex was a member and making posts.
Attachments
Last edited: