What's new
British Ordnance Collectors Network

This is a sample guest message. Register a free account today to become a member! Once signed in, you'll be able to participate on this site by adding your own topics and posts, as well as connect with other members through your own private inbox!

7,7cm F. Schr. 96 (umg) shrapnel shell

peregrinvs

Well-Known Member
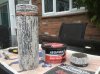
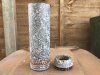
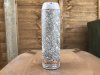
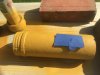
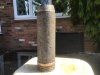
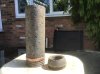
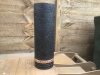
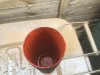
The next project to add to the pile of half-completed projects...

I appreciate WWI shrapnel shells are as unexciting as it gets when it comes to ordnance restoration, but I’ve fancied doing one of these for a while. Partly because it’ll make a nice comparison to my British 13 Pounder shrapnel and partly because I find the Prussian Blue paint + aluminium fuze combination quite aesthetically pleasing. :tinysmile_twink_t2:

So I shall be needing an adapter ring and a Dopp. Z. 96 fuze to complete it. I have a possible lead on the former and I shall probably buy a resin copy fuze from Milcorem as a place holder as I know the real thing is fairly scarce in good condition.

As regards stencilling, could someone explain what the ‘St.’ and ‘III’ markings mean on the illustration at the bottom of this page:

https://www.lovettartillery.com/Ammuntion_7,7cm_lFK_.htm

Thanks,
Mark
44F7F630-019C-4483-A461-3791C8EA90B6.jpg6A980007-D3B3-4733-9A44-E2BFC1FDA979.jpg62061DBA-604C-4F0D-B4B9-C432F89F4820.jpg1EB38F66-9915-4626-AD91-F24F167C0F83.jpg
 
Hello,
Your link shows a post ww1 documentation (look at the fuze ekz16/23) and ww1 markings (for you shell) are different.
III is the "Gewichtsklasse" weight category. As far as I know not such a marking on ww1 7.7cm shrapnel shells.
St seems to be a ww1 marking too. Maybe St stands for "Stahl" (steel). Could matches as my doc mentions steel balls instead of lead balls.
Regards

7.7c.jpg
 
Last edited:
Probably less good if you were on the receiving end... On the subject of WWI weapon nicknames, I came across this article:

http://beyondthetrenches.co.uk/hush-here-comes-a-wiz-bang/

Good news about the ‘III’ symbol as that’s a stencilling job saved. I’ve since found another reference on here to ‘St.’ = Stahl = steel shrapnel balls. I’m idly curious as to why they’d bother? Did it effect the ballistics of the shell in some way?

It’s now joined a semi relic 8,8cm KwK 43 cartridge case in a bath of diluted molasses to remove the rust.
 
Hi Mate, this is my one i done a few years ago,
Cheers
Andy
 

Attachments

  • 77cm shrapnel.jpg
    77cm shrapnel.jpg
    149.3 KB · Views: 86
Did it effect the ballistics of the shell in some way?

Of course yes - the type with Lead balls is much heavier so correction factors (+100 m until -200 m) had to be used for the firing tables which were made for the lead type. The lead type was standard and used no stencils so you can just color the shrapnell and everything is fine. The steel balls were introduced during war to save lead. Both types had not to be mixed during firing.
 
Last edited:
I have an adaptor ring for the 77mm shrapnel shell and DoppZ96nA for sale on QFA auctions, ending TONIGHT soon after 21:30. Depotman.
 
Would I be right in thinking that WWI German projectiles had an undercoat of red oxide primer when they were made? I’m currently removing the rust with citric acid and it looks like some traces have been revealed in the interior.
 
Nearly there. :tinysmile_grin_t: I also got depotman’s fuze adaptor ring which is looking like it has functional threads in the fuze pocket.

I’m going to put it back in the citric acid for a few more days, but I’m not going to drive myself mad trying to remove every last bit of rust. Any remnants will be neutralised with Kurust before I coat it with filler.
 

Attachments

  • 73B90498-2AED-4ADD-957E-BF85BD36B9F8.jpg
    73B90498-2AED-4ADD-957E-BF85BD36B9F8.jpg
    295.2 KB · Views: 69
  • B6EFC25C-281F-4E19-B3F1-DF6A6FA4143F.jpg
    B6EFC25C-281F-4E19-B3F1-DF6A6FA4143F.jpg
    295.8 KB · Views: 55
More progress. Post acid clean I gave the interior and exterior a coat of Kurust. Then for a little extra authenticity, I painted the interior in red oxide primer. Now onto filling in the pitting on the exterior + finish cleaning the fuze adaptor ring.
 

Attachments

  • 87F0DAD4-0B1B-4886-ADCA-19960C0037D4.jpg
    87F0DAD4-0B1B-4886-ADCA-19960C0037D4.jpg
    307 KB · Views: 47
  • 202DE8E6-AC8A-4423-ABFA-A6EBF563FCCD.jpg
    202DE8E6-AC8A-4423-ABFA-A6EBF563FCCD.jpg
    277.9 KB · Views: 42
95% of the pitting eliminated in one fell swoop, but it’s always the last few % that takes the longest. (Not to mention the vast quantity of sanding now required...)
 

Attachments

  • D46AE755-1F34-4B17-9FD1-659ED9ED274B.jpg
    D46AE755-1F34-4B17-9FD1-659ED9ED274B.jpg
    305.9 KB · Views: 49
Filler sanded back. From here on it will adding and sanding back layers of paint until the surface is smooth. Quite labourious, but I have yet to think of a clever way of speeding the process up.
 

Attachments

  • A8592BED-A835-4B5F-87B8-782459691A5A.jpg
    A8592BED-A835-4B5F-87B8-782459691A5A.jpg
    307.4 KB · Views: 29
  • 454FDBE0-F479-486F-B51A-1AC68F9F9FA8.jpg
    454FDBE0-F479-486F-B51A-1AC68F9F9FA8.jpg
    305.3 KB · Views: 21
  • 46C5F45B-6F9B-4F55-A87F-442DDF7A50AD.jpg
    46C5F45B-6F9B-4F55-A87F-442DDF7A50AD.jpg
    285.2 KB · Views: 24
Like so... The trick here is to more dab it on rather than spread it so that it (hopefully) fills the pits. Electrical tape is the ideal tool for masking off a fired drive band as it can partly be moulded around the shapes.
 

Attachments

  • 6B513A14-533F-40DC-A2F9-7A5B21EBAB58.jpg
    6B513A14-533F-40DC-A2F9-7A5B21EBAB58.jpg
    291.6 KB · Views: 29
Ground that back and have now gone on to filler primer spray. Still some way to go though. I’ve also done a test card of the paint I’m intending to use - Revell 56 Matt Blue.
 

Attachments

  • EA5B07CD-AB4E-41C2-98DD-F52CA740E270.jpg
    EA5B07CD-AB4E-41C2-98DD-F52CA740E270.jpg
    280 KB · Views: 43
Top