British Ordnance Collectors Network
You are using an out of date browser. It may not display this or other websites correctly.
You should upgrade or use an alternative browser.
You should upgrade or use an alternative browser.
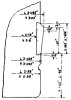
3inch 20ctw dimentions
- Thread starter BMG50
- Start date
rickwedlock
Well-Known Member
thanks i also have a 16lb 20 cwt shot that needs rebanding. this time i will try to up my game and copper weld the joint in place instead of soldering it, although the solder joint is small it still bugs me to see it and i'm getting fussy in my old age ")
rickwedlock
Well-Known Member
i think i'll have a go at melting a bit of copper wire onto a scrap offcut and see what happens without using flux. i'll be using a propane gas axe so it will be interesting. i'll also try a map gas plumbing torch to see if it can generate enough heat to fuse the copper. i'll post up the results later
Just a tip it takes a while for copper to heat up, so take your time. Support the bottom of the cut with a bit of cut fire brick, this should help retain the heat and stop any colapse of the heated section. For a filler just use electric copper wire as a filler, a bit of trial and error
If the shell you are discussing is a practice shot then the driving band was to drawing R.L. 17487 C/4, see attached I cannot get the picture to transfer, please contact me directly and I will email it.
rickwedlock
Well-Known Member
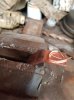
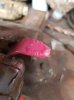
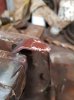
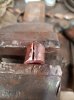
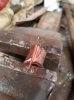
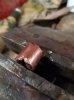
soldering was really easy but BMG50 did have a much better way of joining the band together. I used solder but the joint can still be seen after it's been machined. fusing the copper together by simply melting the ends and adding a bit of extra copper in the same way as brazing is definitely the way to go. I had a try today and was happy with the results. it is fairly easy to melt and weld and didn't require any flux but next time I'd use a thicker bit of copper as the brazing rod.
i had a practice on a bit of copper to get a feel for it. i was expecting the copper to just melt away without pooling like lead does but it not only turned cherry red as an indicator of the heat but it also pooled very nicely which made it easy to manipulate the pool. once i understood a bit more about how it was going to go i practiced joining the ends of a ring which was straight forward and took no time at all.
one thing i was not expecting was just how brittle the copper became after it was heated to cherry red. it snapped as soon as it was bent even though i hadn't quenched it and had allowed it to cool in the air. the heat seemed to have changed the grain structure to something that looked like cast iron. so any bending or forming must be done before it's heated.
Attachments
-
 189836655_1466549890359675_3398146808305628506_n.jpg119.9 KB · Views: 40
 -
 191687708_1466549923693005_2242753522885772134_n.jpg80.4 KB · Views: 38
 -
 191653460_1466549980359666_8779583273737918377_n.jpg108.8 KB · Views: 38
 -
 188990871_1465778950436769_3214987119268743892_n.jpg123.2 KB · Views: 40
 -
 189686839_1465779030436761_8393653112462838201_n.jpg115.6 KB · Views: 40
 -
 190849724_1465779103770087_313899257820407813_n.jpg130.5 KB · Views: 41
 -
 190076113_1465778833770114_766149146516235870_n.jpg111.6 KB · Views: 43
Last edited:
soldering was really easy but BMG50 did have a much better way of joining the band together. I used solder but the joint can still be seen after it's been machined. fusing the copper together by simply melting the ends and adding a bit of extra copper in the same way as brazing is definitely the way to go. I had a try today and was happy with the results. it is fairly easy to melt and weld and didn't require any flux but next time I'd use a thicker bit of copper as the brazing rod.
i had a practice on a bit of copper to get a feel for it. i was expecting the copper to just melt away without pooling like lead does but it not only turned cherry red as an indicator of the heat but it also pooled very nicely which made it easy to manipulate the pool. once i understood a bit more about how it was going to go i practiced joining the ends of a ring which was straight forward and took no time at all.
one thing i was not expecting was just how brittle the copper became after it was heated to cherry red. it snapped as soon as it was bent even though i hadn't quenched it and had allowed it to cool in the air. the heat seemed to have changed the grain structure to something that looked like cast iron. so any bending or forming must be done before it's heated.
Good job well done. I found i had no problems forming the welded ring into the banding grove, nice and soft and machined nicely. Copper is one of the oldest used metal going back thousands of years, it was welded shaped and formed with basic heat sources, no fancy tig welding with different gases and fluxes, just good old heat
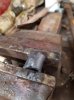
How many projectile were filled in the ballast box, that must have been a good find to discover. What were the other calibre's, I have noticed that some projectiles that come up for sale from this horde still have the paint on them.I Did have a 3 pounder shot very nicely stamped which i bought for £3 from a pile at a show years ago but sold it on as i had no idea about banding, now i am keeping my eye out for them. Just been doing the last 3"20cwt so show some picture of the set up in a fly press.Here's a picture of re-banded 3-inch 20cwt I used to own; unfortunately I don't know if the person who did the re-banding copied the correct profile, but I believe he did. This was from the Woolwich crane ballast box (where I was one of the first on the scene!), many years ago now. Depotman
View attachment 163951
I see the question of driving band geometry has been raised again with particular reference to the "ballast box". My book " British Artillery Ammunition Volume 3 - Quick Fire" contains original drawing of all British issued shell during WW1 up to 1926. See my advert in books section.
How many projectile were filled in the ballast box, that must have been a good find to discover. What were the other calibre's, I have noticed that some projectiles that come up for sale from this horde still have the paint on them.I Did have a 3 pounder shot very nicely stamped which i bought for £3 from a pile at a show years ago but sold it on as i had no idea about banding, now i am keeping my eye out for them. Just been doing the last 3"20cwt so show some picture of the set up in a fly press.
There were an amazing number of varieties of shells from the ballast box. It was a very long time ago, but here are my recollections (smallest calibre first):
2-pdr practice with steel truncated nose, empty with flat base
2-pdr HE practice, pitch filled with threaded nose and base
3-pdr solid common-pointed practice
6-pdr solid flat-head proof/practice
3-inch 20-cwt solid common-pointed practice
4-inch solid flat-head proof/practice
4.7-inch solid common-pointed practice
They were all unfired and in reasonable condition; most of the stampings were clear and many were painted with legible stencils. Most had had their copper driving bands chopped off. Unfortunately I didn't record many stampings or stencils, and only photographed a few.
There may have been others and I'd be grateful if anyone could add to this list. Depotman
Like to see the photos when you have a chance.
Just like to add something to those welding copper to make bands. Some people have mentioned that the join weld can be weak or have holes, thus breaking. If you use tig or heat up the weld too much with gas oxy acet then you risk boiling the copper. The copper needs to be hot enough to melt it so the copper fuses together, don't over heat it where it sparks and flashes. I use a Oxy Propane torch that take a while to heat to melt but avoids boiling, the filler wire and two joints just flow together nicely.
Just like to add something to those welding copper to make bands. Some people have mentioned that the join weld can be weak or have holes, thus breaking. If you use tig or heat up the weld too much with gas oxy acet then you risk boiling the copper. The copper needs to be hot enough to melt it so the copper fuses together, don't over heat it where it sparks and flashes. I use a Oxy Propane torch that take a while to heat to melt but avoids boiling, the filler wire and two joints just flow together nicely.