Evening All,
Here's a small restoration project that has been on the back burner for a while until now.
In reference to German torpedoes, the Germans used the "Pi" designations to begin with (Pi = short for pistole). The early models were named according to function and/or torpedo type like "PiG7H" or "PiG7a-MZ", but this was later replaced with a simple system of numbers, like "Pi1", "Pi2" etc.
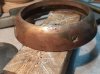
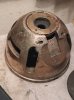
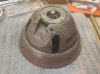
The example shown is an early German G7H torpedo pistol (short for PiG7H), where the "G" indicated the torpedo diameter i.e. 53cm or 21". The "7" indicated the approx. length of the torpedo: 7163mm (or 7m)
The PiG7H was later designated as Pi1 and for all practical purposes both models were identical components wise.
There were two main areas for the restoration:-
1) Restoration of the G7H Pistol Nose
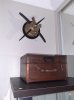
2) Creation and construction for a wall mount plaque.
Restoration Process (1) involved:
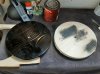
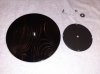
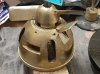
> The normal light "acid wash" of the brass/bronze components (which basically removes the outer oxidation layer thereby providing for easier polishing). However except for the impeller, the nose dome and body ring unfortunately had suffer from dezincification resulting in some pinkish spots /areas. The use of fine grade steel wool did to a degree reduce /tone down the pink effect, however not to an acceptable level IMHO. The simplest solution was to spray the nose dome and ring with a bright gold enamel which surprisingly "matched" the impeller which was just polished and lacquered.
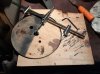
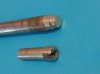
> Manufactured of replacement whiskers pivot screws/pins
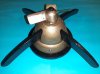
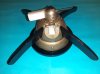
> Repaint 4 x Whiskers (these were originally a glossy black)
> Careful assembly of Pistol nose components for wall plaque mounting.
Restoration Process (2) involved: [More work than Process (1) above!!!]
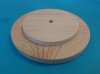
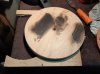
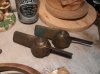
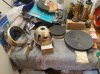
> Selection of suitable type of wood - in this case Oregon or Douglas Fir (known for its beautiful wood grain). Had to find a specialist timber recycle place as the standard hardware stores /timber yards don't stock this anymore
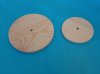
> Purchase of a new drill bit /circle cutting tool") xd:- always looking for an excuse to buy a new toy!)
xd:- always looking for an excuse to buy a new toy!)
> Then apply the usual sanding /staining / vanishing cycles.
Why a wall mount did I hear you ask? >>>>>>>>>>Looks impressive!!!!!
Enjoy
Cheers
Drew
Here's a small restoration project that has been on the back burner for a while until now.
In reference to German torpedoes, the Germans used the "Pi" designations to begin with (Pi = short for pistole). The early models were named according to function and/or torpedo type like "PiG7H" or "PiG7a-MZ", but this was later replaced with a simple system of numbers, like "Pi1", "Pi2" etc.
The example shown is an early German G7H torpedo pistol (short for PiG7H), where the "G" indicated the torpedo diameter i.e. 53cm or 21". The "7" indicated the approx. length of the torpedo: 7163mm (or 7m)
The PiG7H was later designated as Pi1 and for all practical purposes both models were identical components wise.
There were two main areas for the restoration:-
1) Restoration of the G7H Pistol Nose
2) Creation and construction for a wall mount plaque.
Restoration Process (1) involved:
> The normal light "acid wash" of the brass/bronze components (which basically removes the outer oxidation layer thereby providing for easier polishing). However except for the impeller, the nose dome and body ring unfortunately had suffer from dezincification resulting in some pinkish spots /areas. The use of fine grade steel wool did to a degree reduce /tone down the pink effect, however not to an acceptable level IMHO. The simplest solution was to spray the nose dome and ring with a bright gold enamel which surprisingly "matched" the impeller which was just polished and lacquered.
> Manufactured of replacement whiskers pivot screws/pins
> Repaint 4 x Whiskers (these were originally a glossy black)
> Careful assembly of Pistol nose components for wall plaque mounting.
Restoration Process (2) involved: [More work than Process (1) above!!!]
> Selection of suitable type of wood - in this case Oregon or Douglas Fir (known for its beautiful wood grain). Had to find a specialist timber recycle place as the standard hardware stores /timber yards don't stock this anymore
> Purchase of a new drill bit /circle cutting tool
xd:- always looking for an excuse to buy a new toy!)> Then apply the usual sanding /staining / vanishing cycles.
Why a wall mount did I hear you ask? >>>>>>>>>>Looks impressive!!!!!
Enjoy
Cheers
Drew
Attachments
-
 20201229_122610a.jpg128.3 KB · Views: 27
 -
 20201229_122534a.jpg135.1 KB · Views: 26
 -
 20210115_212040a.jpg212.1 KB · Views: 30
 -
 20210115_211840a.jpg227 KB · Views: 31
 -
 20210118_172420a.jpg123.1 KB · Views: 32
 -
 20210106_204741a.jpg260.5 KB · Views: 40
 -
 20210103_200338a.jpg232.7 KB · Views: 36
 -
 20210103_200601a.jpg205.1 KB · Views: 35
 -
 20210103_200257a.jpg206.6 KB · Views: 38
 -
 20201212_231300a.jpg238.4 KB · Views: 42
 -
 20210104_202306a.jpg275.7 KB · Views: 25
Last edited: