What's new
British Ordnance Collectors Network

This is a sample guest message. Register a free account today to become a member! Once signed in, you'll be able to participate on this site by adding your own topics and posts, as well as connect with other members through your own private inbox!

Fermangans Process?

BMG50

Well-Known Member
Premium Member
Reading chapters on British grenades in the excellent book or should i say bible "Grenades by Rick Landers researched by Norman Bonney and Gary Oakley, i came across a rustproofing process called Fermangans Process, an alternative to painting or as in the case of the No20 rifle grenade an alternative to copper plating the 10 inch rod that went down the barrel. The copper protecting steal against steel as not to damage the rifling, so i assume. Any one know what this process is. What did it look like, how do you identify it.
Is it a form of phosphating, as this process was used in the paint industry before 1900 as a process for the paint to adeare better, to a metal surface and to rust proof it as well without using a primer paint that would be less effective.
 
The only references I have seen to it are in Mills grenade manufacturing documents but it doesn't say how to do it or what it was. I think Tom (Snufkin) may have details.
 
A process invented in 1911 by Mr Frank Richards, a Warwick chemist, whereby the ferrous articles to be rust proofed are boiled in a suspension of manganese dioxide in phosphoric acid. A rust-preventing deposit of iron and manganese phosphates is formed in the surface of the iron or steel of the articles, hence the name Fer-Mangan. Not dissimilar to Mr Coslett's rust-proofing process.
 
A process invented in 1911 by Mr Frank Richards, a Warwick chemist, whereby the ferrous articles to be rust proofed are boiled in a suspension of manganese dioxide in phosphoric acid. A rust-preventing deposit of iron and manganese phosphates is formed in the surface of the iron or steel of the articles, hence the name Fer-Mangan. Not dissimilar to Mr Coslett's rust-proofing process.

Thanks Tom, I've searched all over the place but not found an explanation. Was this a Mills only process or did other cast iron hand grenades, 15, 16, 19, 28 and 34 also have it?
 
Same process as phosphating i believe.


A process invented in 1911 by Mr Frank Richards, a Warwick chemist, whereby the ferrous articles to be rust proofed are boiled in a suspension of manganese dioxide in phosphoric acid. A rust-preventing deposit of iron and manganese phosphates is formed in the surface of the iron or steel of the articles, hence the name Fer-Mangan. Not dissimilar to Mr Coslett's rust-proofing process.
 
This process Fermangans is noted in the book Gunsmithing by Roy F Dunlap under Parkerizing which gives a dark grey or black finish.
 
Was this a Mills only process or did other cast iron hand grenades, 15, 16, 19, 28 and 34 also have it?

Fermangan was used on most British cast iron-bodied grenades at some point. Early on in the war lacquering was used, but Fermangan and Coslettising became more popular as imported shellac from India got more expensive, and finally in 1918 oil-blacking was approved for grenades.

Fermangan, Coslettising, Parkerising (and no doubt the Schmidding process referred to by Alpini in post #4) were all much of a muchness, and involved depositing an impermeable phosphate barrier onto a ferrous surface to preclude access of oxygen, and thereby stop rusting. I have the US patent of Frank Richards - herewith:
 

Attachments

  • Fermangan_2.jpg
    Fermangan_2.jpg
    328.9 KB · Views: 15
Same process as phosphating i believe.

You are right, it's the type of phosphating with the biggest layer thickness. Ok, manganese dioxide is sold in eBay, H3PO4 can be bought in most hardware stores. Wonder if we should try it :)
 
Last edited:
Thanks Tom.

The process looks quite simple and at first glance looks cheaper than oil-blacking. I assume the latter was more durable?
 
Quite durable as they use this process on firearms especially the Americans and British during WW2, difficult to get black colour. As for the No20 rifle grenade its said that the 10 inch rods which go down the barrel are copper plated but not all, as some were done in this finish.
 
I think copper plated is the wrong term.

They were given a 'copper wash' - a 30 minute immersion which left a thin coating for rustproofing purposes and aimed not to transfer rust from a rod to the rifle barrel.
 
I think copper plated is the wrong term.

They were given a 'copper wash' - a 30 minute immersion which left a thin coating for rustproofing purposes and aimed not to transfer rust from a rod to the rifle barrel.


Plating - or electroplating - is the correct term and was the process used to apply rust proofing with copper (and nickel, and zinc...). The specification for manufacture called for "the rod to receive an electrolytic coat of pure copper"; Fermangan was approved as an alternative. (A "copper wash" is something else and has limited durability.)

The photo below (at much reduced resolution from original and just a small part of a far larger image) shows the electroplater at Mills Munitions works at Bridge Street West, Birmingham, used to plate rods and No.23 MkI base plugs. The equipment was made by W Canning and Co. of Great Hampton Street, Birmingham, suppliers of electroplating plant and machinery for copper, tin, nickel and zinc finishes. As an aside Canning had supplied the company of James Gibbons before the war for the latter to electro-zinc their lock products. Gibbons ultimately applied their wealth of expertise with plating of locks to practice grenades.
 

Attachments

  • Cu electroplating.jpg
    Cu electroplating.jpg
    82.6 KB · Views: 22
Plating - or electroplating - is the correct term and was the process used to apply rust proofing with copper (and nickel, and zinc...). The specification for manufacture called for "the rod to receive an electrolytic coat of pure copper"; Fermangan was approved as an alternative. (A "copper wash" is something else and has limited durability.)

I'm not sure if there is too much difference but I always understood the rods were 'washed' i.e. a much thinner coating than is gained from plating and that plating in the traditional sense was not needed for grenade rods. As rods had a very limited lifespan, was full plating justified in terms of time, process and materials?

The No 23 Mk I instructions state "The rod is to receive an electrolytic coat of pure copper. It should remain in the bath for about half an hour; an alkaline bath should be used alternatively it is to be treated by the fermangan process".

I'm not sure if the plating process takes 30 minutes or more. Anyone know? Certainly if the fermangan process was suitable why go the whole hog and copper plate the rods? Not clear to me on that.
 
I've had a look at some patents and this process goes back a while. The first patent for washing in phosphoric acid goes back to 1906 with the Coslett patent 8667. Other patents were filed in 1908, 1910 and 1911 by Heathcote and Rudge- Whitworth Ltd. Richards files two patents 20,798 of 1911 and 25,134 of 1913.

Looking at the patent (25,134) the treatment could last between 2 and 20 minutes depending on the material treated.

Interesting stuff.
 
I'm not sure if there is too much difference but I always understood the rods were 'washed' i.e. a much thinner coating than is gained from plating and that plating in the traditional sense was not needed for grenade rods. As rods had a very limited lifespan, was full plating justified in terms of time, process and materials?

The No 23 Mk I instructions state "The rod is to receive an electrolytic coat of pure copper. It should remain in the bath for about half an hour; an alkaline bath should be used alternatively it is to be treated by the fermangan process".

I'm not sure if the plating process takes 30 minutes or more. Anyone know? Certainly if the fermangan process was suitable why go the whole hog and copper plate the rods? Not clear to me on that.


Copper electroplate can be just a few microns thick, but even so is well bonded to the substrate, and provides good rough handling. The process is quick, and is low voltage and low current. Alkaline rather than acidic electrolyte is used so as not to pit the rods being plated. Copper washing is classically the schoolboy trick of dipping a pen knife blade into copper sulphate solution; the blade emerges with a shiny copper coat, which quickly wears off with the slightest handling.

Like everything else, rods could be stored for weeks in damp environments and any scratches to the surface would invite rusting of the steel. Though consumable items, they had to work correctly when the time came, which justified effort, time and materials. Inspection of rods - raw material and finished items - was rigorous, as for example this report of 18 August 1917:

"Rifle rods for No.23 MkII grenades. - It is much to be regretted that more than a week’s supply has been lost owing to DITW having suddenly altered the procedure for inspection, by which material for rods was in the past inspected before manufacture. The case has now been taken up with DGIM to revert to previous practice."

The copper plating process used by Mills was described as that, plating, viz the box of rods shown below. The caption of the original photo is "Plating Base Plugs and Rifle Rods":
 

Attachments

  • Cu electroplating_2.jpg
    Cu electroplating_2.jpg
    99.6 KB · Views: 26
a while back I raised a question in a post entitled copper plated no 23,now after following this informative thread I am now wondering whether it is actually fermangan finished,I would re post image ,but am struggling with tech ,image still attached to original post,(but text may now be somewhat irrelevant) any thoughts gladly received

Link added by spotter
http://www.bocn.co.uk/vbforum/threads/103016-Copper-plated-no23
 
Last edited by a moderator:
Back to the Fermangans process - I tested our compareable Schmidding-Process because I found a good description in a 1917 document of the prussian Spandau laboratory about how to rust protect iron fuze parts:

The document is describing the process as follows:

1. heating up 100 liters of water until it starts boiling
2. adding 1250 cm³ of phosphoric acid
3. adding 0.3 kg of Manganese Dioxide
4. stirring the liquid with a wooden stick

It is mentioned that to few and also to much acid and also to few Manganese Dioxide is preventing the growth of a good phosphate layer. Further it is described how to test the bath for optimal proportion of the acid but there are chemicals required which I don't want to use and have :).

Now the bath is ready for phosphating and it should be kept at 95°C temperature.

Divided for my requirements I used:

1 liter of water
12.5 cm³ phosphoric acid
3 g Manganese Dioxide

I did not meassure the temperature but it was just a little less below boiling. The thickness of the phosphating layer can be adjusted through the remaining time in the bath. After 1-2 minutes the parts are starting to get dark colored. After 10-15 min it is usually enough. Some parts I left in the bath for half an hour and these got a very dark/grey chrystalline looking layer. When these parts are moved in the light reflections from the small chrystals become visible. The parts also feel more rough than before. After the procedure I washed the parts in hot soap water. As soon as they become dry they look dark grey. To get a dark black color the parts need to be oiled. After applying the oil it can be wiped off completely with some cloth. The parts still retain their black color because the oil move into the rough chrystalline surface. Usually phosphating + oiling ist combined because oiling improves the rust protection a lot. Depending on the type of steel the process takes some minutes longer or shorter. A good alloy steel is getting dark color earlier and a simple construction steel takes longer. I did not dry a grey cast iron part like a Mills grenade yet. When putting thick walled fresh parts into the bath it takes a few minutes until they are getting the same temperature like the bath. When they are hot enough the process is beginning and the parts start bubbling. An enamel pot seems to survive the bath well.
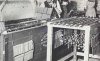
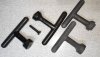
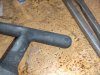
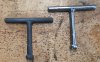
The pictures show

-a comparsion between oiled and not oiled surface (The screw has its original black color but I am not sure if it is phosphated or burnished)
-a macro picture of a thick (30 min) phosphated surface with the crystals slightly visible
-a comparsion between a (thin=15 minutes) phosphated and natural surface

My conclusion: Its an easy to apply process even at home without much dangerous chemicals. Basic safety meassures like wearing googles when handling the phosphoric acid and the prevention of dust clouds when handling the Manganese dioxide of course should be taken. Phosphoric acid and Manganese Dioxide are easy to get for a few bucks...
 

Attachments

  • IMG_20210405_193425.jpg
    IMG_20210405_193425.jpg
    287.7 KB · Views: 25
  • IMG_20210405_175120.jpg
    IMG_20210405_175120.jpg
    295.4 KB · Views: 25
  • IMG_20210405_163830.jpg
    IMG_20210405_163830.jpg
    153.7 KB · Views: 28
Last edited:
Top