What's new
British Ordnance Collectors Network

This is a sample guest message. Register a free account today to become a member! Once signed in, you'll be able to participate on this site by adding your own topics and posts, as well as connect with other members through your own private inbox!

SD2A Restoration pt2

satan18

Well-Known Member
Once all the paint was stripped of there was a lot of stress fractures
and generally not very nice.

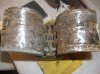
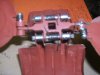
Time to replace all the springs and pins and make a better job of the wings.

First coat of primer to show up more dents and nasties.

Now the wings are sitting deployed i can spend more time on
making the wings look better,as they were quite stretched.
 

Attachments

  • SD2A Restoration pt2 001.jpg
    SD2A Restoration pt2 001.jpg
    96 KB · Views: 63
  • SD2A Restoration pt2 002.jpg
    SD2A Restoration pt2 002.jpg
    95 KB · Views: 60
  • SD2A Restoration pt2 003.jpg
    SD2A Restoration pt2 003.jpg
    91 KB · Views: 70
hi satan18 thats comming along nicely your doing a fine job looking forwards to seeing it all finished

regards leeski
 
Thanks leeski

They are just so fiddley to work on but have cracked the worst jobs
to be done.
 
Thats some work you have done on them matey,well done!

Did you fill any of the cracks with standard body-filler and where on earth do you get replacement springs from??

best
Waff
 
Thanks paul,
Back in the good old days of ordnance on Ebay i bought a bucket load of SD2s from finland,with spares in mind.

Most have been used up now and havnt been able to get anything since
which is a pity.

Not to much body filler as i use JB Weld which is a two part glue and goes of like Hard resin.

Cheers mate

phil
 
Hi Phil

I remember those days of the parts from Finland also!
Wasnt the guy at Beltring last year?,im sure i talked with him?

That JB weld you mention,is it the same as `Devcon` metal filler?

best

Waff
 
Hi Satan,

Did you make the springs your self or did you got them some where??
I need some springs for some one.
 
I have made replacement springs to one of my SD2's, here's a tip how to do:
Get piano string wire of suitable thickness, it's hard but you may bend it with proper pliers, you need round nose and different flat nose pliers. Try to avoid bending too sharp edges, wire cracks easily, the same if you bend wrong and try to bend it back - you have only one change to bend the wire, but exercise makes a master.
After you are satisfied with the replacement spring you still must heat treat it. Here you can use your kitchen oven, correct temperature is about 250 degrees C but do not trust your oven thermostate. First set temperature to approximately 220 degrees, put the spring in hot oven and wait for a few minutes. Then look at the color of the bright steel, it must turn to straw yellow. If nothing happened increase temperature a bit and wait again. Repeat this as long as necessary but be careful, if the metal color turns to blue or after that grey you have overheated and spoiled the spring.
When you have the brownish-yellow color let the spring cool down in air ( not in water ) and you have a perfect and working spring.
 
Hi Guys,

Thank you very much for this info and help.
 

Attachments

  • bug.gif
    bug.gif
    9 KB · Views: 59
Last edited:
Top