What's new
British Ordnance Collectors Network

This is a sample guest message. Register a free account today to become a member! Once signed in, you'll be able to participate on this site by adding your own topics and posts, as well as connect with other members through your own private inbox!

Don't try this at home

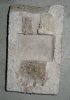
I think Anders did extremely well in the cut he made in the link in the above post.
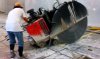
I can also see pzgr40's point, in that you will struggle to get a neat/smooth cut on one of these mines. (I assume the ultimate would be a polished type surface)

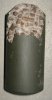
I also think what Slick has achieved has lots of potential - personally I wouldnt try to smooth it out so much, tidy up a little, but leave the edge rough looking - I think with an added fuze, stick, internals etc, it will be a very displayable piece, the crudeness of the design perhaps reflected in the jagged edge of the cut?. I think DJH (pzgr40) also has a point,dont throw away the removed bits, like Anders has done, maybe you could extract the metal bits to add to the display.

will continue to follow this one and see the finished results.
regards Kev
 
DJH

I agree, they are not a common item in these parts. Consideration of that was taken prior to the first application of a saw blade. When all is said and done, the cut one, with bohrpatrone 28 charge and ZZ42 igniter and stick will have cost in the $100 range. Not that bad, considering what I have tied up in some of the other items in the collection.

Sudelmuk
Anders' example was my inspiration for this project. My plan is to center the cut one with a green and another yellow/tan on either side. Leftover bits and chunks from the cutout section will be placed on the base, along with a spare, repro(thanks BMG50) bohrpatrone and another ZZ42.

Kev
When the first piece broke away, I had the same thought of leaving the face of the cut in the rough vs polishing. I may only polish one of the cuts and leave the other in an "exploded" state.


My main fear is the whole thing will break up and leave me with a pile of rubble. I'm using a light hand when working it. As well, I hit the edges with a spray coat of clear sealer to delay the metal pieces from rusting.

If it does fall to pieces, I'll either glue it back together or make an exploded example ala a Mk2 grenade I have. IMG_0180 (609x800).jpg
 
Here my 2 cut-aways. Stockmine was naturally cut by frost on ground and the tile type was cut with diamond disc dry.
 

Attachments

  • brick.JPG
    brick.JPG
    256.1 KB · Views: 69
  • Stock.JPG
    Stock.JPG
    163.2 KB · Views: 69
Just had this image sent by ricks neighbour showing him getting ready for another go
 

Attachments

  • Screenshot - 02_01_2014 , 13_17_06.jpg
    Screenshot - 02_01_2014 , 13_17_06.jpg
    73.3 KB · Views: 88
Nice work, good that it stayed together.
If you have a local Lapidary/Rockhound club, or locals with that interest,who have rock saws, they can produce very fine cuts first time.And the items you're cutting would esasily fit on most saws.

Bob
 
one way to stop the metal getting to hot is to have someone dribble water onto the disk/cut when you are cutting. Con saws have a water point on them to stop the stones from cracking when cutting. It also stops the dust!
 
I would hate to even imagine how much one of the blades costs for that machine.
 
No. The weather has been such that it will have to wait for a warming up. This single digit temp polar vortex global warming ruins all my outside plans. The grinding is too dusty, and sparky, to try inside.
 
Last edited:
Top