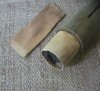
As shown I obtained this American made Cooper Bomb.
The condition was that it had been in moisture. The original
paint was pretty much gone - traces of blue for post ww1 practice
were present. The metal portions being rough cast were not much affected,
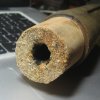
only the tail fins showed some pitting. The wood tail was in four sections having split
and the upper end which goes into the base of the bomb had blackened, rotted and was in pieces.
The treatment of the metal parts was to remove all loose rust and apply wax. (reservable) instead of
a repaint. For the tail I first glued together the four main portions using hose clamps for a good
amount of pressure. The loose pieces were then glued into place. When dry I thinned down some
wood glue and applied this to the weakened end and soaked it in to add stability (as one might
treat a fossil etc.) As the end was worn blackened, shrunken, fragile and a loose fit I sleeved it.
I used splint wood from an old 6 gt. basket. The glue was moist enough to soften it and allow me to
wrap it around the end. I covered this in tight elastic bands until dry. After this was dry I trimmed the
splint wood back. There were gaps and spaces with the end being out of shape etc. I filled tightly
any spaces with a mixture of sawdust (not powder fine) and wood glue paste. When this dried I sanded
the end to suite. I could if I find a wood tube drill down the centre a distance and sleeve the inner
part, I can do this any time if I find the right piece. The tail is now stable and all original, the repair
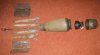
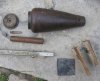
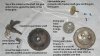
is hidden and not seen. The pot metal geared piece that holds the firing pin and is meant to rotate into
position and no longer will as the metal has distorted and jams.
Two other images show the internal parts before cleaning.
The condition was that it had been in moisture. The original
paint was pretty much gone - traces of blue for post ww1 practice
were present. The metal portions being rough cast were not much affected,
only the tail fins showed some pitting. The wood tail was in four sections having split
and the upper end which goes into the base of the bomb had blackened, rotted and was in pieces.
The treatment of the metal parts was to remove all loose rust and apply wax. (reservable) instead of
a repaint. For the tail I first glued together the four main portions using hose clamps for a good
amount of pressure. The loose pieces were then glued into place. When dry I thinned down some
wood glue and applied this to the weakened end and soaked it in to add stability (as one might
treat a fossil etc.) As the end was worn blackened, shrunken, fragile and a loose fit I sleeved it.
I used splint wood from an old 6 gt. basket. The glue was moist enough to soften it and allow me to
wrap it around the end. I covered this in tight elastic bands until dry. After this was dry I trimmed the
splint wood back. There were gaps and spaces with the end being out of shape etc. I filled tightly
any spaces with a mixture of sawdust (not powder fine) and wood glue paste. When this dried I sanded
the end to suite. I could if I find a wood tube drill down the centre a distance and sleeve the inner
part, I can do this any time if I find the right piece. The tail is now stable and all original, the repair
is hidden and not seen. The pot metal geared piece that holds the firing pin and is meant to rotate into
position and no longer will as the metal has distorted and jams.
Two other images show the internal parts before cleaning.
Attachments
Last edited: