What's new
British Ordnance Collectors Network

This is a sample guest message. Register a free account today to become a member! Once signed in, you'll be able to participate on this site by adding your own topics and posts, as well as connect with other members through your own private inbox!

18 Pdr restoration gone wrong... or has it?

starshell

Well-Known Member
Premium Member
Hello all,

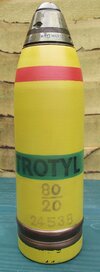
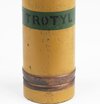
Been working on this 18 Pdr restoration lately. It was in fairly good nick with a touch of pitting on its base so it was a good candidate.

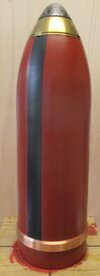
Painting went well, hand brushed on a turntable, bands too.
However, it all went South when I started on the stencilling....

TROTYL turned out relatively ok, if not a bit chunky.

The filling station and ratio No.s.... well...cutting stencils for these was nigh on impossible so I hand drew them on. Not the best effort. In fact they looked bloody awful.
But I left them anyway and applied some wax, which almost wiped the stencils off. This wax I've always used for this application so not sure what's gone wrong here.
But as I wiped the crud away, the stencils had faded to a rather pleasing aged look.

Bob Ross might say a 'happy accident'? I'm in two minds , but siding with 'It looks quite effective'?

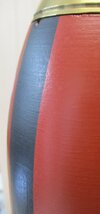
I've attempted to weather the rest of the shell to suit.
Just wondered what other members views might be?
Strip down and start from scratch? Or leave as is?

Many thanks in advance!
 

Attachments

  • IMG_8946 (2).JPG
    IMG_8946 (2).JPG
    1.6 MB · Views: 76
The stencils look good and well done. what yellow did you use was it BS381C 359 MIDDLE BUFF as that's what I used on mine
Cheers
Andy
 
Last edited:
Cheers Andy,
No. I used Humbrol No.24 Matt.. probably a bit too yellow...:confused:

Jury is still out on this one. It might get redone? Maybe?...
 
And in tandem with the 18 Pr, I have a German 10.5cm being given a facelift, (although just finished), plus a French 75 which I've started painting FA Mle1918 colours (and is currently drying)...watch this space!
These were all previously painted shells. I don't usually paint them, but leave as is.

The 10.5 you might recognise as the one I rebanded last year?
Cheers!
 

Attachments

  • IMG_8949 (2).JPG
    IMG_8949 (2).JPG
    1,010.8 KB · Views: 32
Dont make the stencilling or stamps too perfect. Stencilling was done with a traditional stencil brush and the shell was rolled over the stamps. I make my own rubber stamps and stencils as i have my own laser cutter.
 
Many thanks gents for the kind comments!
The German 10.5 is now waxed and completed so can put that one to bed. Quite pleased with the brush mark effect on this one. That little turntable does bring them up looking pretty good.
The 18Pr....hmm.... I feel a re-run coming up for that one.
Cheers!
 

Attachments

  • IMG_8950 (2).JPG
    IMG_8950 (2).JPG
    1.3 MB · Views: 23
  • IMG_8952 (2).JPG
    IMG_8952 (2).JPG
    1.9 MB · Views: 23
Last edited:
Dont make the stencilling or stamps too perfect. Stencilling was done with a traditional stencil brush and the shell was rolled over the stamps. I make my own rubber stamps and stencils as i have my own laser cutter.
Thanks BMG,
Where do you find the right typeface for the stencils? Or is it a bit of artistic license?
I'm reduced to checking fonts on word for something that might look 'fairly' accurate then tweaking it by hand with a fine tip sharpie.
I agree with your comment stencils shouldn't be too perfect. They were more for information purposed than aesthetics I guess.
Cheers!
 
Unfrotunately you can't have both a "TROTYL" and a "80/20" marking on the same shell, because "Trotyl" is basically "tri-nitro-toluene" or TNT, and the latter marking denotes filling with "Amatol" which is a mix of 80% ammonium nitrate and 20% TNT (or 40-60% if the marking is 40/60).

So either you have a simple green band with 80/20 or a green band with Trotyl written on it, but not both simultaneously. I know some manuals show both, but that is simply because they're showing all the possible markings.

Second picture is a screengrab of a shell in the IWM collection.

EDIT: Added a picture with how I painted mine.
The casing in which the 18-pdr shrapnel sits has been cut and that the No.80 fuze has been mushroomed, but I haven't gotten around to fixing them yet. On the other hand, the adapter on the 13-pdr 9 cwt has original paint on it, so I left it as-is. The No.106 Mk.III fuze on the gas shell is also a copy, because good luck finding an original cast-iron No.106...
 

Attachments

  • 38628183-british-notes-on-the-ammunition-for-qf-13pr-and-qf-18pr-horse-and-field-equipment-191...jpg
    38628183-british-notes-on-the-ammunition-for-qf-13pr-and-qf-18pr-horse-and-field-equipment-191...jpg
    89 KB · Views: 59
  • img_4110.jpg
    img_4110.jpg
    99.5 KB · Views: 58
  • 13-18-pdr_23_1.jpg
    13-18-pdr_23_1.jpg
    231.4 KB · Views: 60
Last edited:
Many thanks wingsofwrath,

Yes, I kinda went OTT with the stencils....and fouled it up anyway!
I've decided to strip this one back down and start from scratch, so I'll take note of your comments. Not having to apply the fiddly 80/20 might be a plus...
The IWM pic is very useful...trying to second guess the typeface of a Trotyl shell doesn't always work.

Nice collection you have there!
Cheers!
 
I usually do a lot of research looking at original photos for markings, bit hard to do but there are some gems about. Although there are many 18 pounders about there not many with original paint let alone markings, thats where i copy my stencilling from especially from WW2 items. Has anyone got any original marked up 18 pounder rounds.
I have seen the factory women paint such shells usually with a 4 inch wide paint brush so much for being perfect.
 
Although I think the quality and appearance of the stencils looked kinda ok, it's clear to see that you yourself aren't satisfied with it. In my case (having done loads of restorations of Japanese ammo) I then always end up repairing or totally redoing it, because otherwise it WILL keep annoying the heck out of me. :/

Apart from that, what Wingsofwrath wrote would make that decision fully final then: either lose the trotyl or the other markings.

In this case I'd therefore like to recommend a quick fix to you, so you you don't have to do it ALL over again. And yes, I have applied this technique on occasion to get rid of partially messed up stencils: take some plastic bag (or custom fit from a garbage bag, pull it over the top, right up until almost the bottom of your green band. Attach it with paper paint tape to the projectile, making the bottom of the tape fully flush with the bottom of the green band (make sure to get that nicely right). Use some 3 layers of tape so no yellow will come through.
Do the same with a piece of plastic coming from the bottom, attaching the plastic with paper paint tape attaching it to the drive band with paper tape such that the top of the tape is flush with the top of the drive band. Again, apply some 3 layers of tape. Now the only exposed part is precisely the yellow section with the markings you want to lose (because those were the ones you were most unhappy with anyway, whereas the trotyl one is fine to you).
Now simply apply a few more coats of yellow (with drying time in between) until the markings are gone.
That should do it and save you a ton of work. In case the markings are distinctly 'raised', just sand them down a tiny bit grain 800-1000 sanding paper and then do the above process (after making sure to lose the sanding paint dust).

If this quick fix somehow goes wrong or is not up to your expectations you can always decide to still do it all from scratch again, and not having lost a load of time and material in it.

Good luck!
...and hope to hear/see what you ended up doing and how it came out.

-O.
Many thanks ogreve,

Yes, you're right. It sits up in the collection and niggles me everytime I look at it. The paradox is I'm a perfectionist in most things, but completely understand that shells were far from perfect when painted and stencilled.
So I guess I'm looking for a perfectly imperfect finish (if that makes sense?).
As wingsofwrath says, try finding an 18Pr with original paint and stencilling. I've never seen one. Maybe one, or some, exist out there?

I've now managed to remove offending stencils, leaving only the TROTYL. Will post pics later.
Thanks for the tips and advice, much appreciated. Always good to know the get out of jail methods should it all go wrong!

Cheers!
 
Sounds great, and I definitely recognise and understand your comments 100%: I have exactly that same opinion and am a perfectionist in that way too. :)
This especially is the case if massive restoration work preceded the final paint phase; to me it then just feels kinda 'wrong' if the end result doesn't come out fully to my satisfaction. In earlier years for a long time I tried to see if I'd like to intentionally make items look aged, but I didn't like the results so I decided to make them in a kind of 'like arsenal new' condition, done as tightly as I could (by which I mean that I didn't intentionally put markings misaligned, or otherwise crippled etc.).
There does indeed come a point where it becomes really difficult to get the EXACT look 100% the same or same-ish as specimens with original paint. Over the years I've come to learn that modern paints are different (often at least) from old paint. In most aspects, modern paint is of higher quality, so logically superseded old paint which then got discontinued afterwards. As an example, the original paint on Japanese items rather easily chips off (partially). Also, by closely studying specimens with original paint I too came to the conclusion that the Japanese themselves didn't bother to make each batch look exactly the same; some paint on specimens is more dull than that on others and also there is variation in the thickness of it and the same applies to the colour bands etc: not always the exact same shades of yellow, red and white and not always applied the exact same way.
Back then I decided for the colour bands on having the red and yellow custom mixed (as terpentine based brush paint) and for the white to stick with a readily available terpentine based kind. For the body I use black matte spray paint, just a commercially available kind, not custom made or so. The white markings are stencilled on with rubber stencils using water based white paint, a mate of mine does those (he has a very extensive set of stamps) and in the last batch he hand painted on some Kanji with a very thin brush.
The end result then may not look 100% as the exact finish you see on original items, but that's OK to me. I think you'll end up coming to similar conclusions in case you do get to see several specimens with original paint: these items were made under wartime conditions and making each and every one of them look perfectly painted was a matter of very low priority then. ;)
So yes, by all means it's likely that original specimens had varying tones of yellow and green, had variations in the exact sizes and positions of the colour bands, of the size and shade of the text, etc.
My main advice to you then is to not go out on an eternal quest for THE perfect finish, but to settle on a kind of finish and colour uses that looks correct and pleasing to you colour wise and that is also correct of course in terms of having the right set(s) of information in the markings. That way I'm sure you'll be pleased with the end results, and after all: these items are in your collection and you are the one who'll most often be looking at them, so it makes perfect sense that you are "you're own hardest, but most important, customer to please". :)

-O.
Many thanks Ogreve,

Wise words indeed. I have experimented here with different paints, differing techniques, etc, and find too perfect a finish just doesn't seem right. As you say, wartime conditions meant expediency was more important than perfect paint jobs. I'm sure the munitions workers were slapping on dozens of painted bands every hour and took no notice of whether the band was wonky or not.
I guess, being a bit of a pefectionist, I fuss too much!
I have had nice results with a couple of German 77's lately, having painted the bands using a turntable. The way the paint thins in areas and the edges feather slightly looks pretty authentic.
It really is a trial and error subject I think, and unless original painted examples come along, it'll always be a guessing game I suppose.

I think I have reached a point where the attempt at producing a crisp, razor sharp, perfectly stencilled shell is over.....imperfection is king!
After all, these pieces were designed to be destroyed. I can't imagine a munitions worker sobbing at her work bench, because the perfect stencil she'd spent weeks mastering had gone up in smoke!
Thanks for the kind words. I shall post pics when they are completed.
All the best!
starshell
 
Unfrotunately you can't have both a "TROTYL" and a "80/20" marking on the same shell, because "Trotyl" is basically "tri-nitro-toluene" or TNT, and the latter marking denotes filling with "Amatol" which is a mix of 80% ammonium nitrate and 20% TNT (or 40-60% if the marking is 40/60).

So either you have a simple green band with 80/20 or a green band with Trotyl written on it, but not both simultaneously. I know some manuals show both, but that is simply because they're showing all the possible markings.
A bit of an old thread but I was looking for tips on painting a British shrapnel mine and it popped up. I believe these had Amatol in them. Was a green band used for Amatol, Baratol, or both? I think on Mills grenades the green band means Baritol. Seems like you are saying a green band plus an 80/20 stencil outside of it would be correct for Amatol. Right? I mean a green band and no other explosive markings isn't the way they painted ordnance?

What you said about Trotyl being TNT, if TROTYL is stenciled inside a green band, does that say the ordnance is filled with plain TNT?
Another question - does anyone know if a one pound charge in a shrapnel mine would have been more like 60/40 or 50/50 Amatol.

I am going to post a new question elsewhere about other typical markings for WW2 British shrapnel mines.
 
A bit of an old thread but I was looking for tips on painting a British shrapnel mine and it popped up. I believe these had Amatol in them. Was a green band used for Amatol, Baratol, or both? I think on Mills grenades the green band means Baritol. Seems like you are saying a green band plus an 80/20 stencil outside of it would be correct for Amatol. Right? I mean a green band and no other explosive markings isn't the way they painted ordnance?

What you said about Trotyl being TNT, if TROTYL is stenciled inside a green band, does that say the ordnance is filled with plain TNT?

Yes, from my research a simple green band with an 80/20 marking would be correct for Amatol.
 
Top