I've been trying to work out how to cut a 67 for weeks.
I couldn't manage to get any screws moved at all so had to work out where to cut the fuze without damaging too much inside.
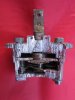
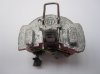
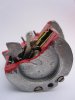
Finally plucked up courage and was pleased with the result.
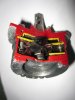
The great thing about sectioning things is it teaches you more about the thing you are cutting. Would you believe it I had often wondered what the thing on top of the main fuze assembly was (don't worry I did know there wasn't anything in it that went bang!!) but it was only when I chopped it up that I realised it was the main spring to make the whole movement work, DOH, I can be a little slow sometimes!!!:tinysmile_eyebrow_t.
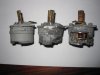
Photos show it as it arrived a few weeks ago (its on the left), then after cutting, and finally several photos of the finished result.
Now to find a suitable body to cut, watch this space.........
Dave.
I couldn't manage to get any screws moved at all so had to work out where to cut the fuze without damaging too much inside.
Finally plucked up courage and was pleased with the result.
The great thing about sectioning things is it teaches you more about the thing you are cutting. Would you believe it I had often wondered what the thing on top of the main fuze assembly was (don't worry I did know there wasn't anything in it that went bang!!) but it was only when I chopped it up that I realised it was the main spring to make the whole movement work, DOH, I can be a little slow sometimes!!!:tinysmile_eyebrow_t.
Photos show it as it arrived a few weeks ago (its on the left), then after cutting, and finally several photos of the finished result.
Now to find a suitable body to cut, watch this space.........
Dave.

")