What's new
British Ordnance Collectors Network

This is a sample guest message. Register a free account today to become a member! Once signed in, you'll be able to participate on this site by adding your own topics and posts, as well as connect with other members through your own private inbox!

A Couple I just Restored...

pzjgr

Well-Known Member
I generally try to pick up rounds with original paint, but I picked these three up at the same time for a good price, all three projos were sans any paint...

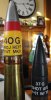
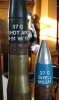
The 40mm I am not sure on, it might be a factory display round...it was attached to a round wooden base (which I removed...), there is no headstamp whatsoever, and there are 0 markings on the projectile...I decided to paint it in a current scheme, as used in the AC-130's...I took a guess at the stencilling. Too bad also that the APC 37mm was fired, but it'll do...
 

Attachments

  • trio1.jpg
    trio1.jpg
    75.3 KB · Views: 166
  • trio2.jpg
    trio2.jpg
    73.4 KB · Views: 140
  • trio3.jpg
    trio3.jpg
    66.8 KB · Views: 128
Looks good, the dummy fuze on the M55A1 should be blue also, the paint never sticks to these very well.
 
Excellent resto work pzjgr. Restored to their former glory. your eyes must be a TAD better than mine. They really look great/////Dano
 
Pzjgr
Couple of questions
what color or brand of blue paint did you use on the 37mm
and the yellow and red for the 40mm
And how did you do the white lettering
 
Hey Ordman...I used Testors Gloss Bright Blue for the 37mm M55A1...it seemed to be pretty close, it could be a little greyer perhaps, but there is quite a range of blue on my TP rounds with original paint, so I think it works ok...

The yellow is just Testors Gloss Yellow....I thought they had a flat yellow, but I couldn't find it. The red is Testors Flat Red. I don't go crazy trying to get an absolute exact match, as I said, there seems to be a bit of latitude in shades in originals...

The lettering I do by first spraying the projo the color of the lettering, in these cases white or black. After letting it dry for a couple of days, I use peel and stick vinyl lettering to do the lettering. You can find it in various fonts, and sizes. I only had black lettering in the sizes I needed for these. It worked out fine for the two 37mm's but doing black letters on a black background on the 40mm was a bear, and it didn't come out perfect...

Anyway, then I spray the final color over top, until I am satisfied (several light coats), let it dry, then carefull with an Exacto and tweezers peel of the letters. I usually will have to do some fine touchup using a brush for little bleed throughs, but it works pretty good. I then shoot them with a few coats of Testors Dullcote to dull them down, and even everything up...

The real way to do it would be to invest in a rib type set...but I haven't taken that leap yet...
 
Pzjr
I have to say they are impressive.
I'm currently looking into a new dry transfer product that you can print off on an ink jet printer then transfer
Looks promising just waiting for it to arrive in the mail
Where are you located in NY
I'm down in the southern tier area
I do a lot of 1/35 scale armor so I quite familiar with the testors line of paint
 
"The real way to do it would be to invest in a rib type set...but I haven't taken that leap yet... "

Firstly, great job on the resto. Impressive.
Having used the peal-n-stick lettering on assorted projects, I was never 100% satisfied with the results; mainly due to the inaccurate fonts. One of the downsides of the "rib set" is the need for an extensive library of letter/number sets of various sizes and fonts. While researching printing options, I ran across what is called block printing. It's an artsy-fartsy thing, I guess. I'd never seen or heard of it, but then, I'm no artiste. Anyway, you basically "carve" whatever it is in a "plate" of linoleum. This is inked, or painted, and the object to be labeled is pressed, or rolled, over the block, transferring the image. My hopes are that more accurate renditions will result. We'll see.
 
Ordman....I believe several guys here have used the dry transfer method with great success. It seems to be the easiest and best method IMHO, once you get it figured out...I just haven't sat down to try it out. Please do let us know how it works! I am in the Buffalo area by the way...

Slick...I agree, the peel and stick method has its drawbacks, fonts and exact sizing is a problem, I just do my best to try to match things up. It is not 100% accurate, but I live with it, and 99% of people looking at them have no clue anyway ;) ! I like the idea of the rib type, but hear you on the need for multiple sizes at least. My problem is do I do enough restotrations to make it worthwhile to make the investment. The block prinitng...forget it, I would never be able to carve it without it looking like a rohrschach test!

I am most intrigued about the dry transfer method, I need to look into that more myself...
 
I have a 40mm case with no headstamp. I know it is American made from the primer. I would like to know why this was done.

The block printing seems like a good idea. I remember doing it in the first couple of years of high school when everyone had to do art class. However, cutting out the reverse lettering so it was all perfectly cut would take a while.
 
Last edited:
Great job pzjgr. I like them!!:tinysmile_classes_t

It's good to know that I'm not alone. All of us are looking for that magical system that will allow us to replicate lettering on our big ordnance.

Rib-Type costs nearly $100 for just one size and font. Far to expensive to do one projectile or bomb or whatever, and completely unrealstic if you have several, each needing it's own size and lettering style. So, for the time being, I am still using pzjgr's stick-and-peel method although even it has some drawbacks. The biggest for me is finding the smaller sized lettering. I currently use sheets that I bought from "Tattooking". Their smallest size seems to be about .400". So, does anyone know of a place that sells smaller lettering sheets, say down to 1/4" or so???????

Ray
 
Last edited:
I have a few sheets made by "Chartpak" I believe that are 1/4"....I found a good supply of various peel and sticks in all sizes and fonts at an art supply type place called Hyatt's here locally. I would look for a big well stocked art supply store, thinking a bit more professionally oriented than say a Michael's, although you might want to give them a shot....
 
Thanks - I'll google Chartpak. I remember that name from somewhere. Seems to me they are draftsman supplies rather than art supply. Maybe that's where I need to be looking.

Ray
 
Firstly what a nice restoration job you have done on them-thanks for showing us your work.

Secondly for all of you that have encountered the difficulties in painting Aluminium and similar alloys here is one way of solving the paint adhesion problem.
Use your selected paint but add some "Araldite" or similar "Epoxy Resin" to the paint bearing in mind that it will change the colour slightly and will become "time sensitive" in its use.
I have used "Araldite" before with a good amount of success on Alumium and Brass but the mixing is critical as it is hard work to get the Epoxy mixed in thoroughly with the paint and you have to do it before the stuff goes off !
Once hardened it is pretty tough and will take a good bashing before any damage occurs.
An important thing here is always do this in a well ventilated area and be prepared for the loss of the brush.
All you are doing here is making your own "two part Epoxy Paint mix" which is no longer available to joe public over here.
 
Yeah great job looks fab , I love fired projectiles as well as unfired , as long as not damaged that is ,
Nice one

Ken
 
Top