What's new
British Ordnance Collectors Network

This is a sample guest message. Register a free account today to become a member! Once signed in, you'll be able to participate on this site by adding your own topics and posts, as well as connect with other members through your own private inbox!

Butterfly cut.

SG500

Well-Known Member
Premium Member
I thought I'd start a thread about my latest project, cutting an SD2 and a number 67 fuze then putting it all together. Its not quite done yet but is nearing completion so isn't quite ready for showing off but here's a progress report.

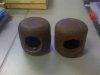
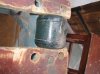
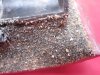
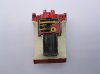
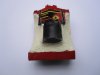
First off was choosing a body and fuze. The body was one of 2 relic items I picked up a few months ago with some slight damage to the top, which for the purposes of sectioning didn't matter because that bit got cut out. The 67, part of a swap with Waff was in rough dug state so what the inside was like was a complete mystery. Its the one on the left in the photo.
 

Attachments

  • Body choice.jpg
    Body choice.jpg
    102.2 KB · Views: 70
  • 67 choice.jpg
    67 choice.jpg
    89.8 KB · Views: 86
Choosing the cut.

The first cut is always the hard part.

With the 67 I spent ages studying another 67 that didn't have the case on the base trying to work out which bit to chop out and decided it had to be a front facing or rear facing part. Cutting along the line of 2 of the vertical screws resulted in a lucky section that worked!!

The decision on where to cut the body was even worse! Having studied various sections on BOCN by several experts out there who had been brave enough to do it first I decided on a completely different cut that fitted the fuze section and also maintains both ends of the body in complete condition. This allows for the sectioned fuze and HE substitute to be displayed and also some of the inside of the body so as to retain that 3D effect.

The sawing began!................
 

Attachments

  • 67 rough cut.jpg
    67 rough cut.jpg
    94.3 KB · Views: 88
  • First cut.jpg
    First cut.jpg
    91.7 KB · Views: 72
  • Second cut.jpg
    Second cut.jpg
    95 KB · Views: 65
Finishing the fuze and cutting a template.

The fuze got carefully sanded and the internals polished with a fine wire brush then the edges were painted (apologies if you've already read my thread about cutting the 67, I'm just including it here so you can see how it all fits together).

After a huge amount of fiddling around I managed to cut a cardboard template that fitted the inside of the body. I then marked the outline on hardboard and cut a hardboard section. The template was then cut and angled into the body and glued in place with metal bonding glue.
 

Attachments

  • 67 finish.jpg
    67 finish.jpg
    85.2 KB · Views: 84
  • Hardboard template.jpg
    Hardboard template.jpg
    96.5 KB · Views: 60
  • Rough cut.jpg
    Rough cut.jpg
    94.6 KB · Views: 83
Paint and stuff

The edges and main surfaces of the fuze and body were easy enough to paint, the problem I had was with what to use for the HE substitute. After a fair amount of experimenting and advice from other BOCN members sandpaper seemed to be the thing to use, the only problem is I'm not that good at cutting with that degree of precision so ended up making my own. I found that if you paint a surface with thick paint like hammerite and then sprinkle sand on it and blow off the excess sand you get a surface that covers up all the mistakes which when dry can then be over painted. The photo shows the sand before over painting.
Well that's as far as I've got for now but it'll be completed this week.
Dave.
 

Attachments

  • Sand on wet paint before final coat.jpg
    Sand on wet paint before final coat.jpg
    98.6 KB · Views: 53
Hardboard stuck in.

Hardboard now stuck into the body ready for fuze to be fitted.
 

Attachments

  • Template stuck in.jpg
    Template stuck in.jpg
    97.7 KB · Views: 64
Body cut complete.

A few photos of the completed body cut.
Dave.
 

Attachments

  • Finished butterfly cut 002.jpg
    Finished butterfly cut 002.jpg
    88.9 KB · Views: 79
  • Finished butterfly cut 005.jpg
    Finished butterfly cut 005.jpg
    90 KB · Views: 58
  • Finished butterfly cut 004.jpg
    Finished butterfly cut 004.jpg
    85 KB · Views: 59
  • Finished butterfly cut 003.jpg
    Finished butterfly cut 003.jpg
    82.6 KB · Views: 69
  • Finished butterfly cut 001.jpg
    Finished butterfly cut 001.jpg
    84.3 KB · Views: 65
The bit that was cut out.

I didn't want to throw the bits away that were cut out so here they are.
 

Attachments

  • Finished butterfly cut 006.jpg
    Finished butterfly cut 006.jpg
    88.6 KB · Views: 53
  • Finished butterfly cut 007.jpg
    Finished butterfly cut 007.jpg
    80.1 KB · Views: 43
  • Finished butterfly cut 008.jpg
    Finished butterfly cut 008.jpg
    83 KB · Views: 42
  • Finished butterfly cut 009.jpg
    Finished butterfly cut 009.jpg
    86.3 KB · Views: 53
Both together

Just a final photo to show them both together.
Dave.
 

Attachments

  • Finished butterfly cut 011.jpg
    Finished butterfly cut 011.jpg
    83.2 KB · Views: 51
That is one very nice cut you have done there Dave, well done!!

I like the fact that you kept the cut bit too - I'm not the only one who can't bear to throw these away LOL !!!!!

Many thanks for showing

kind regards
Kev
 
Thanks Kev, it took about 20 hours total over several weeks.
Dave.
 
You had better keep either the collection, or your hacksaw under lock and key now - these cut-aways can become somewhat addictive if you are not careful!!!!

I bet the 20 hours went by very quick. Sometimes there doesn't seem to be enough time in a day, when you get stuck into a project. I'm sure I'm not alone in this thought!!!!

regards Kev
 
Some quality 'cuts' happening on BOCN in recent times.This project is one of them.
Well done Dave,im glad you have sorted one of those 67's i got for you. :)

best

waff
 
Thanks Waff, yes the 67 was invaluable and was great condition when I got inside it.

Dave.
 
Top