I felt like a challenge just before Christmas so decided to take a few badly damaged SD 2 parts and see what I could do with them. Im sure the purists would disagree with me doing up relics like this, apologies in advance, but it does mean they get saved from the dreaded rust.
Having rummaged through the spares box I came up with:
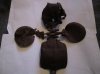
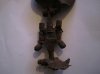
An end paddle that was fixed to the wing cradle. The wing cradle was broken with 3 out of 4 of the spindle supports broken.
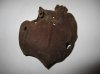
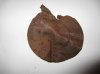
An end paddle that was missing its bracket to hold it to the wing cradle.
A brake wing that was squashed flat with broken hinges
A brake wing that was also missing its hinges
The photos below show the progress of the project.
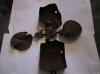
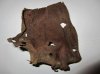
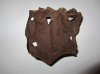
Photo 1. The 2 brake wings before. The flattened one is to the top of the photo. Broken wing cradle with good paddle. Broken end paddle minus bracket.


Photo 2. Shaped end paddle. Shaped brake wings.


Photo 3. Hinges made out of tin can.

Photo 4. Hinges attached to brake wings with chemical metal.


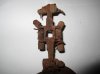
Photo 5. Repaired wing cradle. Due to the extent of damage at the spindle supports the springs unfortunately had to be fixed to the wing cradle for extra strength.

Photo 6. The new bracket made for the broken paddle was made from a tin can.


Photo 7. View of wings before sanding.


Photo 8. View of wings after sanding.


Photo 9. View of wings after painting


Photo 10. View of wings after assembly.

I was fairly happy with the result, it looks a bit rough but then thats to be expected given what it started off like. It took about an hour a day for a week to do this one.
Dave.
Having rummaged through the spares box I came up with:
An end paddle that was fixed to the wing cradle. The wing cradle was broken with 3 out of 4 of the spindle supports broken.
An end paddle that was missing its bracket to hold it to the wing cradle.
A brake wing that was squashed flat with broken hinges
A brake wing that was also missing its hinges
The photos below show the progress of the project.
Photo 1. The 2 brake wings before. The flattened one is to the top of the photo. Broken wing cradle with good paddle. Broken end paddle minus bracket.
Photo 2. Shaped end paddle. Shaped brake wings.
Photo 3. Hinges made out of tin can.
Photo 4. Hinges attached to brake wings with chemical metal.
Photo 5. Repaired wing cradle. Due to the extent of damage at the spindle supports the springs unfortunately had to be fixed to the wing cradle for extra strength.
Photo 6. The new bracket made for the broken paddle was made from a tin can.
Photo 7. View of wings before sanding.
Photo 8. View of wings after sanding.
Photo 9. View of wings after painting
Photo 10. View of wings after assembly.
I was fairly happy with the result, it looks a bit rough but then thats to be expected given what it started off like. It took about an hour a day for a week to do this one.
Dave.

")