If anyone has a vague interest in butterfly bombs I recommend you try a full restoration of one from relic parts, it just teaches you so much about these little things.
About a year ago I got several parts for a butterfly bomb that looked like they'd been shot or blow up, they really were in rubbish condition.
A few months on and some more parts were obtained from Phil and Waff and I started work.
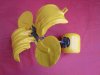
Wings are by far the most difficult part to find and restore.
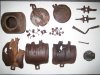
At the risk of boring you folks they are made up of:
2 wings
2 end paddles
4 springs
4 metal rods that hold on the wings and end paddles
6 thick washer type things that fit on where the end of the wings/paddles attach to the bit of metal on top
1 bit of metal on top that all the wings etc. fix onto.
How complicated is that!! A total of 19 different parts plus the 2 bits that are on the end of each of the 2 wings to enable a clip to be attached!!
Back to the restoration. The whole lot got dipped in Halfords de rusting solution, wonderful stuff! Everything has to be degreased first but they it gets it all back to bare metal.
The hinge end of the wings had to be rebuilt because they had been ripped off and would not fix correctly. This was done by cutting some thin metal from a tin can and gluing it on the inside of the wings. LOTS of filler/glue was used for this.
One of the end paddles was completely folded up on itself so it got put in a vice, straightened out and then some filler applied.
Both of the paddles I used had a bit missing out of the edge so this was filled and sanded.
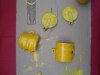
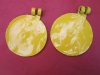
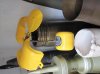
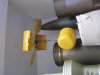
Once sanded etc. paddles and wings were painted with lots of yellow hammerite.
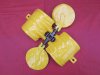
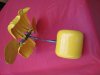
Springs were a big problem that I never did solve entirely. Large paper clips make excellent springs and are easy to form quite accurately, the problem being that they are not very springy..........so the final restored butterfly bomb now has permanently open wings - they will fold but then the springs wouldn't spring back so it wouldn't display well.
The metal rods that hold the wings/paddles/springs in place are nails and the ends are slightly split to hold the wings in place.
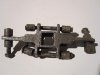
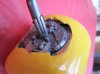
The body was easy - sanded plus hammerite with some careful dremmel work to clean out the fuze pocket (it wouldn't accept a fuze at first due to the amount of rust where the fuze turns).
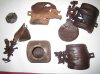
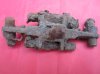
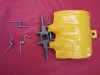
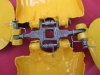
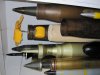
So what I started off with was a pile of relic material.
Having read lots on the forum and had some great help/advice/parts from Waff and Phil I've ended up with something that displays well. Its not perfect but looks OK hanging up in the display......but the most important thing for me was what I learnt about them, having fiddled about with small springs and things for several months on and off I have quite a good knowledge of how these things work now.
Attached are some photos of how it all started.
Dave.
About a year ago I got several parts for a butterfly bomb that looked like they'd been shot or blow up, they really were in rubbish condition.
A few months on and some more parts were obtained from Phil and Waff and I started work.
Wings are by far the most difficult part to find and restore.
At the risk of boring you folks they are made up of:
2 wings
2 end paddles
4 springs
4 metal rods that hold on the wings and end paddles
6 thick washer type things that fit on where the end of the wings/paddles attach to the bit of metal on top
1 bit of metal on top that all the wings etc. fix onto.
How complicated is that!! A total of 19 different parts plus the 2 bits that are on the end of each of the 2 wings to enable a clip to be attached!!
Back to the restoration. The whole lot got dipped in Halfords de rusting solution, wonderful stuff! Everything has to be degreased first but they it gets it all back to bare metal.
The hinge end of the wings had to be rebuilt because they had been ripped off and would not fix correctly. This was done by cutting some thin metal from a tin can and gluing it on the inside of the wings. LOTS of filler/glue was used for this.
One of the end paddles was completely folded up on itself so it got put in a vice, straightened out and then some filler applied.
Both of the paddles I used had a bit missing out of the edge so this was filled and sanded.
Once sanded etc. paddles and wings were painted with lots of yellow hammerite.
Springs were a big problem that I never did solve entirely. Large paper clips make excellent springs and are easy to form quite accurately, the problem being that they are not very springy..........so the final restored butterfly bomb now has permanently open wings - they will fold but then the springs wouldn't spring back so it wouldn't display well.
The metal rods that hold the wings/paddles/springs in place are nails and the ends are slightly split to hold the wings in place.
The body was easy - sanded plus hammerite with some careful dremmel work to clean out the fuze pocket (it wouldn't accept a fuze at first due to the amount of rust where the fuze turns).
So what I started off with was a pile of relic material.
Having read lots on the forum and had some great help/advice/parts from Waff and Phil I've ended up with something that displays well. Its not perfect but looks OK hanging up in the display......but the most important thing for me was what I learnt about them, having fiddled about with small springs and things for several months on and off I have quite a good knowledge of how these things work now.
Attached are some photos of how it all started.
Dave.

")