What's new
British Ordnance Collectors Network

This is a sample guest message. Register a free account today to become a member! Once signed in, you'll be able to participate on this site by adding your own topics and posts, as well as connect with other members through your own private inbox!

Dissmantel Fuzes ??

Dave83

Well-Known Member
Hello

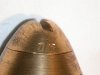
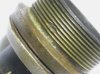
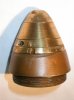
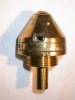
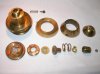
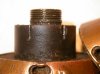
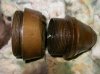
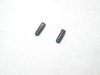
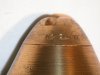
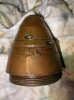
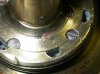
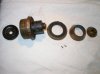
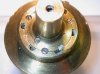
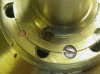
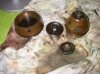
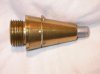
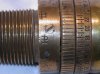
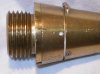
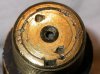
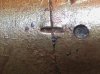
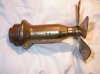
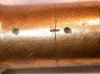
I have many fuzes of ww1 some of them needs to get cleaned up .
For better cleaning acces i want to dismantle the fuzes ,now my question does anyone know how to dismantle fuzes i mean not the technical side i mean the parts are corroded and very tuff to unscrew .
is there are a technique to get the parts losen ?
Has anyone experience to do this ?

thanks in advance

wbr David
 
Hi David,

I normally have "issues" with dismantling non-corroded fuses little alone corroded ones!!!:tinysmile_cry_t2:

Depending on the metals and how badly corroded the fuse is etc, you can always "soak" the fuse in a container of diesel for a week or two to start with - especially good for all brass and lightly rusted metal.

For more heavily rusted metal - ie the metal has expanded and pushed the rusted metal outwards, you can soak it in a container of Molases again for a couple of weeks, checking the progress, or I would now prefer to use Electrolysis, which is also much quicker (overnight)..... this should "knock" the heavy layers of rust off and at least expose those rotten little grub screws which seem to always be the show stoppers.

For those grubs screws.............you may at the worst case have to drill them out.

Heat and a soft hammer can also be helpful.

The right tools (correct screw driver blade size etc) are also a mandatory requirement!

Good Luck!

Cheers
Drew

NB: For battlefield recovered ones - ie they had a "hard" landing.....don't expect the fuse to be fully "squared" - the threaded sections most likely are more "[FONT=&quot]elliptical[/FONT]" rather than "[FONT=&quot]cylindrical", presenting a further "challenge" to unscrew!!!!:tinysmile_cry_t4:
[/FONT]
 
Last edited:
I have heard people talk about using Molases but have never had any success with it and diesel I have not found it the answer to the problem either. I did find that it did soak into the threads etc but it still didn't help with the ease of dismantling. I have yet to find a non destructive method of dismantling stuborn fuzes yet. Had tried getting special C spanners custom made to fit Japanese fuzes but the pins in the C spanners were not strong enough even when using tungsten rods. It is very fustrating. Brought a special pin wrench and that to broke and by no way was strong enough. I have now frozen the fuzes and then dunken them into boiling water. I am now waiting on another chain vice grip and then will try wrapping the fuze parts with strips of rubber tyre tube and then using the chain vice grips in opposite directions using brut force and hope for the best.

Have also been told that tea tree oil is great stuff to soak stuff in to loosen things up but still looks as if I will need to use brut force.

At the end of the day it is very fustrating and there is no perfect solution. For those people that claim to have no trouble dismantling fuzes I chalange them to dismantle some of my spare Japanese ones that I have put aside to dismantle before I have a go at sectioning.

Cheers,
BOUGAINVILLE
 
as the other members have already pointed out fired relic fuzes can be near impossible to strip due to corrosion and impact distortion,,if i was you i would try and find mint examples of the fuzes you have to display alongside the ones used actually in battle...
 
Hi Robert,

I often wondered if one had the "original" fuse spanners themselves, if it would make any difference in dismantling them??? Yes perhaps long ago when the items were first produced, but over time with corrosion etc, may even be a "challenge" using them now! This may be evident by your broken tungsten rods /pins

Also on a lot of Japanese fuses, there seems to be "punched" marks across where gaine screws up to body - I don't believe these are alignment marks, but perhaps a crude form of "loctite"??? Having stated that, with the right tools (whatever these may be?) should still be able to unscrew.......OK wishful thinking!!!

I guess the bottom line is that one will only go so far in attempting to dismantle a fuse - the probability of causing more damage is just not worth the risk, especially with uncommon and rare examples.

I also have a "too hard box" full of fuses!!!!

Cheers
\Drew

BTW - Molases/Electroysis is good to strip away the flaky rust and expose a solid surface for the "tools" to get a grip on.....sometimes there not much to grip on...
 
Thanks to all of you for the good answers

The most of my fuzes are not that bad there of course fired but not much damaged but still its a hard thing to dismantle this things ,i will give the frozen ,boiling water method a chance i guess.
I m often facing fuzes in fired conditions which are great restored and dismantled but i dont know how they have fone this .

Thanks again

wbr David
 
Interesting thread and I agree with what has been said. For Drew, the `punched' marks were most likely to have been part of the assembly process. I remember the term `punch stabbing' used, particularly in relation to Small Arms Ammo, where the base of the cartridge case is punch stabbed close to the percussion cap, to prevent the percussion cap from loosening. I have also seen it on the magazine cap on the base of the No 117 artillery fuze, presumably to ensure there would be no air gap between the explosive in the fuze magazine that might otherwise result in a functioned fuze but no detonation of the explosive in the shell.
 
Hi Ammotechxt,

Very interesting point of yours re having "no air gap"!

Yes I agree - the "punch stabbing" would have been part of the assembly process and suspect the screwed part would have also been tightened to a specific torque setting prior to being "punched stabbed". Interesting enough, early British fuzes used a similar method (circular punch) around the pre/post 1900 period, and with the Japanese adopting Britsih (+ other European) military methods and processes, incorporated it into their manufacturing as well.

Funny enough, it seems that the IJA used this quite extensively on their fuses, compared to the IJN - apart from one Type 88 impact navy fuse, can't find these "punch stabs" on any others???


Anyway, I have posted a couple of pics for clarification:
1st set: Japanese Type 92 Large Bomb Nose Fuse;
2nd set: Japanese Type 88;
3rd set: British No 60, 1904 (Later converted to a No 65 in 1912)

Cheers
\Drew
 

Attachments

  • DSCN4679.jpg
    DSCN4679.jpg
    29.6 KB · Views: 31
  • DSCN4680.jpg
    DSCN4680.jpg
    61 KB · Views: 27
  • DSCN4678.jpg
    DSCN4678.jpg
    43.2 KB · Views: 29
  • DSCN4682.jpg
    DSCN4682.jpg
    70.4 KB · Views: 25
  • DSCN4674.jpg
    DSCN4674.jpg
    79.6 KB · Views: 26
  • DSCN4677.jpg
    DSCN4677.jpg
    39.8 KB · Views: 25
  • DSCN4673.jpg
    DSCN4673.jpg
    70.5 KB · Views: 23
  • DSCN4676.jpg
    DSCN4676.jpg
    52.8 KB · Views: 24
I'm aware of the punch stabbing and when necessary I clean them up with a small drill so as not to have any burrs etc that would impede the unscrewing of the respective parts.

I also notice that IJA fuzes employed C spanners for tightening and have the holes for the pin in the C spanner to fit into. The IJN mostly had spanner flats which certainly makes it very easy to disassemble. The only fuzes that I'm having trouble with are the IJA ones.

Cheers,
BOUGAINVILLE
 
i am not sure about that but i gues on german ww1 fuzes this punch stabbing was not done .
there are inly assembled .

wbr David
 
Early thread included the words heat I would have thought this a big NO NO it may be fired but if may not have functioned we British had a reputation for duds, still a big bang and bits of metal flying around would cure any hint of constipation and maybe get the neighbours round for a chat.
 
Heat! well not all fuzes have energetics inside of them and rely on an additional gaine and if this gaine is not present well turn up the heat mate as long as the brass and alluminium don't melt. A number one rule is know your fuze and thread directions and interenal construction of fuze and what if anything that it contains etc.

I know that from when I was dealing with scrap for a while some years back that with brass fittings if they are stuck and won't buge, a good tap all around with a hammer soon loosens them up. I am loath though to do this with a fuze unless maybe a rubber mallet with fuze placed on a soft surface so as not to mark the fuze. That is providing the internals don't have any substances that would prevent you from giving it the shock treatment.

Cheers,
Bougainville
 
i am not sure about that but i gues on german ww1 fuzes this punch stabbing was not done .
there are inly assembled .

wbr David
Hi David,
On one of my previous replies I was about to state that I have not observed this on ww1 German fuses. But after a quick check, found punch marks around where the gain screws into a dop-96 fuse, similar to the british punch marks on the no 56 fuses etc. I'll post pics of this later as I'm away for the w/end.
In addition I have just pulled a British no 94 fuse & adaptor out of a 2 week soak in diesel and was able to unscrew both the adaptor off & the nose cap........the issue wasn't thread distortion but the thread section damaged by the fuse adaptor grub screw!
The diesel lubricated the parts enough for me to unscrew by hand. Interesting enough there was slight movement prior to the soak and I was convince the internal thread was distorted by the impact.

I also fully back Roberts views on using heat - you need diagrams on the fuses prior to even thinking of dismantling them.
Also applying heat to specific area also works well - remember your mother using hot water to open stubborn metal lids of glass jars! On this basis, I would be a little "skeptical" how successful using the freezing /boiling water on fuzes made of all brass components as all parts in theory would expand and contract at the same rate!
Remember the saying "cold enough to freeze the balls of a brass monkey" - referring to the brass triangle used on naval vessels which had the cannon balls stack on

Cheer
Drew
 
Last edited:
HI David,

Having a closer look on the German Dopp.Z.92, you can see that they used a much more "secure" method than punch stabbing - a combination of grub screws and pins - actually rather "excessive" IMO!

Also as promised, here are some photos of the fired British No94 and fuze adaptor. One photo shows clearly the thread damage due to the adaptor's locking screw. The top time ring under the nose cap was "pinned" in two places - I was tossing up whether to drill them out or use heat. I gave the heat a go, focusing just on the ring itself and bear in mind the fuse stem is quite thick on the No94 - so in theory the thinner time ring should expand faster....levered and tap from the base of the time ring and the "pins" popped out with the ring!

..and a little more TLC and the fuze is like a "new"!!!!
(OK I had another "minty" one to go back into the fuze adaptor!!! :))

Cheers
\Drew
 

Attachments

  • DSCN4717.JPG
    DSCN4717.JPG
    94.2 KB · Views: 21
  • DSCN4726.jpg
    DSCN4726.jpg
    46 KB · Views: 21
  • DSCN4709.jpg
    DSCN4709.jpg
    38.5 KB · Views: 24
  • DSCN4690.JPG
    DSCN4690.JPG
    90.6 KB · Views: 23
  • DSCN4713.jpg
    DSCN4713.jpg
    44.4 KB · Views: 22
  • DSCN4706.jpg
    DSCN4706.jpg
    41.6 KB · Views: 21
  • DSCN4707.jpg
    DSCN4707.jpg
    32 KB · Views: 23
  • DSCN4686.jpg
    DSCN4686.jpg
    45.9 KB · Views: 22
  • DSCN4708.JPG
    DSCN4708.JPG
    90.6 KB · Views: 23
  • DSCN4716.JPG
    DSCN4716.JPG
    94 KB · Views: 21
  • DSCN4685.jpg
    DSCN4685.jpg
    42.6 KB · Views: 23
  • DSCN4695.jpg
    DSCN4695.jpg
    55.3 KB · Views: 24
  • DSCN4705.jpg
    DSCN4705.jpg
    34.1 KB · Views: 21
  • DSCN4697.jpg
    DSCN4697.jpg
    50.6 KB · Views: 21
  • DSCN4693.jpg
    DSCN4693.jpg
    45.8 KB · Views: 22
  • DSCN4688.jpg
    DSCN4688.jpg
    51.4 KB · Views: 22
Last edited:
Top