Thanks a lot for the answer about the French HE projectile, it sure has a very interesting colour scheme with lots of text on it. Neat!
I'm going to ask a follow-up question here: can you perhaps show some pictures of your colour band painting process using the turntable?
For the restorations I do of Japanese projectiles I didn't like the results of spray-painting the colour bands, so I too have experimented with a small turntable that a mate of mine made from an old microwave. It can be plugged in and the slowly rotates the projectile. Sounds grand, right? However... I had trouble in properly aligning the projectile on it so it would be dead-centre and also I had trouble finding a nice way to keep a paint brush steady against it. Towards that latter purpose I experimented by clamping the brush into a "laboratory stand" (I'm not sure what the official word for that device is in English), but my experiments came out wobbly and not to my likings, so I switched over to a different kinda self-invented technique. I find that often the colour bands on Japanese projectiles like ever so slightly raised and they often don't have the razor sharp edges as one gets when using spray paint with paper paint masks.
Instead, what I do these days is to use some 2-3 layers of electrical (isolation) tape for creating the masks. This is a bit tricky to align right (and not getting a 'wavily' placed mask) so I first measure out the base or top offset (depending which is easiest) for one edge of the colour band (say 10cm from the top), then I cut some paper paint mask tape in some 6 small pieces, making sure each has a straight edge. I then put one of those pieces of tape on the projectile with the straight edge (horizontally levelled) right below the measurement point when working from the top, and right above it when working from the bottom. I do this with the other 5 or so pieces too, placed more or less every spread around the circumference of the projectile. Then comes the bit which is a little tricky: applying the first layer of electrical tape above (or below) those pieces of guides so the mask is positioned correctly. After that, I double check by measuring and correct it if needed. When satisfied with the first layer, I remove the paper guides and continue to pull 1 or 2 more layers over it (Note: all layers are done from a single piece of tape without cutting it in between). Next of course I do the same for the opposite edge of the area that will hold the colour band.
Once both masks are done I simply set the projectile up standing on a table and use undiluted terpentine based paint with a normal brush to apply a slightly thickish coat of paint with a normal brush, coming from the top and letting gravity fill it up downwards. I then let the paint sink from top to bottom a few minutes and the then pick up the projectile and kinda horizontally revolve it slowly in my hands so the paint also spreads sideways and thickish parts spread more evenly, then I turn the projectile upside down and repeat it a few times, after that, you can let it stand for longer times on one end and I only turn them over once every hour or so. At this time I often (but not always) apply a second layer of paint if needed/desired to fill everything up some more. After several hours I remove only the top mask, touch up (i.e. remove) any and all tiny parts of paint that have crept unintendedly above the band (typically this happens a bit at beginning of the tape where it started) using my nail inside a small piece of paper towel that was slightly drenched in terpentine. You can use something like a small wooden skewer inside terpentine drenched paper too, but I find that one's fingers tend to be delightfully accurate tools to work with when doing this. Just be careful to not use too much terpentine and to always wipe it away in the direction coming away from the colour band. It's no problem if a tiny bit of terpentine makes it way into the colour band but if it's too much, it will cause the paint to flow again there. After letting it stand an hour or so like that on the base, I remove the bottom tape and do the same process of it having the projectile standing on its nose (be careful to not knock it over!).
For things like this I'm always interested in seeing how others do it. I experimented quite a bit with this and for example tried the above process with paper paint masking tape too, but didn't like the results as paint would get absorbed in it and cause a mess underneath. With this technique the bands definitely look raised and not razor sharp, which is more or less what I was after, but possibly other techniques give more pleasing results still, so I'm curious to see/read how you do that.
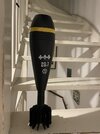
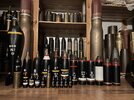
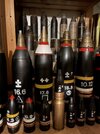
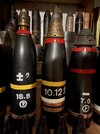
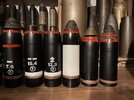
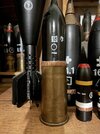
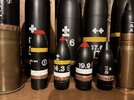
I have attached some images of a batch I did last year to give an idea of what the end result looks like. It more or less has that thickish 'not-perfect' look that true Japanese colour bands have too, but it's not quite the same of course, and no attempts were made at ageing the paint. The text and other markings were stencilled on by a mate of mine who is good at that. In this batch on some of the rounds he also hand-calligraphed several Kanji markings with a very fine tipped brush. I personally think that came out really neatly.
-O.


")