British Ordnance Collectors Network
You are using an out of date browser. It may not display this or other websites correctly.
You should upgrade or use an alternative browser.
You should upgrade or use an alternative browser.
M43A5 Mechanical Time Fuze Info Needed
- Thread starter Darren
- Start date


shelldude
Well-Known Member


Hello darren,
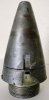
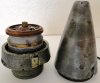
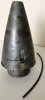
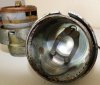
I've included some photographs of my M43A4B1 (1944) and M43A5 (1943) inert M/T fuzes. The M43A4B1's middle & upper portions are brass with a rounded fuze tip. The M43A5 was manufactured in only two portions, both out of steel with a partially rounded fuze tip. I've never found a good explanation for the solid steel design other then possible deeper target penetration.
Best regards,
Randall
shelldude
Well-Known Member

Hello darren,
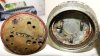
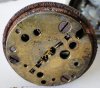
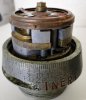
Located in the fuze adjustment notch on the base of the M43A5 fuze is a small horizontally drilled hole. A fine gauge steel wire was inserted into this that slid around the circumference of the fuze holding the steel nose cone to the fuze base. This wire must first be pulled free of the fuze before the two portions can be separated. If for some reason this wire has been inserted to far in and can't be removed, the fuze is almost impossible to disassemble.
Best regards,
Randall
Darren
Well-Known Member
Thanks Randall for that information, that explains a lot. I did wonder what that little hole was for in my example. Mine too like yours has no sign of the wire, i will try to see if it has been removed or pushed in. More than likley pushed in too far as the cone will not pull off.
Thanks,
Darren
Thanks,
Darren
Darren
Well-Known Member
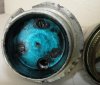
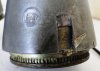
Randall, with your information and a lot of hard work this morning I have managed to open up my fuze with no damage to it. Probably the first time this has been open since 1943.
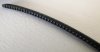
The wire certainly is not fine gauge, it is pretty thick and along one edge has teeth which were used to wind the wire in (and out). The wire was indeed in too far, I managed to rotate the cone clockwise, once I saw the end of the wire I levered it out a little and continued rotating the cone clockwise. I was very lucky, the wire poked out and as I continued to rotate the cone the wire came out fully.
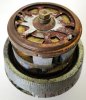
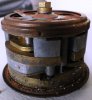
The insides are still in good shape, after a good clean the fuze will look great. I'm sure that you will very interested to see what the inside of your fuze looks like so I will upload some photos of mine soon.
Thanks again for the help,
Darren
The wire certainly is not fine gauge, it is pretty thick and along one edge has teeth which were used to wind the wire in (and out). The wire was indeed in too far, I managed to rotate the cone clockwise, once I saw the end of the wire I levered it out a little and continued rotating the cone clockwise. I was very lucky, the wire poked out and as I continued to rotate the cone the wire came out fully.
The insides are still in good shape, after a good clean the fuze will look great. I'm sure that you will very interested to see what the inside of your fuze looks like so I will upload some photos of mine soon.
Thanks again for the help,
Darren
Darren
Well-Known Member
Photos below....
Attachments
-
 001 (779 x 1576).jpg97.3 KB · Views: 21
 -
 009 (1208 x 1028).jpg93.6 KB · Views: 18
 -
 008 (1004 x 1161).jpg90.4 KB · Views: 22
 -
 011 (1025 x 1107).jpg85.3 KB · Views: 19
 -
 004 (1476 x 1228).jpg92.5 KB · Views: 19
 -
 010 (1696 x 954).jpg100.7 KB · Views: 16
 -
 012 (1234 x 1092).jpg91.4 KB · Views: 14
 -
 002 (722 x 1604).jpg96.4 KB · Views: 19
 -
 005 (1203 x 860).jpg92 KB · Views: 18
 -
 007 (1027 x 1192).jpg90.3 KB · Views: 21
 -
 006 (1358 x 1157).jpg89.4 KB · Views: 17
 -
 003 (1216 x 638).jpg61 KB · Views: 19
Darren and Shelldude, A possible answer to the question of why it was a steel one part upper instead of two piece brass may be that at that time (around 43-44) copper and brass were considered strategic materials in short supply and steel was plentiful. The simplification of the manufacturing process to use a one piece windshield and the change in materials would warrant the use of the "A5" modification since it was a significant change in the basic design or prior modifications. The entire fascinating history of WWII manufacturing is like that. What started out as finely crafted items in all areas and from all belligerents (with the exception of the Soviets, who were trying to re-industrialize after the Revolution) became mass produced items that had usually only one consideration, that it work/function as intended. Cheers, Bruce.
shelldude
Well-Known Member
Hello Darren & Bruce,
Darren, congratulations on getting your fuze disassembled! I've never seen a retaining wire like the beast you were able to withdraw from yours. I've encountered two U.S. fuzes with this method of assembly now so this is very helpful information. Thanks also for your photographs!
Bruce, your explanation of the steel nosecone manufacturing technique makes perfect sense to me too. Thanks!
Best regards,
Randall