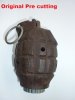
Well a year on i was looking at the cut Mills and i just was not happy with it,,other than cutting it i had made it into something it wasnt, originally it had been a drill grenade with what i thought was a badly drilled safety pin hole as there were two sets of holes one above the other ,These i filled in along with the holes in the body before making into the grenade in my previous post.I was looking on line when i found the extra safety pin holes were for a bar to stop the lever from flying off and getting lost.Then i started thinking i should put it back to what it was originally instead of a frankenstein grenade.What i didnt realise ahead of me lay several days of work,,,
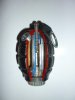
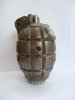
I started by stripping the finish and clearing the holes out and fitting the safety bar ,I then painted it white as it should have been,but it didnt look right it looked too new ,
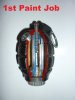
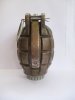
so i built up more layers of white paint and scraped and peeled it so it looked like it had years of age,At first i thought yes that looks good now,,,
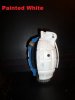
this thought did not last long the more i looked at it the more i thought it still does not look right, its fake aging its still not what it should be .
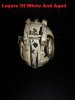
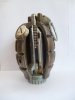
Then i had the thought i will just clean it all back to the bare metal through out and leave it as it is with no fakery ,
So many hours later i got all the previous paint cleaned off and the metal work cleaned and im now happy with the finish, no fake aging or other dodgy finish............