What's new
British Ordnance Collectors Network

This is a sample guest message. Register a free account today to become a member! Once signed in, you'll be able to participate on this site by adding your own topics and posts, as well as connect with other members through your own private inbox!

Sd50 Tail Fin Restoration - Update!

Rockteer

Well-Known Member
It has been a while but have now reached another mile stone on the Sd50 restoration.

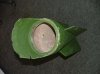
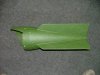
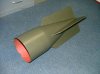
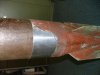
I have now successfully formed the ali insert piece (by hand) that will fill the missing chunk of casing on the tail fin, which is cast Mag Alloy. As we discussed in an earlier post, welding is near on possible without it catching light!

Once I have replaced the cheese head screws which locate into the main bomb casing (I am having to use spiral inserts as nothing is left of the original thread) then I plan to use a couple of ali L-brackets and a pop rivet into the tail fin all along the bottom of the insert piece. Then I plan to fix from the outside using counter sink rivets, this should hold the repair piece in place. Then I will use liquid weld to fill in the gaps, maybe a bit of filler a quick sand down then hopefully if it has gone to plan I can paint the area which I plan to blend into the original. If that doesn't work I will repaint the whole thing.

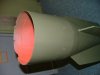
All I need now is the blank for the nose, the lifting eye, then the job is a gooden!
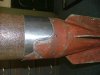
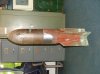
 

Attachments

  • DSCF6323.jpg
    DSCF6323.jpg
    97.5 KB · Views: 77
  • DSCF6324.jpg
    DSCF6324.jpg
    97.1 KB · Views: 82
  • DSCF6325.jpg
    DSCF6325.jpg
    97.2 KB · Views: 99
:top: Bravo Sir!

Thats a fantastic upgrade Rockteer.
Im sure my mate Phil(satan18) will be chuffed with that.
I would be tempted to repaint it also if you cannot blend up.Ask Phil what the correct paint scheme is,as he has done some excellent restores and ive a feeling i will be taking my SD50 down South when i next see him ;)

best

waff
 
Example of anything is possible! Sd50 Tail Unit

Hello Chaps,

Sorry been a while getting this done but here it is, hope you like it, and I hope it spurs some others on to experiment a little.

It has been the most challenging yet! but I am very pleased with the end result (in fact it has been sitting next to the TV so I can admire it while watching my christmas present Danger UXB! The wife was well chuffed and impressed - I could tell. ;)

Anyway, as you will see I opted to make an aluminium insert piece which took ages to get right, one ended up in the bin having formed it without the bomb casing fitted to the tail unit! well I guess you learn. The end result was a near perfect fit.

I then made up some alli angle brackets which were fitted along the bottom of the repair to hold it firmly in place. I used aluminium rivets to avoid the steel and alli corroding against each other with a little aviation zinc paste for good measure (avoiding skin contact as it is pretty nasty stuff). The ones on the outside were counter sunk and flush riveted into place. It took a long time to get the repair to sit flush to the rest of the tail fin, I really wanted to avoid any pressure being on the repair so it had to sit just right.

With that done I then used a product that a friend of mine recommended called JB Weld (available on ebay) this is basically a liquid weld and it worked a treat and is very strong. My only warning is that is has a tendency to creep as it goes off, so you really need to be around to keep an eye on it. To get a stronger weld I used a scriber to score up the edges of the repair piece and also beveled the edges with a file. I then filled or "welded" front and back at the same time (I retained a small gap in the repair to allow this). This meant that a kind of barbed weld was put in which is stronger. I then sanded the repair so it was nice and flush.

A healthy coat of redoxide as an undercoat and I was ready for painting. This forum gave me the paint code so I was all set.

The only thing I want to do now is to put the identification stripes on the side, does anyone have any guidance on the colour positions length etc. Would the ground crews have just slapped it on with a brush or would it have been a stenciled?

The casing is progressing well and nearly ready for painting, the main hold up here is finding a tap larger enough to tap out the hole to fit the lifting eye - can anyone help or lend a suitable tap??

Hopefully to finish the bomb off I can obtain a nose plug and maybe a core plug for the main casing. (I may have to chat Phil up a bit).

Thanks
 

Attachments

  • DSCF4626.jpg
    DSCF4626.jpg
    96.8 KB · Views: 49
  • DSCF4627.jpg
    DSCF4627.jpg
    93.4 KB · Views: 43
  • DSCF6502.jpg
    DSCF6502.jpg
    96.5 KB · Views: 53
  • DSCF6503.jpg
    DSCF6503.jpg
    96.8 KB · Views: 48
  • DSCF6504.jpg
    DSCF6504.jpg
    98.4 KB · Views: 51
Last edited:
Excellent pictures and write ups Rockteer! Bravo!

Speaking of base plugs,you could be in luck as the very conversation was mentioned this morning twixt Phil and i.....;)

best

waff
 
Beautiful work rockteer, a true labor of love. I know it is tedious work but the result looks well worth it..Dano
 
Thanks fellas, course you know what will happen now, someone will walk into the museum and say I have an undamaged tail unit! but even so the way I look at it is that it is another back on the map, next is the casing. No one has a tap for to tap out the lifting eye socket?
 
Hello Chaps,

Sorry been a while getting this done but here it is, hope you like it, and I hope it spurs some others on to experiment a little.

It has been the most challenging yet! but I am very pleased with the end result (in fact it has been sitting next to the TV so I can admire it while watching my christmas present Danger UXB! The wife was well chuffed and impressed - I could tell. ;)

Anyway, as you will see I opted to make an aluminium insert piece which took ages to get right, one ended up in the bin having formed it without the bomb casing fitted to the tail unit! well I guess you learn. The end result was a near perfect fit.

I then made up some alli angle brackets which were fitted along the bottom of the repair to hold it firmly in place. I used aluminium rivets to avoid the steel and alli corroding against each other with a little aviation zinc paste for good measure (avoiding skin contact as it is pretty nasty stuff). The ones on the outside were counter sunk and flush riveted into place. It took a long time to get the repair to sit flush to the rest of the tail fin, I really wanted to avoid any pressure being on the repair so it had to sit just right.

With that done I then used a product that a friend of mine recommended called JB Weld (available on ebay) this is basically a liquid weld and it worked a treat and is very strong. My only warning is that is has a tendency to creep as it goes off, so you really need to be around to keep an eye on it. To get a stronger weld I used a scriber to score up the edges of the repair piece and also beveled the edges with a file. I then filled or "welded" front and back at the same time (I retained a small gap in the repair to allow this). This meant that a kind of barbed weld was put in which is stronger. I then sanded the repair so it was nice and flush.

A healthy coat of redoxide as an undercoat and I was ready for painting. This forum gave me the paint code so I was all set.

The only thing I want to do now is to put the identification stripes on the side, does anyone have any guidance on the colour positions length etc. Would the ground crews have just slapped it on with a brush or would it have been a stenciled?

The casing is progressing well and nearly ready for painting, the main hold up here is finding a tap larger enough to tap out the hole to fit the lifting eye - can anyone help or lend a suitable tap??

Hopefully to finish the bomb off I can obtain a nose plug and maybe a core plug for the main casing. (I may have to chat Phil up a bit).

Thanks

Very nice re construction there and what you had to work with has turned the job around and is a worthy display bomb now:tinysmile_grin_t:.

The tap should be a standard 13mm tap for the top lifting eye although
most of mine have thinned out a bit over the years and i have found 13mm
a bit wobbly.

Best phil
 
Hi Phil, I have sent you a PM.

The tap is 13mm (I haven't found anyone that can supply me one without it costing a fortune!). I think the front is a 13mm as well, so could tap both at the same time.

Looking a past posts I think the tail fin needs some yellow stripes on it but would like to check first on this forum, does anyone have any photos?

Thanks everyone for your kind comments.
 
........... Looking a past posts I think the tail fin needs some yellow stripes on it but would like to check first on this forum, does anyone have any photos?

Thanks everyone for your kind comments.

Very nice restoration!!!

re stripes ; I think the stripes would be red on an SD bomb, unfortunately I dont have the appropriate docs, but maybe someone else could oblige.

regards
Kev
 
Top