paul the grenade
Well-Known Member
Hi All.
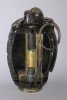
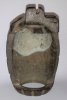
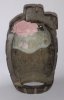
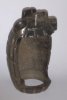
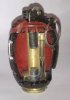
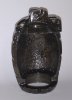
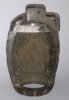
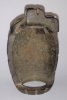
Heres a sectioned centre cast mills No5 thats been sat on my shelf for ages waiting to be restored.
I finally got round to doing it last week so heres a few pics showing how i did it.
It had a small bit missing from the top left of the cut out so first thing i pressed some modeling clay inside the top back to make a mould of the inside shape then removed it and turned it round and put it back in. this gave me something to build the filler up on to.
Next i mixed up a dollop of car body filler and filled in the missing section making sure it was well above the level of the existing frags. once it was dry i removed the modeling clay and procceeded to slowly carve the frags back into the filler and then tidied them up with a fine file and emery paper. I had to add a few more fine layers of filler till i got the desired shape.
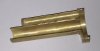
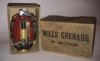
Next i painted the filler a dark brown to match the body colour and when i was happy with it i gave the whole gren a coating of shellac. I was missing the centre piece so i thought one of Dugups repros would be just the job. I ordered one of the brass ones and when it arrived i fitted it to the body then marked where i would cut it out. I removed it and sectioned it with a dremel rotary cutter and finished the edges with a fine file. All that was left to do was paint the coloured bands and reassemble it. and finally to finish it off i placed it inside an original sectioned mills box made by E A Radnall. the base plug is also marked E A Radnall & Co which finishes of the grenade perfectly.
Hope you like the pics.
Cheers, Paul.
Heres a sectioned centre cast mills No5 thats been sat on my shelf for ages waiting to be restored.
I finally got round to doing it last week so heres a few pics showing how i did it.
It had a small bit missing from the top left of the cut out so first thing i pressed some modeling clay inside the top back to make a mould of the inside shape then removed it and turned it round and put it back in. this gave me something to build the filler up on to.
Next i mixed up a dollop of car body filler and filled in the missing section making sure it was well above the level of the existing frags. once it was dry i removed the modeling clay and procceeded to slowly carve the frags back into the filler and then tidied them up with a fine file and emery paper. I had to add a few more fine layers of filler till i got the desired shape.
Next i painted the filler a dark brown to match the body colour and when i was happy with it i gave the whole gren a coating of shellac. I was missing the centre piece so i thought one of Dugups repros would be just the job. I ordered one of the brass ones and when it arrived i fitted it to the body then marked where i would cut it out. I removed it and sectioned it with a dremel rotary cutter and finished the edges with a fine file. All that was left to do was paint the coloured bands and reassemble it. and finally to finish it off i placed it inside an original sectioned mills box made by E A Radnall. the base plug is also marked E A Radnall & Co which finishes of the grenade perfectly.
Hope you like the pics.
Cheers, Paul.
Attachments
-
 mills restoration 8.jpg88.7 KB · Views: 93
 -
 mills restoration 2.jpg84.9 KB · Views: 81
 -
 mills restoration 3.jpg73 KB · Views: 88
 -
 mills restoration 5.jpg46.6 KB · Views: 86
 -
 mills restoration 9.jpg85.6 KB · Views: 108
 -
 mills restoration 7.jpg95.5 KB · Views: 85
 -
 mills restoration 6.jpg79.5 KB · Views: 83
 -
 mills restoration 10.jpg88.3 KB · Views: 94
 -
 mills restoration 4.jpg70.1 KB · Views: 84
 -
 mills restoration 1.jpg86.4 KB · Views: 92