What's new
British Ordnance Collectors Network

This is a sample guest message. Register a free account today to become a member! Once signed in, you'll be able to participate on this site by adding your own topics and posts, as well as connect with other members through your own private inbox!

starting another WWI German fuze project

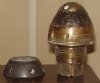
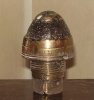
Well since i've finished the GRZ14n/A fuze this will be my current project. This is a German WWI Dopp Z15 and came to me in the same deal as the other which also included a KZ11. Anyway the Dopp Z15 is pictured. The rusted mid section had been filled with a type of body filler which I completely removed with the wire wheel attachment to my Dremel tool. I am about lost at this point because it is in that section of the fuze where the Dopp Z15 stamping is supposed to go. I have already figured on refilling the mid section with "fill lite" but my dilema is how to replicate the Dopp Z15 stamping. I am not totally against not filling the rusty section but stamping right on the corrosion and that would keep the relic theme a reality. Any hints and or suggestions would be more than welcome. I've pondered about taking the stamping to my local graphics shop and see if they could make a facsimile decal? These Z15 fuzes are not too easy to come by so I figure it's this one or nothing. In case you haven't noticed I am somewhat lost here. The KZ11 will not be restored in any way because I like the way she looks as is. HELP......Dano
 

Attachments

  • Picture 675.jpg
    Picture 675.jpg
    43.1 KB · Views: 74
Last edited:
Hi Dano,
I have a spare steel steel ring stamped Dopp Z 15 umg if you want it. You would need to cut away more of the corroded section to make it fit. PM me if you want a photo of the ring.
Richard
 
I have a good center section en-route from England with the stamp and date etc...Will update when piece arrives and cover process of getting it installed. I am quite excited about this fuze as it is one I did not have. Am currently plotting scenearios of removing center section without harming rest of fuze. Any idea(s) would be greatly appreciated as I don't even want to screw this up. One thing for sure it will be a valuable (personal) addition to my collection as you just don't see many of these critters out there. Standard dis-assembly would be fruitless I would imagine due to being a dug piece that has not been apart for some 90+ years. I'm thinking of making two diagonal cuts 180 degrees apart on the center section, then maybe popping it apart with a cold chisel?? One thing for sure, I will take my time as I sure want this one right. Richard, you are the man and words could not describe how much I appreciate your help in this project. Regards...............Dano
 
Last edited:
Hi Dano,
I would cut around the circumference just above the brass ring to a depth matching the diameter of the top cap. Would make a similar shallow cut just below the top cap and then chisel away between the cuts. If the corroded material does not break away easily then make several vertical cuts with you dremel between previous cuts and chisel away. Would wait for the ring to arrive before starting.
regards
Richard
 
The spare center ring arrived today (thanks Richard) and ready to get started. The object of course is get the better center ring on the fuze. Will cover more on it later...Dano
 

Attachments

  • Picture 729.jpg
    Picture 729.jpg
    61.7 KB · Views: 25
Top