Hello,
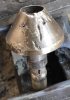
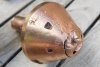
I'll show a little article about how broken brass fuzes can be repaired. Required is a AC tig welder. I used a 200 Amps import model, 3 mm brass welding rods of unknown alloy (bright yellow brass color). In the german language internet not much can be found about how to weld brass with a tig welder so I had to experiment myself. Welding steel and inox is pretty easy aluminium can be much more difficult depending on the type of alloy and thickness. Compared to aluminium brass is even more difficult. It requires much power and when starting it requires about a minute for thick walled fuze parts to heat up until welding becomes possible. With too much heat the brass will be "cooking" when the Zinc starts burning so it's best to do it outside as the smoke is not healthy. So only a small temperature range is left for a good weld. Also I had a problem to weld in edges as the liquid brass doesn't want to flow there.
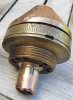
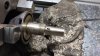
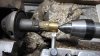
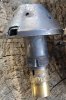
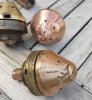
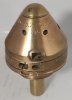
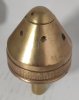
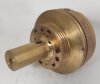
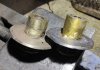
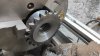
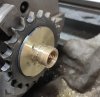
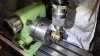
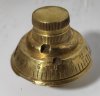
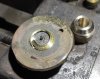
First of all I turned down the broken surface of the fuze body to a flat shape and machined a small brass bar as a replacement for the missing part. In the next step I made a fuze holder from an old gear. Then I screwed the welded fuze body into this fuze holder. So I could securely machine the part on the lathe. After smoe simple machining and thread cutting th last step was drilling the flash holes on the milling machine using a dividing head. The last pictures show the finished fuze. It's a prussian "Feldschrapnellzünder C/73". For this fuze I couldn't notice any color differences between the original fuze brass, my replacement brass bar and the welding seam.
When I find some time during the next days I'll show the same repair for Dopp.Z.92 fuzes...
I'll show a little article about how broken brass fuzes can be repaired. Required is a AC tig welder. I used a 200 Amps import model, 3 mm brass welding rods of unknown alloy (bright yellow brass color). In the german language internet not much can be found about how to weld brass with a tig welder so I had to experiment myself. Welding steel and inox is pretty easy aluminium can be much more difficult depending on the type of alloy and thickness. Compared to aluminium brass is even more difficult. It requires much power and when starting it requires about a minute for thick walled fuze parts to heat up until welding becomes possible. With too much heat the brass will be "cooking" when the Zinc starts burning so it's best to do it outside as the smoke is not healthy. So only a small temperature range is left for a good weld. Also I had a problem to weld in edges as the liquid brass doesn't want to flow there.
First of all I turned down the broken surface of the fuze body to a flat shape and machined a small brass bar as a replacement for the missing part. In the next step I made a fuze holder from an old gear. Then I screwed the welded fuze body into this fuze holder. So I could securely machine the part on the lathe. After smoe simple machining and thread cutting th last step was drilling the flash holes on the milling machine using a dividing head. The last pictures show the finished fuze. It's a prussian "Feldschrapnellzünder C/73". For this fuze I couldn't notice any color differences between the original fuze brass, my replacement brass bar and the welding seam.
When I find some time during the next days I'll show the same repair for Dopp.Z.92 fuzes...
Attachments
-
 IMG_20220816_221902.jpg129.9 KB · Views: 67
 -
 IMG_20220818_152547.jpg98.8 KB · Views: 60
 -
 IMG_20220818_185023.jpg144.7 KB · Views: 62
 -
 IMG_20220818_214725.jpg112.2 KB · Views: 59
 -
 IMG_20220826_015445.jpg114.2 KB · Views: 60
 -
 IMG_20220826_015533.jpg125.6 KB · Views: 59
 -
 IMG_20220816_220119.jpg155.5 KB · Views: 64
Last edited:
")