What's new
British Ordnance Collectors Network

This is a sample guest message. Register a free account today to become a member! Once signed in, you'll be able to participate on this site by adding your own topics and posts, as well as connect with other members through your own private inbox!

US G.P. AN-M65A1 box retarder

DEADLINE222

Well-Known Member
Would anyone happen to have the dimensions and/or measurements to the box retarder for a U.S. 1,000 pound AN-M65A1?

I have been searching for months and I cannot find a thing. Any help would be very much appreciated.
 
Hello Deadline,

what do you mean with "retarder box" ?
The only box fin assembly I found for an AN-M65A1 is the normal box, not a retarder system.
Hope this can help you.

Yoda
 

Attachments

  • Fin assembly for GP bombs.pdf
    47.3 KB · Views: 184
This is good stuff. Thank you very much.

After researching for the "fins" for the MK82 and BDU-50/b, I have assumed that all "fins" are called retarders, but I guess that would be silly because the box only prevents that case from tumbling, and does not slow it's fall.

Would you happen to know what gauge or thickness of steel would be proper for this?
 
Last edited:
So do you want the metal thickness for the box fins for the older style WWII, Korea, and early Nam fins for the M65 1000 Lb bomb or do you also need the metal thickness for the other sizes of this family of bombs?

Attached is the manufacturing drawing for the 500 Lb. size fin. I don't have the drawing for the 1000 Lb. size, but I have a fin I can measure. Do you plan to have a fin fabricated for an AN-M65 Bomb?

The measured thickness of the sheet metal on the 1,000 Lb. box fin is 0.115 inches thick. I don't have a guage chart in front of me to sell the gauge.
 

Attachments

  • 500 Lb fin001.jpg
    500 Lb fin001.jpg
    101.2 KB · Views: 89
  • 500 Lb fin002.jpg
    500 Lb fin002.jpg
    96.9 KB · Views: 73
  • 500 Lb fin003.jpg
    500 Lb fin003.jpg
    93.6 KB · Views: 58
Last edited:
I assume I would like the heavier World War II version.

I plan to make the fin myself. Other than tha "cup" portion with the stamping details on it, I don't see a problem.

I have two fins for my AN-M64s; both the AN-M109 and heavier AN-M109a1, so with help with the drawings I will scale them up to the 1,000 pound size.

I just finished painting the nomenclature on one of these fins. According to those drawings, my numbers and letters are too small! Boo!

However, I would much rather have an original. If you own the fin you can measure, I would take it off your hands.
 
I hope you have access to a water jet or laser to cut your sheet metal and a metal break to bend it, and a spot welder to put the parts together. You can make the cup by welling a strip into a tube shape and welding a circular plate on it with a hole in the middle to go around the rear of the bomb.

Unfortunately my fin is on my bomb, and I actually need 2 or 3 more fins for some other bombs, but as I said, I would take some measurements for you and redline an AN-M64 drawing so you have something to work with.
 
No problem.

I have a plasma cutter, all three types of welders, a lathe and a milling machine and press. However, I have yet to acquire a spot welder as I have never required one to this point.

For making the cup, I have wondered about making some sort of two piece die so I could stamp the thing? I would hate to waste a bunch on steel to cunstruct one, but I may in the end as my pieces reflecting historical accuracy is pinnacle to my restoration and/or fabrication efforts.

This thing will look like it just left the factory or I will not be happy.

I typically refrain from hijacking my own thread, but to clear up any doubt as to my abilities; directly below is a picture of my scratch built U.S. Model 11.75" Tiny Tim rocket. At this point it is considered a prototype as I did not have to proper materials at the time of it's construction. I plan to build another when I can grab some 11.750 well casing for the motor and SAP warhead, and thicker steel for the fins. The materials I used were free, hence my sway from perfection. And yes, it is inert and completley non-functional.

I appreciate any help I can get. It is nice to speak to a fellow "collector". I would love to see and/or hear about what you have.

TINYTIM.jpg
 
Last edited:
Wow! Nice rocket! I've always wanted one, since I saw the one they have outside the Camp Pendleton EOD museum.

So do you plan to make the bomb too, or do you have one already?

What part of the states do you live in?
 
Does your bomb have its fin retaining ring, or do you need to make one of those also? Does it have all of the adaptors in the fuzewell to hold a tail fuze? I do have spare tail fuzes if you need one of those.
 
My casing is complete.

The retaining ring was a problem as it was heavily rusted. I couldn't budge it with a 48" pipe wrench and all of my weight.

I had to cut it off with the plasma cutter and reweld it together and then re-thread it with a dremmel. It was a chore, but now it screws on as smooth as silk.

My casing came from a dealer filled with concrete, with a weight of well over 1,000 pounds. In order to be able to place the casing on a stand and be able to move it, I spent five hours cutting the thing in two with a grinder and then another two days digging out the 600 pounds of concrete.

Pictured below; now it is painted and ready for it's fin. The two white boxes are my "EOD EMPTY" tags.

If the price is right, I would love to have a tail fuze. But, I would even more love to hear about this Tiny Tim at this EOD museum. Is it vintage, and are there any pictures of it? I am obsessed with the Tiny Tim as it was produced just down the road from me in Charleston, at the former Naval Ordnance Plant #1.

333444555.jpg
 
Wow, really nice paint and lettering on your bomb! You will have to tell me how you did the lettering.

The Tiny Tim I mentioned is leaning up against the front of the the EOD Museum at Camp Pendleton, California. They had retrieved it from a bombing range that they had done a sweep on. I might have a photo somewhere, but I haven't seen it in years. USsubs has been to the museum, he might have a photo.

There is a posting about the Tiny Tim here on BOCN. I type in Tiny Tim in the search box and 100 posts come up, so I will post the photos I downloaded here.
 

Attachments

  • 12%2C75%20Rocket%20on%20Ramp%2C%20Tiny%20Tim.jpg
    12%2C75%20Rocket%20on%20Ramp%2C%20Tiny%20Tim.jpg
    72 KB · Views: 36
  • 12%2C75%20Rocket%20on%20Ramp%2C%20Tiny%20Tim_0002.jpg
    12%2C75%20Rocket%20on%20Ramp%2C%20Tiny%20Tim_0002.jpg
    94.5 KB · Views: 34
  • 12_75%20Rocket%20in%20Truck.jpg
    12_75%20Rocket%20in%20Truck.jpg
    93.2 KB · Views: 34
  • 12_75%20Rocket%20on%20Truck%202.jpg
    12_75%20Rocket%20on%20Truck%202.jpg
    91.1 KB · Views: 35
  • Aircraft%20loaded%20with%2012_75%20Rocket.jpg
    Aircraft%20loaded%20with%2012_75%20Rocket.jpg
    83.7 KB · Views: 30
Nice stuff. I cannot wait to see more!

Now on to the lettering.

I simply used Window's Paint and a thermal label printer. These little printers are the type you see UPS/Fedex labels printed on, in which older models can be found on Ebay for very cheap.

Just be sure you get a USB model, if your newer computer does not have a serial port. Serial port models are a pain to get to work on a new system that is only USB.

I simply found the correct letter size and font and printed the information out on the labels. I then took a hobby knife and cut out the letters.

Thermal label printer paper is a sticker, so I peeled off the stencil I have made and broke out the ultra-flat black spray paint. If you do the stencil well, you won't even have to do any touching up. This technique woks on every type of ordnance you can imagine.

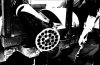
Since we were origionally talking about bomb fins, I am in desperate need of a slick fin for both a MK81 and MK82!!!!! :neutral:

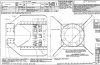
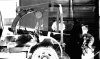
Below is the exact image I used for my AN-M65A1.

1000GP.jpg


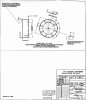
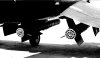
I quickly revised my nomenclature on my AN-M64's early-war fin, thanks to the image you provided eariler. I downloaded the image, stretched it to size, printed and so on. The operation took just over a half hour.***

000000000099.jpg


***After reviewing the aforementioned image, I realized my "AN-M109" is indeed too small! I had a long day at work yesterday!
 
Last edited:
Very useful information! So how do you handle the letters that have islands, like the P and B? Do you stick the islands down after the main stencil, or do you not remove the outer letter part till after it is stuck to the bomb body?

What size paper does the printer take?

Thanks,

John
 
Last edited:
When I first started using this method, I would paint in the islands of the letters by hand. But one day I saved those islands and used them I quickily found that although taking a few minutes longer, using the islands produced superior results.

I have seen all kinds of versions of thermal printer paper. The kind I use is from UPS, which I get free at work. It is perforated, with the main sticker being 4"x6", with a 2"x4" section that seperates. Windows Paint sees one big sticker, so I would say 8"x4" total.

I am sure my printer's setup is not as optimized as it could be, so I have to print out a line at a time, or a word at a time with bigger letters.
 
E.jpg


And that is how you make a crooked letter "A" in about two minutes. The good news is that I have yet to experience any paint removal from peeling off the sticker. The glue is strong enough to hold down all of the image and it's edges firmly, but not enough to take off any paint.

However, I would not allow the sticker to stay on what you are painting for any length of time. I have had it on for probably no longer than ten minutes and it will eventually stick to where your going to spend some un-fun time peeling it off.
 
That is an excellent method of doing the hard stuff. I'm thinking that a full size piece of paper with backing would work in a regular printer, for doing more letters at a time.

Do you have any photos of your other bombs? I'm sure the members would love to see them.
 
Yes, a full size piece of sticker backed paper would be the way to go. However, I like my paper because it is free!

I have been collecting inert ordnance for around three years now. I purchased my first casing just over a year ago and have accumulated a nice number just in the past year. I get my casings from folks I speak with at gun/military shows and hours of constantly searching the internet. The prices range anywhere from $100.00 to $1000.00.

I will stick to my pre-World War 1 and World War 2 stuff for the moment.

Below is a yellow Mark III high capacity 50 pound bomb, with it's paint job based on the example found on display at the National Museum of the United States Air Force. Beside it is a 100 pound Mark 1. They are both hand painted. I do not know how accurate they are, because I have found few pictures of the original pieces. I would love some reference material!

Also, with the exception of the yellow piece, all of may casings and all other ordnance pieces are well marked as to being inert filled or empty.

MARK13.jpg
 
Last edited:
Here is my AN-M64, General Purpose 500 pound casing with original fin. I purchased this piece from a gentleman who had it on loan for display at a museum. It was my first casing purchase. It was made in 1945 and inert loaded in 1948.

My long term goal is to open a museum centered around the ordnance that the explosives made here in West Virginia USA, were used to fill. It is said that this area was the number one target for Germany in the event that they could reach it. It seems that everyday I learn of a new location or former location around here that produced materials, ordnance or explosives during the wars.

To the right of the 64 is a casing to an un-touched AN-M26 parachute flare.

64.jpg
 
Top