Hi, It's taken a while, but I've finally got most of the bits together for my M433 (thanks Paul). It's my intent to take to it with my Dremel and section it. Before I do that, I'd appreciate it if you could post photos of your sectioned M433, so that I can determine which way I want to do it. Cheers
British Ordnance Collectors Network
You are using an out of date browser. It may not display this or other websites correctly.
You should upgrade or use an alternative browser.
You should upgrade or use an alternative browser.
40mm M433 in section
- Thread starter Fragman
- Start date
paul the grenade
Well-Known Member
Hi Paul, That's really nice. Thanks for posting it
heres a pic of one colin.:tinysmile_fatgrin_t pinched from mr google.
cheers, paul.
If you need any close up photos of this one let me know.
http://www.bocn.co.uk/vbforum/40mm-grenade-t73205.html
Dave.
http://www.bocn.co.uk/vbforum/40mm-grenade-t73205.html
Dave.
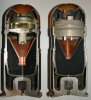
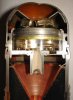
Hi, Thats a fantastic looking cutaway. Thanks for sharing it. The ogive cut is really nice, the way it shows the dimples holding in place the tension cap (I thought the dimples were just for night identification). I will definitely cut my one that way. I would really like a close-up of the det and the shaped charge base cap, as I am missing those bits and will have to make them.
Im not sure whether or not I want to cut the shaped charge, Ive seen some nice ones with the cone intact. I think I also want to half fill the grenade element with HE substitute. Does anybody have a photo of one like that? Cheers
Im not sure whether or not I want to cut the shaped charge, Ive seen some nice ones with the cone intact. I think I also want to half fill the grenade element with HE substitute. Does anybody have a photo of one like that? Cheers
Here are some photos of two variations of the M433 cutaway. Might be of help to you. As you can see, both of these have the cone cutaway, which is good because the cones are different. Both are filled with a hard black plastic to simulate the HE filler. Good luck on the cutaway.
Bob
Bob
Attachments
dano1917
RIP
What a SWEET round Fragman. I could not bring myself to section such an awesome piece, but that is me. I could not do it unless I have another to display beside it. I am sure it will come out awesome. I will be trying a 40mm section shortly, but am getting 6 belted rounds in trade....DanoHi, It's taken a while, but I've finally got most of the bits together for my M433 (thanks Paul). It's my intent to take to it with my Dremel and section it. Before I do that, I'd appreciate it if you could post photos of your sectioned M433, so that I can determine which way I want to do it. Cheers
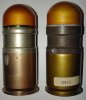
The first photo is the other side of the two sectioned M433's in my previous posting in the same position as the original photo. The right hand one was mounted on a display board at one point which is why there is a threaded hole in it. The second photo are two inert dummy variations. The one on the right has "EMPTY" stenciled in white on the other side of the projectile.
Attachments

Hi. Theres some fantastic rounds on display with this thread. Thanks guys. Yeah Dano, I think the HEDPs are the nicest 40mm rounds. Thats why I want a bit of advice before I start cutting. I do have an earlier one to display with it. It does not have the ogive dimples, but is otherwise pretty close. It was roughly inerted, by having the grenade completely removed just below where it joins the casing and the all of the internals have been drilled out. Whilst it is complexly empting, the inerting method has left the rest of the round correctly crimped. The two will look great displayed together. Cheers
Attachments

paul the grenade
Well-Known Member
Very nice, thanks Bro! GROGThe first photo is the other side of the two sectioned M433's in my previous posting in the same position as the original photo. The right hand one was mounted on a display board at one point which is why there is a threaded hole in it. The second photo are two inert dummy variations. The one on the right has "EMPTY" stenciled in white on the other side of the projectile.
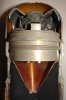
Hi. That's a great looking round. This is the only other style of cutaway I can find. It has the shaped element left intact and I am tempted to do the same with mine. Cheers
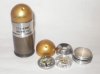
I better show a pic of my one as well. here it is with a spare fuze. both fully inert.:tinysmile_fatgrin_t
Cheers, Paul.