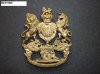
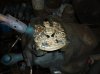
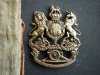
This is a quick run through of how i age brass,it only takes about 20 minutes.I collect Royal Artillery badges and was given this repro helmet plate by one of the members.
Now im not trying to make fakes to sell on,this is for my own collection i just dont like the nasty new finish on something that is ment to look years old and anyone who collects these badges will spot a fake from a mile off.
Ok here we go..
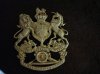
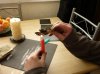
step 1..Using fine wire wool or a scotch brite pad give the badge a good rub over to get rid of the nasty goldness
step 2..now using fine wet and dry paper sand the badge all over to get rid of the sharp edges,this will add wear and tear as you would expect on something allegedly old
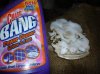
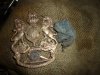
step 3.. i now spray the item liberally with a cleaner called cillit bang and leave this on for 5 minutes,note this does damage and stain the brass.
Step 4..i then burn off the cillit bang using a blow torch ,i have found this also helps to age the brass
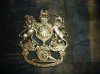
step 5..using fine wire wool i scrub the discoloured brass been carefull not to remove all the discolouring
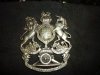
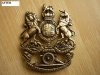
step 6..then its back to a more traditional brass cleaning method i polish the brass with brasso cleaner,this again adds wear and grime
step 7.. buff to a shine using a soft cloth
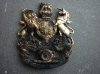
step 8.. now to add some more age using a burning candle i pass the badge over the flame untill it is completely covered in soot this again gets grime into all those little places where you would expect to find it in something old
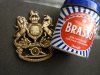
step 9.. again lightly buff the soot off and you should end up with brass that looks aged dirty and worn.
hope this is of use to you
Now im not trying to make fakes to sell on,this is for my own collection i just dont like the nasty new finish on something that is ment to look years old and anyone who collects these badges will spot a fake from a mile off.
Ok here we go..
step 1..Using fine wire wool or a scotch brite pad give the badge a good rub over to get rid of the nasty goldness
step 2..now using fine wet and dry paper sand the badge all over to get rid of the sharp edges,this will add wear and tear as you would expect on something allegedly old
step 3.. i now spray the item liberally with a cleaner called cillit bang and leave this on for 5 minutes,note this does damage and stain the brass.
Step 4..i then burn off the cillit bang using a blow torch ,i have found this also helps to age the brass
step 5..using fine wire wool i scrub the discoloured brass been carefull not to remove all the discolouring
step 6..then its back to a more traditional brass cleaning method i polish the brass with brasso cleaner,this again adds wear and grime
step 7.. buff to a shine using a soft cloth
step 8.. now to add some more age using a burning candle i pass the badge over the flame untill it is completely covered in soot this again gets grime into all those little places where you would expect to find it in something old
step 9.. again lightly buff the soot off and you should end up with brass that looks aged dirty and worn.
hope this is of use to you
Attachments
-
 P1000297.jpg98.3 KB · Views: 86
 -
 P1000301.jpg88.5 KB · Views: 58
 -
 P1000305.jpg94.4 KB · Views: 51
 -
 P1000307.jpg94.7 KB · Views: 56
 -
 P1000309.jpg70.8 KB · Views: 57
 -
 P1000311.jpg98.4 KB · Views: 54
 -
 P1000312.jpg96.8 KB · Views: 48
 -
 P1000313.jpg95 KB · Views: 53
 -
 P1000314.jpg99 KB · Views: 55
 -
 P1000316.jpg84.9 KB · Views: 67
 -
 P1000317.jpg97.1 KB · Views: 70
 -
 P1000320.jpg98 KB · Views: 93
Last edited: