What's new
British Ordnance Collectors Network

This is a sample guest message. Register a free account today to become a member! Once signed in, you'll be able to participate on this site by adding your own topics and posts, as well as connect with other members through your own private inbox!

1.1"/75 cal (28 mm) naval projectile

youngbrain

Well-Known Member
Hello Mates...:)

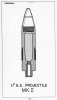
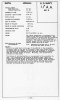
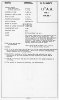
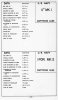
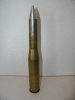
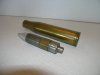
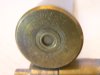
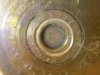
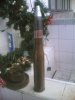
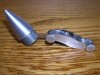
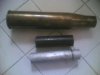
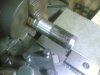
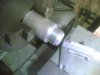
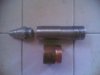
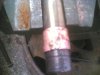
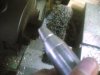
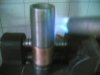
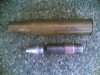
I'm looking for dimentions of the 1.1" or 75 cal AA round... I have a a shell but don't have the projectile...:)

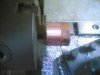
Does anyone out there own one? Can anyone post a picture & the respective dimentions of it please. I'll be turning my own projectile replica on my lathe. Please help me... Thanks a lot mates

Cheers;
andrew
 
Oh Thanks a lot Hazord, Very useful information.... I'll try to scale to ratio the photo attach to proximate other dimentions knowing its drawn to scale... Be posting the finish product soon... Thanks again... Best regards..:)

andrew
 
I have a case with a replica projectile, shown in this photo from the Ammo Photo Gallery on my website:

WW2navalAA1.jpg
 
Thanks Sir Tony... I'll be posting photos of my work soon, keep in touch...:) oh almost, what does its primer look like?
 
U.S. 1.1"/75 cal naval AA projectile

Hello Andrew, Here are a few photographs of my 1937 dated projectile. I hope they are of some help.

Best regards,

Randall
 

Attachments

  • P1010012.JPG
    P1010012.JPG
    65.3 KB · Views: 44
  • P1010013.JPG
    P1010013.JPG
    55 KB · Views: 54
  • P1010015.JPG
    P1010015.JPG
    54.6 KB · Views: 36
  • P1010014.JPG
    P1010014.JPG
    61.8 KB · Views: 36
hello sir Randall...:) Thanks for the photos, i got it this morning & i tried to make my own projectile... Thanks a lot for the help guys...:)

Without you giving enough datas', this project will not be possible...

I got photos of the work in progress ... Finally, i'm done this afternoon.

Sir spotter, where shall i post the work in progress?
 

Attachments

  • 13052009(008).jpg
    13052009(008).jpg
    32.4 KB · Views: 52
1.1in US

Can anyone advise if American fuze threads are standard or like British ones that are special ie strange diameters and often strange pitches. ie Shelldude what thread does the 1.1 have? as seeing how good yours is Youngbrain thought I might try to make one for my case.
2pr
 
hello sir Randall...:) Thanks for the photos, i got it this morning & i tried to make my own projectile... Thanks a lot for the help guys...:)

Without you giving enough datas', this project will not be possible...

I got photos of the work in progress ... Finally, i'm done this afternoon.

Sir spotter, where shall i post the work in progress?

Your perfectly fine here mate
 
Can anyone advise if American fuze threads are standard or like British ones that are special ie strange diameters and often strange pitches. ie Shelldude what thread does the 1.1 have? as seeing how good yours is Youngbrain thought I might try to make one for my case.
2pr


Hello 2pdr... The one i made was not base on an exact replica. I used mine from a 1.05" od x 0.6" id seamless pipe because thats the only material i have close to the size & to lessen working hours. ( notice that the od is smaller than the actual shell mouth, i just rolled some tape around the projectile to compensate wobble) But you can make yours from a solid 1-1/8" bar or larger seamless pipe & machine it to size.

I threaded my work with a standard US tap 3/4-16 for the fuse.
It would be much better if i also knew the real thread pitch.

I wanted to share how i came up with the projectile together with some photos.

Will it be ok if i post it here or on the restoration page?

Cheers;
andrew
 
Thanks Sir Allan... Its around midnight here in the Philippines. I'll post what i have tommorow. Need to rest...:sleep:

I'll get back to you my friends, Keep in touch...Chao
Thanks a lot! & Have a great day!

andrew
 
U.S. 1.1"/75 cal naval AA round

Hello 2pounder,

The fuze threads on my 1.1"/75 cal projectile are right hand with a thread pitch of 1.25mm.

Take care,

Randall
 

Attachments

  • P1010016.JPG
    P1010016.JPG
    72.9 KB · Views: 16
Photo shows shell & the raw materials for the fuze & projectile body namely 1" aluminum round bar & a cutted, turned to length 1.05"od x 0.6" X 3.35" seamless pipe.
 
I turned the seamless pipe to the profile of the projectile based on the drawings given, i took dimentions by mearsuring the drawing's dimention then i do ratio/proportion to get the actual size.

I theaded the base mouth of the fuze with 3/4-16 to take the fuze.

Next the fuze, made from aluminum.I first threaded the fuze so i could tighten it on the projectile as a holder clamp to the chuck to ease machining... I machined it with a taper approx 12deg value also obtained from the drawing using simple trigo...:)
 

Attachments

  • 12052009(001).jpg
    12052009(001).jpg
    20 KB · Views: 16
  • 13052009.jpg
    13052009.jpg
    19.5 KB · Views: 14
rotating band

After some time i arrived with this... shown also is a 40mm type-k copper tube which will be used as the rotating band..

second photo, i'm cutting the copper tube of the same lenght as the rotating band... using 1.1" as diameter i mutiplied it by 3.14 to come out with the circumference of the band so that i know how long will i cut thru the copper tube... (Hint: using a masking tape, cut tape same lenght with the circumference, stick it around the copper tube. this serves as guide where to cut)

When you got it right. the tube will have a "C" shape. THIS IS THE MOST DIFFICULT PART...wrap the "C" shaped copper around the a smaller diameter bar & try to connect the ends to form an "O" as pecfect as you can using wood mallet or what ever...

slide the "O" shaped copper into the rotating band groove from the fuze taper. clamp & see if the band seat perfectly else excute any remedy "Difficult"

Got it right know? I silver solder it to connect the seams of the copper band. & Filed (ground) it clean.
 

Attachments

  • 13052009(001).jpg
    13052009(001).jpg
    10.3 KB · Views: 17
  • 13052009(002).jpg
    13052009(002).jpg
    20.3 KB · Views: 16
  • 13052009(003).jpg
    13052009(003).jpg
    18 KB · Views: 18
Last edited:
after filling. grinding of the rotating band... i use d a wire brush wheel to remove some of the tool marks shown photo 1...Sand & buff it if you like...:)

Photo 2, using a torch, I gave the steel projectile some coloring. paint will do but i prefer heat to color the steel..hahahaha..:wink:

Oh almost done, when the steel is cold to handle. wash it with detergent soap to remove any dirt spectially the rotating band.

photo 3, pieces of the projectile ready to be assemble!!!
 

Attachments

  • 13052009(004).jpg
    13052009(004).jpg
    21.2 KB · Views: 19
  • 13052009(005).jpg
    13052009(005).jpg
    16.1 KB · Views: 17
  • 13052009(006).jpg
    13052009(006).jpg
    25 KB · Views: 20
Top