What's new
British Ordnance Collectors Network

This is a sample guest message. Register a free account today to become a member! Once signed in, you'll be able to participate on this site by adding your own topics and posts, as well as connect with other members through your own private inbox!

Replica 9.2 inch Projectiles

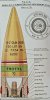
If you want a late filled shell this could be for you. It is a 1934 TNT filled APC marked TROTYL filled by Royal Laboratories
During WWII the actual filler was used rather than the more general RL and TNT was used on the green band rather than TROTYL.
If you wanted to mark it with TNT it would have TNT on the band, with 93 underlined and 7 below the line immediately underneath on the main filling colour, denoting a filling of 93% TNT to 7% Beeswax. Pick a date before 1944, otherwise you will have to move the red/white/red rings onto the bottom of the cap.
The main filler of 9.2" APC at that time was ROF Glascoed mark GD.
In a post of mine on page 2 of this thread you will see the TNT percentage marking and the two main filler of the time, ROF Chorley (CY) being the other one.
 

Attachments

  • 1.jpg
    1.jpg
    263.8 KB · Views: 39
Last edited:
Thank you for the information. I will remember about the position of the rings when I refurbish the original Mk 12B round, its dated 1942 so will be below the cap.

Below is the first APC round to be completed, the additional number marking above the weight is a serial number and matches what was on the original Mk 12B we have. I believe now that our Mk 12B was refurbished while at the Belmont Munitions Depot in New Zealand. The original colour doesn't match this British yellow and there are extra markings on the Shell including the 'WNZ' and the addition of the Shell's serial number.

ConcreteShell_09.jpgConcreteShell_10.jpg
 
It is really amazing that these look so good, knowing they are made of concrete.
 
I'm wrapped about how good they look too, even though the house is beginning to look like a munitions factory it will be sad to see them go. I just hope they are looked after when they reach their new home.
 
Next will be the Mark 17B HE Shell

This requires some surgery to the nose of the concrete shell to produce the fuze plug, blunted nose shape which I'm working on at the moment with a grinder and diamond blade. :tinysmile_eyebrow_t

Here's what I propose to do:-
MK17B-PROPOSAL-BACK.jpgMK17B-PROPOSAL-FRONT.jpg
 
Last edited:
Presumably you have doctored the picture rather than having already done the work and are showing it retrospectively?
With your diamond blade skills, perhaps you could put a slight groove in the APC to show where the cap would be relative to the white/red/white rings?
 
The images are just that. I haven't started on the real thing yet, I thought i would draw them up first.

I thought about shaping the cap of the APC but I don't think it will end up looking very good. Its too late now for the first one, I might look at doing something with the second one depending on how it goes engraving the HE version.
 
Well I've finally got the HE round sorted out. Here is the new garden gnome: B.L. 9.2 inch Mark XVIIB Shell.
ConcreteShell_13.jpgConcreteShell_14.jpg

Fuze Plug (I even managed to give it that just recovered and refurbished from the sea look) :tinysmile_fatgrin_t
ConcreteShell_11.jpg

Lifting Eye Hole
ConcreteShell_12.jpg
 
Thanks for the comments.

They wouldn't look anywhere as good as they do if it wasn't for the help and guidance give by the members of the forum.

Now I have the 'pattern' for painting these, it will be full steam ahead with them.

I'm still contemplating how to made the bottom edge of the cap/body visible, it requires the body to be cut in at an angle, easy to do if I had a lathe and it was a chunk of steel. Being concrete it could be done with a grinder but I would need a jig to hold it in place and then try spin the shell on the painting dolly..... That could be fun.
 
Could you build the cap edge up with bog or something similar(Knead it?) and blend it in to the ogive above? .Or possibly a bit of creative painting could create enough of an impression of the cap edge.
 
Last night I attacked the shell with a dremel tool. On the original, the body starts reducing from the leading edge of the right hand strip of masking tape to where I've cut out the edge of the left hand piece of tape. But due to the pain in the neck nature of doing this modification I might leave it as its shown in the photo. I still need to try and smooth out the cut out area, as its quite wavy to the feel. I might have to attack it with a belt sander.
ConcreteShell_16.jpg
 
You have the patience of a Saint, I am so impressed with the detail on each and every one of the gzillion shells you are making.
Keep it up.
Cheers
Gary
 
It may look messy at the moment but it is going to look so good when you have tidied it up,smoothed it and repainted that area.
It already looks so realistic.
 
Just because................ I must be insane............... I've put the crimping points of the cap into the concrete. Really I don't know what I was thinking.... I've gone completely mad :eek:oh:

ConcreteShell_17.jpg
 
Finally after some diamond surgery and a new paint job the new Mark 12B APC Shell is complete. Yes it was my intention to make the stenciling crooked.

Now I have to modify the first APC shell I did to bring it up to this new standard.

ConcreteShell_18.jpgConcreteShell_19.jpg
 
At the risk of sending you apoplectic, you should have a weight marking for the actual shell weight in addition to the nominal shell weight for the periods pre '44 and '44 - '48.
See page 2 of this thread. A simple + or - figure will do.
 
Top