British Ordnance Collectors Network
You are using an out of date browser. It may not display this or other websites correctly.
You should upgrade or use an alternative browser.
You should upgrade or use an alternative browser.
Before and after
- Thread starter Endel
- Start date
Chris 42 RQ
Well-Known Member
Nice one!
Crackin job Endel !
Crackin job Endel !
Endel
Well-Known Member
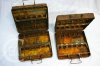
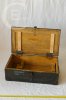
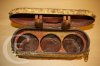
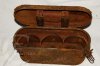
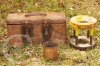
Some more pictures.
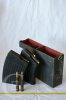
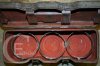
First one is 75mm le.I.G. 18 wooden box for 3 round and Nebelkerzen box, but some parts on lid are still missing (is it right name - cramp iron?).:tinysmile_hmm_t2:
Regards
E
First one is 75mm le.I.G. 18 wooden box for 3 round and Nebelkerzen box, but some parts on lid are still missing (is it right name - cramp iron?).:tinysmile_hmm_t2:
Regards
E
Attachments
Murdosbunker
Member
Restored boxes
This is fabulous work, looks superb. Yes, I would like to know as well what you use to do the great work....what do you "rub" into the wood to restore it. Cheers, Murdosbunker.:tinysmile_cry_t2:
This is fabulous work, looks superb. Yes, I would like to know as well what you use to do the great work....what do you "rub" into the wood to restore it. Cheers, Murdosbunker.:tinysmile_cry_t2:
Endel
Well-Known Member
Thanks!
I`ll try to say some words about the restoration steps, but sorry about my language if something good be understandable.
First step with the wooden box: I remove (rub) the dust and dirt with mixture of water and denatured alcohol (50:50), this mixture leaves extant the old paint markings. The cleaning tools are brush, sometime the finest grades of steel wool and peace of cloth. Actually it`s not abiding the restoration ethic to use the water but its easiest way, water is not right detergent for old objects actually.
After that Ill use a brush to apply the natural lacquer (a solution of shellac in alcohol) it leaves the dust away from surface and in future its easy to remove with alcohol if its needful and or refresh later. Its easy to hold clean of this surface, just remove dust with cloth. About the black shellac, I add the nigrosine (Solvent Black 5) in to the shellac solution.
I never use the oil products, because after a while it drys to hard, then its not possible remove (dissolve) and it goes dirty (oil drag the dirt in) because it drys too slowly.
If ill restore the metal objects, if there are some peace of original paint i leave it these condition that it is, only remove the rust with acid solution and then laying the surface with the rust protecting solution. Usually I dont repaint this items, because old finish have a warmer effect.
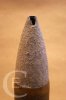
Actually i have one shell project which is in progress as yet, here ill painting it over, I attach some pictures of this.
Regards
E
I`ll try to say some words about the restoration steps, but sorry about my language if something good be understandable.
First step with the wooden box: I remove (rub) the dust and dirt with mixture of water and denatured alcohol (50:50), this mixture leaves extant the old paint markings. The cleaning tools are brush, sometime the finest grades of steel wool and peace of cloth. Actually it`s not abiding the restoration ethic to use the water but its easiest way, water is not right detergent for old objects actually.
After that Ill use a brush to apply the natural lacquer (a solution of shellac in alcohol) it leaves the dust away from surface and in future its easy to remove with alcohol if its needful and or refresh later. Its easy to hold clean of this surface, just remove dust with cloth. About the black shellac, I add the nigrosine (Solvent Black 5) in to the shellac solution.
I never use the oil products, because after a while it drys to hard, then its not possible remove (dissolve) and it goes dirty (oil drag the dirt in) because it drys too slowly.
If ill restore the metal objects, if there are some peace of original paint i leave it these condition that it is, only remove the rust with acid solution and then laying the surface with the rust protecting solution. Usually I dont repaint this items, because old finish have a warmer effect.
Actually i have one shell project which is in progress as yet, here ill painting it over, I attach some pictures of this.
Regards
E
Attachments
Thank you for such a detailed report E. There is no need to apologize about the language, it is no problem to understand.
I can tell that you spend a lot of time and hard work to make sure that you do a perfect job. The only problem is I think I would be too worried about making a big mistake :sad:.
Many thanks again.
PC
I can tell that you spend a lot of time and hard work to make sure that you do a perfect job. The only problem is I think I would be too worried about making a big mistake :sad:.
Many thanks again.
PC
Endel
Well-Known Member
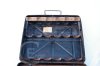
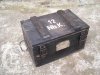
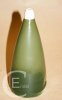
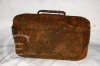
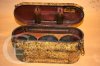
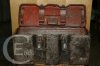
Some progress on of this section. I spent a few hours for 50 mm mine container and the results are here. To clean and finally repaint it was my first idea, but during the process I decided to leave it originally.
Best
E
Best
E
Attachments

Chris 42 RQ
Well-Known Member
Sheet metal worker
That is a cracking job and I am impressed with your skills as a sheet metal worker !
That is a cracking job and I am impressed with your skills as a sheet metal worker !
Once again Endel I see the work of a very skilled craftsman.
Mere mortal collectors like me should not be even tempted to try this type of restoration work. I would fear the potential for a disaster is much greater than success.
What amazes me is the end result is the same container.
Excellent work and I am very pleased that you left it original.
PC
Mere mortal collectors like me should not be even tempted to try this type of restoration work. I would fear the potential for a disaster is much greater than success.
What amazes me is the end result is the same container.
Excellent work and I am very pleased that you left it original.
PC
Endel
Well-Known Member
Hi
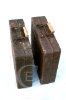
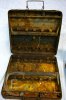
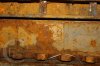
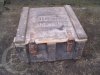
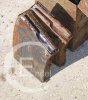
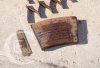
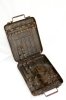
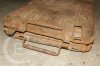
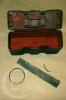
Here is a work of this week. I`ve got two S.Mi.35 crates from the antic fair, both on this year and now i have had a time to work with it.
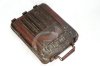
One, the sandy color, is surely digged, i bought it for less than euro (0,5 LVL). It was like a challenge to see, is it possible to restore it and find out some paint. Results are here.
Here is a work of this week. I`ve got two S.Mi.35 crates from the antic fair, both on this year and now i have had a time to work with it.
One, the sandy color, is surely digged, i bought it for less than euro (0,5 LVL). It was like a challenge to see, is it possible to restore it and find out some paint. Results are here.
Attachments
Last edited:

Endel
Well-Known Member
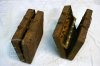
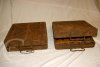
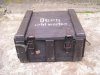
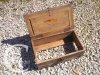
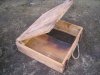
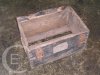
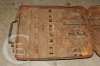
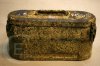
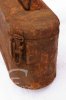
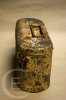
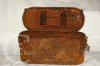
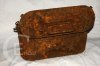
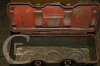
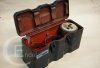
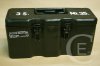
Other one is also from the fair, after the war it has been some kind of tool box i guess. All mine supports are missed and i decided to rebuild a new parts.
There wasn`t original paint enough to save and now this is my first repainted crate, i saved only the paint under the lid.
There wasn`t original paint enough to save and now this is my first repainted crate, i saved only the paint under the lid.
Attachments


Endel
Well-Known Member
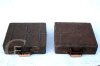
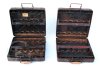
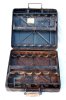
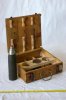
I have got two containers for 3,7 cm Flak and luckily for a different types of ammo.