British Ordnance Collectors Network
You are using an out of date browser. It may not display this or other websites correctly.
You should upgrade or use an alternative browser.
You should upgrade or use an alternative browser.
Frag coil.
- Thread starter navyman
- Start date
Brixia
Hi Navyman,
Have a look at the following thread, it goes into a lot of detail regarding the Brixia and has some drawings and pictures of the positioning of the frag coil.
http://www.bocn.co.uk/vbforum/italian-45mm-brixia-t4187.html?t=4187&highlight=Brixia
Best regards Weasel.
Hi Navyman,
Have a look at the following thread, it goes into a lot of detail regarding the Brixia and has some drawings and pictures of the positioning of the frag coil.
http://www.bocn.co.uk/vbforum/italian-45mm-brixia-t4187.html?t=4187&highlight=Brixia
Best regards Weasel.
Thanks for putting me onto that thread Weasel. Lots of info there. Judging by the fragile state mine is in it's going to be a lot of work to stabilize it and do the restoration. The only marking I can find on it is; P.I. in an oval, (manufacturer ?), no sign of date etc but this may be concealed by corrosion, so work will also have to be very gentle. I enjoy these types of challenge and it will keep me occupied for some time.
Best regards,
Guy.
Best regards,
Guy.
Hello again,
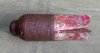
I've started work on stabilising the really bad bits of the Brecia and will post pics as it, (hopefully), progresses. I keep a photographic record of all stages of any restoration jobs for future reference.
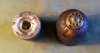
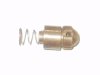
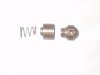
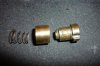
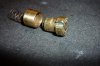
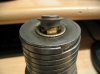
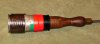
I'm now looking for a fuze unit to fit in the pocket of the frag coil. If anyone can sell me one, or parts for it I'd be very grateful? I'll be off air for a fortnights shooting soon but will be back on the site as soon as I return.
The pic's have a wobbly arrow to illustrate which bit I'm after!
Any help very gratefully accepted.
Cheers,
Guy.
I've started work on stabilising the really bad bits of the Brecia and will post pics as it, (hopefully), progresses. I keep a photographic record of all stages of any restoration jobs for future reference.
I'm now looking for a fuze unit to fit in the pocket of the frag coil. If anyone can sell me one, or parts for it I'd be very grateful? I'll be off air for a fortnights shooting soon but will be back on the site as soon as I return.
The pic's have a wobbly arrow to illustrate which bit I'm after!
Any help very gratefully accepted.
Cheers,
Guy.
Attachments
Grenademan2005
Well-Known Member
The fuze parts are very difficult to find, you can find hundreds of Brixias, but always without the fuze.
paul the grenade
Well-Known Member
Hi navyman.
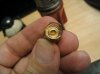
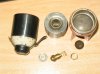
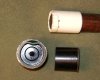
I have found the little bit that sits on top of the fuze well, just above the spring. Its yours for free if you need it:tinysmile_grin_t:
paul.
I have found the little bit that sits on top of the fuze well, just above the spring. Its yours for free if you need it:tinysmile_grin_t:
paul.
Hello,
Thanks are due to Paul The Grenade for finding me the top fuze cap. All I need now is the pin and guide, I've found a creep spring, but as my lathe is out of order I can't make one. Miguel has told me they are difficult to find, but if anyone has one for sale I'll snap it up!
Thanks all for your help with this restoration project.
Cheers,
Guy.
paul the grenade
Well-Known Member
paul the grenade
Well-Known Member
the bomb was produced in lots of different factories so it may just be a slightly different design that does the same job.
paul.
paul.
Grenademan2005
Well-Known Member
Hi:
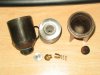
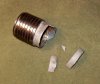
Well, looking that the "very difficult to find" fuze parts are "surfacering" like mushrooms, I took my three Brixias and checked them, two of them have the parts inside, one of them in mint condition and I think unused as I even have the original wraping paper. Too much stuff for remember what is inside of every item :hmmmm2:.
Well, looking that the "very difficult to find" fuze parts are "surfacering" like mushrooms, I took my three Brixias and checked them, two of them have the parts inside, one of them in mint condition and I think unused as I even have the original wraping paper. Too much stuff for remember what is inside of every item :hmmmm2:.
Attachments
Hello again all,
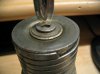
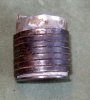
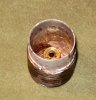
I thought you may like to see this part of the frag coil restoration using chemical metal. I must admit I didn't have a lot of confidence that this would work. The pictures show the coil in its corroded state, then I made an interior mould by fitting a plastic 35mm film can over a chisel handle with the aid of masking tape. The can was made a good fit into the frag body with the green insulating tape, then the red tape was applied to leave a gap of roughly the right length to fill the missing aluminium part. After three applications of chem metal, fileing between each, the can was carefully cut off. Then whilst cutting out the bottom of the can from the coil body the expected disaster happened and the thin filler fractured! With the aid of yet more wine, cigarette, and steady held tweezers, the bits were glued back together using araldite. When set I coated the inside with more araldite for added strength, and a couple of coats of matt varnish on the outside. Length ground down to fit, and it's ready for paint. It took all night to do, but I finished just in time to watch the Grand Prix at 0600! I'm rather pleased with the result of this little experiment.
Cheers,
navyman.
Attachments
-
 Brescia 7a.jpg79.9 KB · Views: 9
 -
 Brixia frag coil masked 2a.jpg76.2 KB · Views: 12
 -
 Brixia exp with filler 1a.jpg88.4 KB · Views: 11
 -
 Brescia frag coil chem met 2a.jpg86.9 KB · Views: 10
 -
 Brescia renovation disaster 1a.jpg90.3 KB · Views: 12
 -
 Brescia renovation repair disaster 1a.jpg76.7 KB · Views: 10
 -
 Brescia renovation repair disaster 4a.jpg72.9 KB · Views: 11