What's new
British Ordnance Collectors Network

This is a sample guest message. Register a free account today to become a member! Once signed in, you'll be able to participate on this site by adding your own topics and posts, as well as connect with other members through your own private inbox!

No 68 experimental restoration.

navyman

Well-Known Member
Hello all,
Thought I'd let you know how this experiment is going. It's not finished and so the paint colour is wrong and the finish is rough and ready but I needed to find out whether the materials I'm using are compatible, The final re shaping and correct colour painting can be done later with the dremmel tool which has worked well so far.
Picture notes for information;
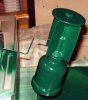
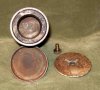
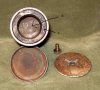
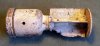
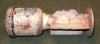
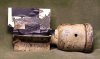
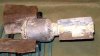
1 and 2; Two damaged fins and pitting to body as bought relic.
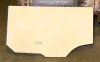
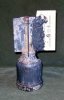
3 Template made from business card.
4 Template and first application of 'chemical metal'.
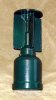
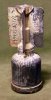
5 First rough shaping.
6 Shaping and grinding, sealing with 'araldite'.
7 Further filling and shaping.
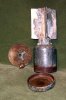
8 Second corroded fin.
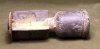
9 First fill, second fin.
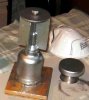
10 More filling, araldite, and shaping.
11 Coat of aluminium primer.
12 First test spray.
13 Job done so far, after second spray.

Hope this may be of use to anyone who may be contemplating stabilising a relic which would otherwise continue to deteriorate. I will add the last three pictures next.
Cheers,
navyman.
 

Attachments

  • at 68 1.jpg
    at 68 1.jpg
    104.8 KB · Views: 46
  • at 68 2.jpg
    at 68 2.jpg
    105.7 KB · Views: 38
  • at 68 3.jpg
    at 68 3.jpg
    39.9 KB · Views: 33
  • at 68 4.jpg
    at 68 4.jpg
    98.9 KB · Views: 39
  • at 68 5.jpg
    at 68 5.jpg
    102.9 KB · Views: 38
  • at 68 6.jpg
    at 68 6.jpg
    65.4 KB · Views: 36
  • at 68 7.jpg
    at 68 7.jpg
    96.1 KB · Views: 35
  • at 68 8.jpg
    at 68 8.jpg
    68.7 KB · Views: 30
  • at 68 9.jpg
    at 68 9.jpg
    79.9 KB · Views: 38
  • at 68 10.jpg
    at 68 10.jpg
    95.5 KB · Views: 49
No 68 experiment continued

Hello,
Here are the last three pictures.
 

Attachments

  • at 68 11.jpg
    at 68 11.jpg
    66.6 KB · Views: 54
  • at 68 12.jpg
    at 68 12.jpg
    76.4 KB · Views: 52
  • at 68 13.JPG
    at 68 13.JPG
    62.4 KB · Views: 56
Excellent recovery. If you have managed to retain the tail markings then they are unique to the Drill Mark I and IMHO it would be good to paint it matt white etc.
 
No 68 Drill

Navyman,
This is pretty good pair of original 'training grenades' which hopefully shows the colour and the DRILL stencil. The tails were put together by A & F Pears of Isleworth Middlesex (A&FP inspection stamp) from Patent diecasting Co Ltd (PDC) components. The lead weighting block was made by HG Sanders of Southall, Middx and the whole thing assembled by Burrage & Boyd of Northampton. I would say that yours is from this stable.
 

Attachments

  • Drill No68.jpg
    Drill No68.jpg
    88.2 KB · Views: 40
Hello and thank you Paul and Bonnex for your comments.
I would like to return it to it's white drill purpose training colours and markings but if the cast marks are too far gone I may try turning it into an inert real coloured one as a last resort, but am reluctant to do that. The cast marks can be made out although faint and fragile, they read; No 68 AT 1/L, and, 1942.
I'm looking for a safety pin and 'remove from grenade before firing' tag. If anyone has a spare I would be interested?
It took two weeks soaking in WD40 to remove the projectile head and I assume the non ferrous cylinder inside is the lead weight which you describe? I must admit I was secretly hoping to find an inert shaped charge cone, but realised that was most unlikely! I'll add a picture of the inside, is this the weight you were referring to?
Many thanks again,
Guy.
 

Attachments

  • at 68 14.jpg
    at 68 14.jpg
    90.2 KB · Views: 21
yours looks the same as the insides of my one. a bakelite cylinder and behind that a mazak weight which is dome shaped to fit the bottle neck of the body. will it come out?
paul.
 
I have actually seen some with wooden inserts, but I'm not sure if they were official or not ?
 
... I'll add a picture of the inside, is this the weight you were referring to?
Many thanks again,
Guy.

Yours is a different weight. There were two (maybe more) types of weight. A wooden block weighted with a lead cylinder and a diecast washer is more common. Yours, the second type, is a plastic sleeve with a large diecast base.

As well as the 'manufactured as' Drill grenades, service components were used to manufacture Drill grenades so you can find Drill grenades with Tails from Mark II to Mark V grenades - as far as I know they were all designated Grenade, Rifle, Drill, No 68 AT Mark I. A Drill Mark II was designed [DD(L)11503] but I have no idea what it looked like. There was also a Drill version of the Mark VI grenade, identical to the service version but sand filled; I do not know its designation.
 
Last edited:
Hello Paul and Bonnex,
I've had a closer look at the inside and what I thought was lead is indeed a cylinder of black plastic/bakelite (A), resting against a white non ferrous metal (B), which may be the Mazak fitting Paul described, or perhaps a washer of some sort? The cylinder is open ended but I can't try and remove it in case I damage the work expended on the rest of the grenade.
Thanks all for your help, any more information will be gratefully received.
Cheers,
Guy.
 

Attachments

  • at 29 arrowed copy.jpg
    at 29 arrowed copy.jpg
    91.4 KB · Views: 9
Hi Navyman,
Great job ! the series of pictures show really well how this project has progressed and will act as a useful guide to anyone else wanting to have a go at one of these. I have quite often overlooked relic items as i don't have the skill to carry out this kind of restoration.
Thanks for showing it, best regards Weasel.
 
Hello Weasel,
Thanks for your reply,
It's the first time I've tried reconstructing fins so your reply was encouraging for me. Perhaps I'll try some 2" mortar fins next. There were hundreds of them laying around in my school days and most were corroded by salt air, the ranges were on the seashore. That was a long time ago so I imagine there must be plenty of very corroded ones about these days which may be worth a try?
Best regards,
navyman.
 
Top