What's new
British Ordnance Collectors Network

This is a sample guest message. Register a free account today to become a member! Once signed in, you'll be able to participate on this site by adding your own topics and posts, as well as connect with other members through your own private inbox!

ambitious no19 restoration

MG34NZ

Well-Known Member
Hi Guys,

Im begining "Project No19" as you will have seen I tackled the No2Mk2 a while back and now Im onto the 19.
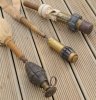
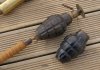
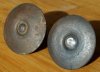
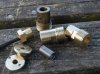
My pics show a very nice No19 that I have the loan of for the purpose of copying parts should they be required...and required they are..as the sum total of my No19 parts lay beside the nice complete and original one

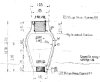
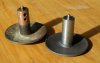
For starters can anyone advise the thread sizes for the top and bottom of the cast body? Also I believe the handle is cane? anyone have a couple of bits floating around? And lastly do any of you have any parts ? anything at all???
I have two sets of parts to beg, buy or fabricate

Thanks for looking
MG34NZ
 

Attachments

  • Guns 086.jpg
    Guns 086.jpg
    94.3 KB · Views: 137
  • Guns 087.jpg
    Guns 087.jpg
    83.8 KB · Views: 135
Good luck with it bud,

looks to be a very nice gren body. Cant help you with any parts but i have a few old hen's teeth and some rocking horse poo available.
Lets hope you get lucky but i think you will have to fabricate most of it.

Best wishes

Andy
 
Handle No 19

... Also I believe the handle is cane? ...
MG34NZ

4. Wood - The handle is to be made of ash, oak, beech, or other approved hard wood, of the best quality, thoroughly sound and free from defects. The wood is to be well seasoned.

[ref = Spec to govern manufacture and inspection]
 
No.19 threads

Measuring the brass components, Im getting 0.895 inch, 14 tpi BSW form for the larger aperture, and 0.655 inch 19 tpi BSW form for the smaller (which coincidentally is the same as for the No.34 grenade igniter body).


Tom.
 
No 19 Body Dimensions

Part of manufacturing drawing attached showing 'gas threads' (per Tim's email) and dimensions (per Snufkin's email). If I remember correctly pipe threads are quoted on bore size hence the apparent discrepancy.
 

Attachments

  • CIW2771(Part)(19)comp.jpeg
    CIW2771(Part)(19)comp.jpeg
    73.2 KB · Views: 84
Thanks for the diagram N, very useful to see the dimensions and tolerances. Yes, BS pipe threads as stated by TimG, and defined as you point out by the bore size.


Tom.
 
You're starting with an excellent sound body mg34nz. Please keep us informed along the way whilst doing the restoration...Dano
 
Tim,Tom and Bonnex Thanks for the info,great help guys!
Danno I will keep you informed via this thread...just may take a bit of time to get things underway

Regards
MG34NZ
 
Here is my contribution for you.
 

Attachments

  • No. 19.pdf
    42.5 KB · Views: 88
Last edited:
5/8 BSP is 14TPI Whit thread form 0.902" major diameter

3/8 BSP is 19TPI Whit thread form 0.656" major diameter

From SKF Thread Technical Data booklet

I have never seen BSP described as Whit Gas Thread before
 
I expect the Whitworth Gas Thread term predates the adoption of British Standards for threads. Fortunately the Whit gas/BSP became a universal standard and consequently tap and die sets are readily available.
 
Thanks again guys,Eodtek,great diagram !
Currently eying up the oak bed end as a possible donor for handle material :xd:
I have put feelers out for some taps as the body is unthreaded,looks like the cheapest source may well be the UK!
I will be looking around for some 3/8" BSP brass plugs/bungs as that is what the bottom fitting looks to be so that end will be easy to modify....with luck.
Top end will be quite a bit of time on the lathe and the top "mushroom" will be a challenge but Im confident everything will fall into place sooner or later.

Cheers
MG34NZ
 
Some progress on this one,
Body is now threaded....94 years after manufacture and the top mushroom I was concerned about turned out to be with the grenade body,even though it had been modified to form a part of the candlestick the grenade was the centerpiece of,some careful work with the press and a hastily made die gave me a reasonable end result.I note the original Im using as a pattern has the mushroom/striker copper washed,I guess to inhibit rust,mine will stay natural finish with a bit of weathering using acid to promote rust then possibly a little shellac.
I will drill the sheer wire and pull pin holes when the brass part for the top is finished

Cheers MG34NZ
 

Attachments

  • grenades 102.jpg
    grenades 102.jpg
    71.2 KB · Views: 69
  • grenades 104.jpg
    grenades 104.jpg
    91.6 KB · Views: 61
  • guns 189.jpg
    guns 189.jpg
    74.3 KB · Views: 62
Last edited:
How it started

G'day Andrew thought I'd post a pic to show what they looked like before you started
 

Attachments

  • no 19 candle stick 002.jpg
    no 19 candle stick 002.jpg
    95 KB · Views: 71
G'day Andrew thought I'd post a pic to show what they looked like before you started

Excellent Daryl, thanks for that,saves me pricing the thing together again for a piccie!

I must add its due to Daryl's generosity I was able to get this project under way, I was looking for a body and in the true ANZAC spirit he gave me this one at no cost.As I make the parts Im doing two of everything so at the end of it Im hoping there will be a resurrected No 19 on each side of the Tasman sea!

Regards
MG34NZ
 
rubbish bin experience

Recieved a email from Andrew [ MG34NZ } to let me know that a part used in the candle stick was also needed to restore the No19. Well this news got me moving as I had cleaned up a bit in my ordnance room on the weekend and had thrown out the needed part .Thank goodness rubbish day is tomorrow!!! Now of to the bathroom for a good washing just wish we hadn't had prawns for dinner on Monday night the bloody cat is eyeing me off as I type.
 
Some more progress today

Striker housing completed with exception of the cross drilling for pin and sheer wire and retaining clip groove for the .380 cartridge case

Tops of fuze well done,trying to source some tube to complete,was flying blind a bit on this part as I didn't want to damage the grenade I have been loaned trying to pull out the fuze well as the threads are super tight.

Bottom plug done along with metal rod to join handle on

also made the coil of wire to form the retaining clip for inside the striker housing

Cheers
MG34NZ
 

Attachments

  • grenades 116.jpg
    grenades 116.jpg
    94.6 KB · Views: 66
excellent work. well done. i cant wait to see it complete.
paul.

Thanks Paul, Striker assembly now completed and has .380 Eley in the base retained by wire clip :tinysmile_twink_t2:

Been trying to find brass split pins today.....bloody hard to find where I live!!
also the split ring is another so far elusive one,at least un nickel or chrome plated rings are hard to find!....This will slow things down a bit untill I find them.
May have found brass tube to complete fuse well...will see on Monday when it turns up.

I would just like to mention the Taps and Dies I picked up to do this job,here in NZ most people hadn't heard of let alone seen 5/8" BSP taps or dies...one old friend said yes they had them on Bendix washing machines 50 years ago but thats all he could recall that size used on so after a bit of a look on the net I found a place in the UK with them at a super friendly price WWW.RDGTOOLS.CO.UK is the place and I was dealing with Chris,super efficient service and unbelievably fast delivery,well worth a look for any obscure taps and dies you may require for your own restorations.

Regards
MG34NZ
 
Last edited:
Top