British Ordnance Collectors Network
You are using an out of date browser. It may not display this or other websites correctly.
You should upgrade or use an alternative browser.
You should upgrade or use an alternative browser.
ambitious no19 restoration
- Thread starter MG34NZ
- Start date
MG34NZ
Well-Known Member
Hi bud,
if you would like a brass split pin and a Mills size ringpull let me know and ile send you some. Great job so far, well done.
Andy
Hi Andy, Thank you mate,you are a Saviour. I will PM you.
Cheers
Andrew/MG34NZ
MG34NZ
Well-Known Member
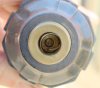
Small progress these past few days,Andy (gothica7) has generously sent out a couple of brass split pins and rings which are currently in transit,I have found a couple of .380 cases to make into dummy blanks for inside the striker housing.
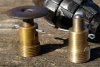
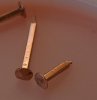
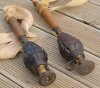
Photo attached shows both striker housings,one awaits its mushroom top which will end up the same as the one shown.
Note the fresh brass look on the incomplete assembly and the aged look on the other,I achieved this by half filling a container with household vinegar and suspending the part above the liquid with the lid back on the jar overnight,I feel the result has given the shiny new part a more appropriate look and it wont be to out of place in the grenade body.
Cheers
Andrew/MG34NZ
Attachments
MG34NZ
Well-Known Member
Andrew - Your restoration is truly professional, I am watching and learning, thank you for continuing to show us every step of your progress. Well Done.
GB
Thank you for the positive comments ,Im pleased you find this project of interest and hope that it may be an inspiration to a few viewers along the way.
Regards
MG34NZ
Last edited by a moderator:
MG34NZ
Well-Known Member
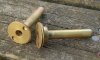
Today I managed to finish the fuse wells,the tube arrived yesterday and I bored it out on the lathe today then used silphos/solder to hold it all together.I capped the open end of the tube with a brass disc parted off from the stem out of an old broken valve....it helps to have a few odds and ends laying around to recycle as required....
I scavenged the legs from an old oak headboard and have a keen wood turner willing to do the handles for me,simple enough if you know what you are doing so fingers crossed I will have these in hand next week. This is the only part of the job I have not attempted myself,turning metal is no issue but wood turnings something I have never tried and I dont have the kit to do it so leaving that to the expert!
off for a couple of days to attend a major gun show here in NZ so the restoration work will be on hold for a few days.
Attachments
Last edited:
MG34NZ
Well-Known Member
Some good progress to report today, Oak handles are ready for fittings and a bit of ageing,I picked them up this morning and as you would expect from a wood turner they were finished to a "showroom" standard,I made them look a little more agricultural by sticking them in my lathe and gouging out the grooves with a bit of tool steel then coating with Briwax.Then it was off to the material shop up in New Plymouth to track down some cotton tape,bang on for size and only slightly different in the weave,picked up three meters of cream colour then it was off to Mums to have one end of each tape folded over and stitched as per original,the pristine new tapes were then frayed at the ends and bathed in tea to produce a more aged look.
Brass pins and pull rings courtesy of gothica7 ( A Big thank you once again Andy!) were delivered by the postman and are currently taking on a patina using the vinegar process mentioned earlier in the peice...
Small copper nails to affix the cotton tapes were also sourced from a massive hardware outlet at New Plymouth and then the rest of the arvo and the contents of my wallet were consumed by the kids and Mrs who joined me on my grenade restoration parts procuring jaunt and were so patient while I searched high and low for such obscure items so it was overpriced food and drinks all round :wink:
Cheers
MG34NZ
Attachments
Last edited:
paul the grenade
Well-Known Member
fantastic!
MG34NZ
Well-Known Member
:top: Thanks Paul!
finished and fitted the handle fittings today,the collar was a bit of 16mm mild steel round bar bored out to size,the round bar has a nice rugged looking finish straight off the rack so will only require a bit of a dose of acid and a couple of days in the bathroom to promote a little rust to give it a bit of a patina.
I remade the rod that join grenade and handle together,the previous ones I did were undersized by 1mm so being a sucker for punishment I machined down some bigger bar stock to size otherwise the small detail that no one would ever notice would have haunted me for life....:wink:
The only copper nails I could find were way to long and had a "Rose Head" so nipped these down in length, resharpened and filed the nail heads flat before fitting the tapes to the handle and binding with string.Still some ageing to do on the tapes and a little on the fittings but its starting to take shape.
Cheers
MG34NZ
Attachments
MG34NZ
Well-Known Member
This really is incredible!! i wish i had the patience and expertise to do something like that. Can't wait to see it all finished :tinysmile_fatgrin_t
Thanks Ben,all I can say is give it a go and dont talk yourself out of it before you start,the more you do the better you get!
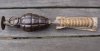
Heres the end result after a little more ageing on the handle and tapes and dab of shellac on the striker also a few pics of the original to compare it with,I have studied all the pics I can find of these and theres quite a variance between manufacturers on all parts,the body I have used when compared with the other is quite a different shape,the "umbrella" at the top comes in all shapes and sizes and look to be either steel, copper washed or brass,handles also vary a lot in style and material used.
Pics include fuse well fitted,.380 Eley blank (converted from live round) fitted to striker housing and retained by clip, assembled striker assembly with sheer wire fitted,restored and original grenades side by side.
I thoroughly enjoyed this project,if you want more detail on anything let me know and if you have an old No19 body kicking around...I would be interested in it :wink:
Attachments

Last edited:
A stunning job there, extremely professional. It's been most enjoyable following the various stages over the last few weeks.
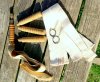
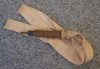
Attached is a shot of a No.19 which has never had its streamers untied. Though not the only way of folding the tails (back on themselves a couple of times), it's one stowage option - may be of some use.
Tom.
Attached is a shot of a No.19 which has never had its streamers untied. Though not the only way of folding the tails (back on themselves a couple of times), it's one stowage option - may be of some use.
Tom.
Attachments
MG34NZ
Well-Known Member
A stunning job there, extremely professional. It's been most enjoyable following the various stages over the last few weeks.
Attached is a shot of a No.19 which has never had its streamers untied. Though not the only way of folding the tails (back on themselves a couple of times), it's one stowage option - may be of some use.
Tom.
Hi Tom
Thank you for the positive comments and taking the time to share your picture,fantastic and it will indeed be of use.
I notice that your grenade and the one I was loaned to copy for this project
bear the same "A" marking on the body,do you know the manufacturer?
Best Regards
MG34NZ
Apart from the "A" there are no other marks, and I haven't found a manufacturer of the No.19 whose name begins with A. It makes me think it is just a mould identifier as often seen on Mills bombs. When the maker's initial or monogram appears on a body it is often complemented with a date - as in your SGB (Stourbridge Glazed Brick & Fire Clay Co. Ltd, Dudley), 1916.
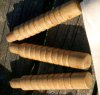
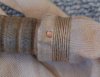
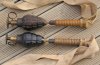
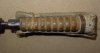
Two close ups of the handle and tapes for you.
Tom.
Two close ups of the handle and tapes for you.
Tom.
Attachments
MG34NZ
Well-Known Member
Hi Andrew,
what a fantastic job you have done. You must be well proud of yourself, i know i would be. Thanks for showing your step by step approach.
An example to us all on how things can be done.
Best wishes
Andy
Thanks Andy,I appreciate your comments and your contribution to the project was much appreciated,It would never have been half the quality its ended up without assistance from others with the loan of the grenade to copy,the body that kicked it all off,the technical info from BOCN members,your superb pins and rings all those things combined made the job a pleasure.
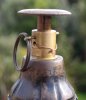
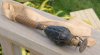
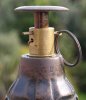
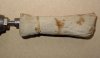
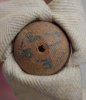
Tom, thanks for the additional pics,the more I look at your grenade and the one I have on loan I swear they are from the same manufacturer "E & S",I have added a couple of pics for you showing the ink stamps that I will guarantee lurk beneath your nice original tapes,also the "mushroom" with the same markings stamped in it as the ink stamps which I guess will be the maker of the complete unit
Regards
Andrew/MG34NZ
Attachments

Last edited:
paul the grenade
Well-Known Member
The BEST restoration i have ever seen!
well done Andrew. I'll let you know what grenade spares im missing and you can have a go at making them if you like.:tinysmile_twink_t: Ha Ha.
Cheers, Paul.
well done Andrew. I'll let you know what grenade spares im missing and you can have a go at making them if you like.:tinysmile_twink_t: Ha Ha.
Cheers, Paul.
Tom, thanks for the additional pics,the more I look at your grenade and the one I have on loan I swear they are from the same manufacturer "E & S",I have added a couple of pics for you showing the ink stamps that I will guarantee lurk beneath your nice original tapes,also the "mushroom" with the same markings stamped in it as the ink stamps which I guess will be the maker of the complete unit
Andrew,
An Edison and Swan Ltd No.19, which tends to confirm the A as simply a mould identifier. Thanks for the close-ups of the handle and head - the percussion head of the one you used as the master is blessed with distinct and discernable stampings. There is a stamping on the head of my No.19, but unfortunately rather indistinct. With a little imagination E & S is the most likely candidate...
Tom.