What's new
British Ordnance Collectors Network

This is a sample guest message. Register a free account today to become a member! Once signed in, you'll be able to participate on this site by adding your own topics and posts, as well as connect with other members through your own private inbox!

ambitious no19 restoration

Hi Andrew & Tom,

do either of you know the thickness of the copper shear wire? It is said that even a knock on the back of a trench when throwing or simply dropping the gren from a few feet set it off. This leads me to believe that the wire was much thinner than that posted in the pictures. For it to break that easily, wouldnt it have to be similar to the old electrical fuse wire of say 30 amps? Sorry, dont know the thickness.

Andy

Hi Andy,
I beleive the grenade I have used to copy parts from has its original shear wire fitted,I wouldnt mind betting that untill I pulled the striker down it had never been undone as the .380 eley blank is still live and remains untouched firmly clipped in place,its around 1mm thickness(will double check tonight) being so soft it wouldnt take a lot of pressure to shear the wire on impact and the weight of the granade would be more than enough to initiate ignition, lighter wire would make a dangerous design even more dodgey when the pin was pulled !

Regards
Andrew / MG34NZ
 
Well Im about to tackle another No19 project with another pair of "candlesticks" ,will try and keep a track on how long it takes to make the different parts this time round and post pics of the end result for you all ;-)
 
No.19 restoration

Hi Andrew
This is the most amazing work i've ever seen.
If there was a reward for "Best Restoration 2010" you get my vote!
Fantastic stuff and one of the best threads to boot!

All the very best
T42
 
You may be right, They were recent pick ups by a fellow BOCN member and friend of mine hence there is suddenly a second project to undertake.
 
Hi Andrew
This is the most amazing work i've ever seen.
If there was a reward for "Best Restoration 2010" you get my vote!
Fantastic stuff and one of the best threads to boot!

All the very best
T42

Thank you T42,I appreciate the feedback and Im pleased that you have enjoyed it.
I thoroughly enjoyed the restoration and hope the next ones come out just as well,its certainly a good exercise in patience!!
Theres an extra challenge with the next ones being the umbrella tops that I will have to make from scratch as unlike the last set of candlesticks the maker neglected to use the striker top it help hold them together with these ones.

I would be very interested to see variations of the umbrella tops if anyone has pics to share.

Regards
MG34NZ/Andrew
 
Last edited:
You may be right, They were recent pick ups by a fellow BOCN member and friend of mine hence there is suddenly a second project to undertake.


Are these them? If so that's funny as when i saw them i thought "that's a shame, would have been nice to have got them" as i would have commisioned you to refurbish them :tinysmile_twink_t:

Can't wait to see them back to how they should be
 

Attachments

  • 19Candlesticks1.jpg
    19Candlesticks1.jpg
    46.9 KB · Views: 29
Are these them? If so that's funny as when i saw them i thought "that's a shame, would have been nice to have got them" as i would have commisioned you to refurbish them :tinysmile_twink_t:

Can't wait to see them back to how they should be

Thats them :tinysmile_twink_t2: If you had picked them up Im sure we could have come to some arrangement

I started making fuse wells today and some handle fittings are made also,I will be making a couple of extra bits as I go to help complete a couple of other grenades missing parts as well so the initial No19 resurrection will now see about 6 grenades in a more "original" state.

Dano thank you for the compliments and Im pleased you find the work of interest.
Cheers
MG34NZ
 
Here is a piccy of my No 19 to complete the set on this fantasic restoration by Andrew.

He kindly made another fuze well for my gren and even supplied the tool to fit it for which i am very grateful as it would have been impossible otherwise. Also let me have a bit of the correct shear wire so the gren is now up to standard.

Many many thanks Andrew.

Andy
 

Attachments

  • No 19 gren 2.jpg
    No 19 gren 2.jpg
    69 KB · Views: 50
The #19 could not be more of a classy piece if it had "I am a classy grenade" stamped on the side. Your work is impeccable and a big tip of the cap from me...Dano
 
Awesome Andy ! that is a nice No19. Only to happy to help given all the assistance you have given me before ;-)

Andrew/MG34NZ
 
Thanks Andrew,

your work has been an example to us all.

Anyone spot the moth in my grens picture?

Andy
 
LOL...think thats the moth by the grenade head?

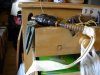
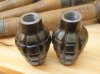
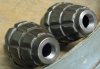
Heres an update on the latest No19 job,These body's are what you would expect from "Reject" casings,the threads are stripped out on the top and bottom ends unlike the first one I did that just required tapping out these are a real challenge and to add insult to injury the bottom hole has been drilled over size when they were made into candlesticks.
I consulted with a few people on this and investigated various avenues of attack. Epoxy metal filler was OUT,its just not right unless 100% necessary Im gunning for the most authentic restoration I can manage so two options remain,welding or machining and fitting an insert. The welding option was ruled out,its not impossible but I have welded a mills bomb body and welding cast iron does tend to cause stress fractures some times,not all the time but the chance is there that a simple weld up could result in the body of a scarce grenade falling to bits in front of your eyes so its the machining and fitting a threaded insert for these,made from cast iron so the material will match and hopefully not stick out like dogs bollocks.
The first insert fell to bits in the lathe as I was turning it down to size :-(
but after consultation with a turning Guru I was given some assistance and advice on machining cast iron and the second one came out just right.
Boring the body's themselves will be another tricky one probably requiring the four jaw chuck and a good deal of patience to set up as the wall thickness will be reduced to to around 3mm before the insert is fitted.....will definitely take it quietly!!

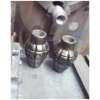
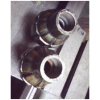
Pics are the "before" pics showing the stripped out threads in the top of the bodys,insert is in chuck threaded and ready for machining down to size ,sorry about the pics,took them with cell phone as I didnt have the camera in the workshop

Regards
MG34NZ
 

Attachments

  • noname.jpg
    noname.jpg
    11.1 KB · Views: 39
  • noname (1).jpg
    noname (1).jpg
    11.7 KB · Views: 38
Last edited:
and like Magic here are the restored top threads,inserts were machined to a very close tolerance and the bodies sat on the boiler for a while to get some gentle heat into them expanding the casting ever so slightly allowing for a nice push fit of the insert,then back into the lathe to face them off,when the grenades are finished these will be hardly noticeable

Next step is the bottom inserts in 3/8" BSPT which will be much the same treatment as the tops have had

Interestingly one of the body's had a casting fault (sand build up) that went all the way through where the thread would have been to within 1.5mm of the outside wall of the grenade and was quite evident once the grenade had been bored out to accept the insert.No small wonder that the thread stripped out when these were made all those years ago.

Cheers
MG34NZ
 

Attachments

  • andy.jpg
    andy.jpg
    77.1 KB · Views: 27
Fantastic job buddy, well done. Your engineering skills are putting most of us to shame.
Also very interesting to see the slight variations in body shape as per the Mills grens from different makers.
What will you be doing with this huge collection of No 19s you are assembling?

Andy
 
Fantastic job buddy, well done. Your engineering skills are putting most of us to shame.
Also very interesting to see the slight variations in body shape as per the Mills grens from different makers.
What will you be doing with this huge collection of No 19s you are assembling?

Andy

LOL, I will have two No19s mate,and they will be retained in my collection both being different body's and for the fact they are restored by me.The other one of the latest pair will reside in the UK when finished with the person who purchased the candle sticks and sent them to me for restoration.
Im very fortunate to have a good pool of knowledge to tap into when investigating different techniques for machining up such odd ball parts! I have never had formal training in lathe work,my trade is fitting and welding and the Lathe work is all self taught or learnt off tradesmen I have been fortunate to work with.

Im very interested to see examples of the striker mushroom/umbrella tops that are out there to see what variations in shape were made

Cheers
MG34NZ
 
A bit more progress to report today,the bottom threads have made a miraculous reappearance! As with the top threads the inserts were machined up then the holes bored out to suite and after a heat up on the boiler for the body's the inserts were pressed into place for a nice firm fit leaving the way clear to machine up and fit required parts as per the previous restoration job!

Its good to know that with a bit of patience and perseverance what would be considered an item ruined beyond repair can be resurrected.
The cast iron I sourced for machining the inserts was in fact an old window weight from a double hung window dating back to the early 1900's and did the trick nicely.

And just to show that not everything goes to plan in MG34NZ's word of restorations....One top insert collapsed in the lathe while machining it...most disheartening ! one of the bottom inserts some how had the thread cut on an angle and had to be redone ( ALL my own fault) then I ever so slightly over bored the bottom making one insert a bit to sloppy for my liking so I ended up making a fractionally bigger one to fit properly ...all in the name of love...LOL

Handles are done for this pair,tapes fitted and suitably weathered and aged and look great with the exception of the top brass part,I made some of these from plugs from a different manufacturer to the previous ones and I feel they are just a bit to thin in the hexagonal part and dont quite look right so Im sourcing a couple more to replace them and I will also refinish and age the body's themselves to make them look more authentic.Will keep you posted on progress and highlight any aspect of the job I do differently from before.

Here's a pic of the newly restored bottom threads!

Cheers
MG34NZ
 

Attachments

  • Stuff 027.jpg
    Stuff 027.jpg
    69.3 KB · Views: 19
Top