When I made my metal and 3D printed limpet and AC Delay I studied the color photos in Anders' book and other ones, but I have an original delay with pretty good paint so mostly went off that. I went to paint shops to compare against color chips and found a decent match. I will give you the specs on the paint but I am in the U.S. and used Benjamin Moore satin, alkyd enamel (oil based) paint. Probably this brand is not available in the UK. I had a quart mixed and had some put into a spray can. Lots left, I suppose I could send you some if you like the shade. See the photos.
For the record, the base paint is C235 4B. Mixing specs are:
BR 0x 4.0000
BK 1x 1.0000
BB 1x 8.0000
WH 0x 26.50000
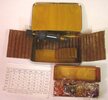
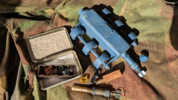
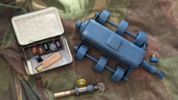
The first three photos are of my set. The scratched delay is original and the one screwed into the mine is 3D with a brass screw I made. FYI my friend and I made the two bursters too, with bench lathe and milling machine.
FYI the mine body is 3D printed using brass colored filament so when the paint is scratched off it looks right. Brass outriggers and placing rod bracket. Steel bolt for magnets with brass tubing spacers which also make the bolts look larger. I believe the magnets are sized correctly and I was lucky to find rubber bushings the exact right OD and ID. This is supposed to be the later Type 6 with bushings bonded to the magnets. There is a washer on each side of each magnet. One magnet slid over a spacer a bit. Need to adjust that.
I know the post is about paint but thought I should explain what's in the pics.
View attachment 207102View attachment 207103View attachment 207104
The delay below is not mine and don't know if it is a repaint. The one below that is from Anders' book.
View attachment 207105View attachment 207106