British Ordnance Collectors Network
You are using an out of date browser. It may not display this or other websites correctly.
You should upgrade or use an alternative browser.
You should upgrade or use an alternative browser.
ambitious no19 restoration
- Thread starter MG34NZ
- Start date
W
ww1grenades
Guest
great job mate keep up the good work . whats going to be your next project .
thanks shaun
thanks shaun
MG34NZ
Well-Known Member
Thanks for the compliments Kev,much appreciated,Im pleased you find this of interest
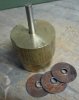
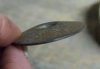
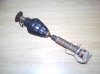
Todays effort was making a start on the striker "umbrella" tops,unlike the previous pair I did I was not afforded the luxury of having the top parts being used as part of the candlesticks this time around so that left me with a simple enough looking part to try and replicate but when you take a close look its actually quite a complex little item that would have been press formed in one piece originally,so lacking the original machinery and dies to make these on I started with a bit of weathered mild steel scrounged out of the rubbish (originally part of an enormous oven) and proceeded to cut holes in it with a 2" hole saw that left me with a holey bit of plate and a stack of metal discs picked out of the cutter that are super close to the original size.
Then it was back to the drawing board for forming the center hole which will eventually butt up to the striker stem via a rivet in a similar fashion to the genuine article, to achieve this without distorting the disc beyond what was required I machined a very simple male and female die to allow me to punch the former I made through the hole previously made by the center drill of the hole saw while retaining the shape of the disc and keeping the dished center hole uniform,worked a treat and the next step will be forming the curve of the umbrella using another yet to be dreamed up former....
Heres a few pics of my crude die and the result of "stage 1" of the forming process
Regards
MG34NZ
Attachments
paul the grenade
Well-Known Member
FANTASTIC WORK!!!
You will soon be able to start up your own grenade factory at this rate!:tinysmile_grin_t:
Cheers, Paul.
You will soon be able to start up your own grenade factory at this rate!:tinysmile_grin_t:
Cheers, Paul.
MG34NZ
Well-Known Member
Thanks Dano and Paul :top: LOL grenade factory....may as well be!
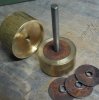
Today I played with the umbrella tops for the striker again,first job of "stage two" was to machine some mild steel down to around 10mm OD then bore a 6mm hole through it before parting off 2mm thick sections to weld inside the recess of the previously made discs,this is where the top will be riveted to the striker stem.
A careful tig weld had them securely fixed in place.Then it was time for the dreaded curve to be put into the disc,in an effort to achieve the desired result I machined up another crude but effective die that held the flat disc central as I pressed the disc down into the concave recess I machined into the die,I used a small socket from my socket set between the press ram and the disc as it was an ideal fit over the raised center part ensuring this wasnt damaged and spread the load evenly during the pressing operation.
The result surprised me when I made a few measurements as its very very close to the original and will look right at home on the completed grenades.I had visions of this being a total disaster from the start of the project so it was a real relief to get such a good result!
Next week I hope to make the striker housings which will be done the same as my first restoration so I wont bore you with the detail again,hope to update again when I can fit the strikers into the housings.
Regards
MG34NZ
Attachments
Last edited:
MG34NZ
Well-Known Member
Here we are again....
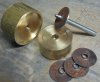
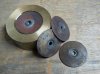
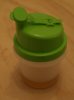
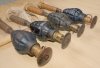
I thought I would expand a bit on the ageing method I previously mentioned that gives the brass a nice patina using vinegar.
The pics show the result of a 24 hour treatment on the newly machined striker housings,one is untouched as a "control" example to give a better idea of the end result.
The container is a mystery object pilfered from the kitchen cupboards at risk of life and limb...shhhh dont tell the Mrs! I have absolutely no idea what its for on the domestic scene but to me its the ideal vessel to hold a bit of vinegar and keep brass items suspended above the liquid while they age gracefully.
A few more bits to put in the "graceful ageing apparatus" tonight and with a bit of luck in a few more days time there will be a couple of complete restored No19 grenades to display
Cheers
MG34NZ
Attachments

MG34NZ
Well-Known Member
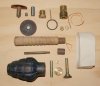
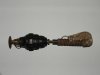
all the parts are basically finished for the latest restoration effort and before final assembly and detailing I thought it may be of interest to show all the separate bits and pieces that go into restoring a No19,The only original part pictured is the No19 body,everything else has been newly made,fuse well is shown as a completed unit and also in "parts" form as is the striker,the handle has its metal collar fitted and also has a collar beside it.
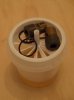
Further to the above posting with the vinegar giving brass a nice aged patina,I had the strikers sitting in the "graceful ageing apparatus" overnight and it also does the same for mild steel so well worth remembering if you have new parts that require a slight patina to make them look more authentic.
Next pics will be the finished job....I hope to find the time over the weekend.
cheers
MG34NZ
Attachments
Chris 42 RQ
Well-Known Member
Very interesting restoration
Not being a "Grenade" enthusiast myself I had not looked very carefully at this thread in the past-until now.
I actually wish I had looked a lot more closely. :s:
What a fascinating restoration/production job this has been and with very worth while results at the end.
Thank you for sharing the "labour of love" with us all and congratulations on a splendid outcome.
MG34NZ
Well-Known Member
Daryl,
it was no problem at all to help out one of my "ANZAC" brethren and a bloody good bloke to boot,I enjoyed the challenge and appreciate the donation of your second body to kick start the whole process.Its great to see all the bits fitted to your grenade body!
One of these days we will get together for a beer or two :tinysmile_twink_t:
Cheers
Andrew
MG34NZ
Well-Known Member
Well Guys here they are at last,
The latest two No19's are done! Pics show them alongside the previously restored example (the twin to 25thaprils grenade posted above) and the very nice original Im so fortunate to have on loan...now the jobs done it can go "home" again
What a job,unlike the first effort the last two were a major undertaking requiring sleeving out top and bottom to repair stripped out threads and strikers made from scratch,its been a great challenge but an enjoyable one at that, necessitating learning a couple of new skills and techniques which will be invaluable for future projects.
I hope to see some more grenades grace this thread as theres a few parts to finish off which will see a couple more N019's completed in others collections as well.
To all who took the time to show an interest and add their encouragement and compliments to the thread,thank you for your interest and positive comments I really appreciate the feedback
Cheers
MG34NZ
Attachments

Last edited:
W
ww1grenades
Guest
dano1917
RIP
The great restoration work I have seen done by BOCN members (especially Andrew and the No 19's) has changed my attitude on restoration altogether. I still love relic pieces mind you but now dabble with mostly minor stuff (making a grenade fuze, aging paint and cleaning etc.....) When I see the kind of pain staking tedious labor it takes (such as is the case in these No19's) it is truly a labor of love. Since I joined BOCN my opinion on several things has changed. I used to think sectioning was ruining a perfectly good piece, but have since changed my outlook on that when I see some of the beautiful sections you guys pull off. I may be set in my ways a bit, but I guess you can teach an old dog new tricks. I want to take on an artillery fuze section but have not been able to bring myself to cut one yet. Guess I start with a "junker" to practice on. Dano